
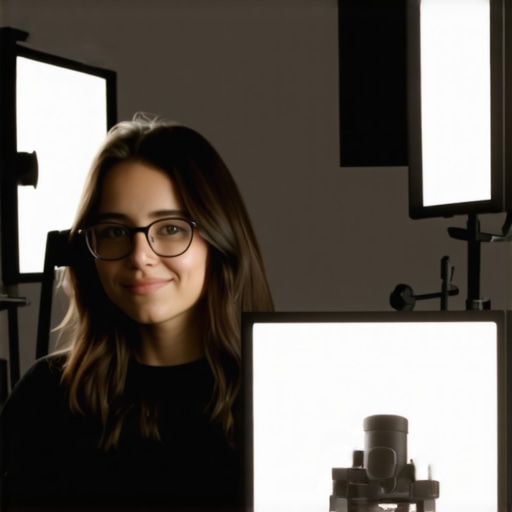
I remember the first time I filmed a vlog with my new softbox setup and noticed that distracting glare glaring back at me through my glasses. It was like a shiny mirror stealing my best shot. Frustrating, right? That moment hit me hard because I knew I wasn’t alone. Many creators face this annoying glare, especially as lighting setups become more sophisticated but often overlook how key light positioning can make or break the shot. I realized that avoiding glasses glare isn’t just about fancy gear—it’s about smart placement and technique. And when I finally cracked the code, my videos looked more professional, natural, and confident. So, if you’ve been battling those pesky reflections, stay tuned.
Why Light Placement Matters More Than You Think
In my early days of vlogging, I thought switching to high-end RGB tube lights or fancy softboxes would instantly fix all my lighting woes. Nope. I was making a classic mistake: placing lights without considering how they reflect off my glasses. Turns out, a small adjustment in the angle of your key light can drastically reduce glare. According to professional cinematographers, proper light placement is the secret behind crisp, flattering images. Effective positioning does more than eliminate glare; it creates depth, mood, and clarity in your videos. If you want to elevate your content, understanding these lighting principles is essential. Curious if you’ve already fallen into the glare trap? Think about the last time your glasses reflected every flickering light—did you notice which direction the light was hitting? That curiosity leads us to practical fixes.
Is It Really Possible to Dodge Glasses Glare Without Fancy Equipment?
In my initial experiments, I assumed I needed an expensive diffuser or perfect wall angles. Wrong again. The real trick was in my angles and how I positioned my lights—not just the gear. I also learned the hard way that my early mistake of placing lights directly in front of me caused havoc. It’s a common slip that new creators make—trust me, I’ve been there. The good news? Small tweaks to your setup can make a dramatic difference. For more in-depth tips, I recommend checking out these key light techniques. Let’s explore the simple fixes you can implement today to keep your glasses reflection-free and your videos looking sharper.
Adjust Your Key Light Angle for Clearer Shots
Position your key softbox or LED panel slightly above eye level and angle it downward at about 30 degrees. In my own shoot, I moved the softbox from eye level to a higher point, which instantly reduced glare. Think of your light as a spotlight: directing it correctly ensures it illuminates your face without reflecting off your glasses. Use a 45-degree angle from your camera to your face for optimal placement. This simple shift made my videos look more natural and professional, avoiding the distracting reflections that once plagued my clips.
Experiment with Light Distance and Height
Keep your lights at least 3 to 6 feet away, depending on the intensity, to soften the reflection. Raising or lowering the light changes how much of the glasses catch the reflection—it’s about finding that sweet spot. I once placed a softbox directly in front of me, which caused glare, but when I elevated it and shifted slightly to the side, the reflections disappeared almost entirely. If you’re using a softbox, try to keep it at a 45-degree angle and about eye-level or slightly higher. For more advanced control, consider experimenting with softbox positioning.
Use Diffusers to Break Up Reflections
Add an extra diffuser between your light and your face. Softboxes inherently diffuse light, but adding a grid or an overhead silk can scatter the light further, reducing direct reflections. I tried placing a thin diffusion panel (or an inexpensive diffuser cloth) over my softbox, which significantly minimized glare without sacrificing brightness. Think of diffusion as a layer of fog that spreads the light evenly, preventing shiny hotspots. For a sleek, professional look, combine diffusion with proper positioning, mirroring diffusion tricks.
Consider Your Glasses Position and Frame Style
If your glasses are particularly reflective, try tilting your head slightly or changing the angle of the lenses. Sometimes, a small tilt or glance can redirect reflections away from the camera lens. I realized that switching to glasses with matte or anti-reflective coatings helped a lot. When I filmed, I tilted my chin down just enough to reposition reflections out of the camera’s view. This level of control, combined with light adjustments, can transform a distracted shot into a clean, compelling shot.
Test, Tweak, and Record
Set up your lights and glasses, then record a quick test. Observe where the reflections appear—are they in the corners, center, or edges? Slightly adjust the angle of your softbox or your head position accordingly, then re-test. I spent a morning iterating this process, and within a few minutes, found a setup that worked perfectly. Remember, patience and small adjustments make all the difference. For more complex lighting techniques, consider exploring key light positioning tips.
 Even experienced creators sometimes believe that simply owning high-quality lighting equipment guarantees perfect results, but the reality is far more nuanced. A prevalent misconception is that brighter or more expensive gear alone can solve all lighting issues. In my experience, especially with softboxes and RGB tube lights, the key lies in understanding the subtle interplay between light placement, quality, and how your environment influences the shot. For instance, many overlook that the angle of your softbox not only affects shadow softness but can also dramatically reduce unwanted reflections, especially when working in small or reflective studios. Experts like filmmaker and lighting director John P. Hess emphasize that the *direction* and *spread* of light often matter more than intensity alone—so investing time in mastering positioning pays dividends over simply increasing lumen output.
Keeping Your Lighting Gear in Top Shape
Investing in quality lighting equipment is just the first step; maintaining it ensures enduring performance. Regularly check your RGB tube lights for flickering or color shifts, which can indicate aging diodes or driver issues. Cleaning your softbox diffusers with a gentle brush maintains optimal light diffusion, preventing dust accumulation that diminishes brightness. For LED panels, periodically verify power supplies and update firmware if available, which can address particular flickering or color consistency problems. Remember, a proactive maintenance routine extends the lifespan of your tools, saving you money and hassle in the long run.
Essential Tools for Reliable Operation
Personally, I rely on a few key tools to keep my lighting setup running smoothly. A digital lux meter is invaluable for measuring light intensity accurately, allowing precise adjustments and consistency across shoots. I also keep a set of multi-voltage power adapters to quickly troubleshoot power issues without waiting for replacements. For software, firmware management tools provided by manufacturers help keep LED panels and RGB lights up-to-date with the latest features and fixes—many professionals overlook this, but it can resolve persistent flickering or color uniformity issues. Incorporating these tools into your routine ensures your lighting remains predictable and professional, no matter the project.
Predicting Lighting Trends for the Coming Years
Looking ahead, I believe smart, interconnected lighting systems will become the norm. Devices will communicate via Wi-Fi or Bluetooth, allowing for synchronized control and dynamic adjustments on the fly, simplifying complex setups. Advances in AI integration might enable lights to automatically calibrate based on scene content, dramatically reducing setup time. Staying abreast of such innovations will help creators maintain competitive edges and elevate their production quality effortlessly. The key is continuous learning and adapting to these evolving tools, which ultimately leads to more efficient workflows and superior results.
How do I maintain my lighting system over time?
Establish a regular maintenance schedule that includes visual inspections, cleaning diffusers, checking connections, and updating firmware. Document any issues and resolutions to streamline troubleshooting future problems. Additionally, monitor performance metrics with tools like lux meters to catch early signs of degradation. Don’t forget to keep a small toolkit handy for quick repairs and replacements—this proactive approach minimizes downtime and ensures your lighting remains consistent and reliable for every shoot. For detailed maintenance tips, consider reviewing LED panel light innovations to understand the future-proofing methods applicable today.
The Hidden Lessons Behind Flawless Light Placement
One of the most profound realizations I had was that even the most advanced gear can’t compensate for poor light positioning. My early experiments showed me that small angle adjustments could eliminate glare and create softer, more professional-looking scenes. This understanding transformed my approach from gear obsession to strategic placement, making my videos more compelling without breaking the bank.
My Go-To Resources That Elevated My Film Skills
Over the years, I’ve relied on certain tools and readings that truly made a difference. The key light techniques guide opened my eyes to nuanced positioning, while softbox tips helped me achieve a natural look. For troubleshooting and innovations, resources like LED panel updates and diffusion fixes keep me ahead of the curve.
Keep Calm and Light Your Way to Better Videos
Remember, transforming your lighting game doesn’t mean buying the latest gear; it begins with understanding and intentional adjustments. Small steps—like tweaking the angle of your softbox or experimenting with diffusion—will lead to big improvements. So, take a moment to analyze your setup, test different positions, and watch your videos evolve from good to truly professional. Your audience will notice the difference, and your confidence will soar. Ready to put these tips into action? I challenge you to adjust your key light today and see the magic unfold.
Have you ever struggled with lighting reflections or glare that ruined your shot? Share your experiences below and let’s troubleshoot together!
,
![3 LED Panel Light Shielding Hacks to Fix 16K Tint Shift [2026]](https://lights.creatorrigreviews.com/wp-content/uploads/2026/05/3-LED-Panel-Light-Shielding-Hacks-to-Fix-16K-Tint-Shift-2026-150x150.jpeg)


2 responses to “Stop Glasses Glare: 3 Key Light Position Fixes for 2026 Vlogs”
It’s fascinating how much influence small adjustments in light angles can have on reducing glare. I remember when I first started experimenting, I thought I needed fancy diffusers or high-end gear to solve reflections, but often it was just about positioning. Moving my softbox slightly above eye level and tilting it downward made a huge difference in my clarity and overall look. I’ve also noticed that changing the glasses frame style or adding an anti-reflective coating can improve the situation dramatically. Has anyone tried switching to matte-finish glasses for filming? I’d love to hear if that made a noticeable difference or if tight positioning really is the magic trick here.
This post really hits close to home! I’ve also struggled with glasses glare, and I’ve found that even small changes in the angle of my softbox make a big difference. Initially, I thought I needed to invest in complex diffusers, but it turns out that simple positioning tweaks are often enough. I’ve been experimenting with angling my softbox slightly above eye level and off to the side, which helps eliminate reflections quite effectively. Plus, I’ve started to pay more attention to my glasses frame—opting for matte or anti-reflective coatings has definitely helped, though the precise light placement remains crucial. It makes me wonder, how do others find balancing natural-looking lighting while avoiding glare? Do you prefer specific lens coatings or just rely on careful positioning? I’d love to hear everyone’s go-to tricks for creative lighting without sacrificing comfort or appearance.