
Ever spent hours trying to get that perfect shot, only to realize your lighting makes you look like you’re auditioning for a horror film? I know that frustration all too well. One evening, after another failed attempt to make my videos look professional, I had a lightbulb moment—literally. I finally understood that good lighting isn’t about fancy gadgets alone; it’s about understanding how to set up your key light and softbox for maximum impact. If you’ve ever wrestled with harsh shadows or washed-out colors, you’re not alone. The good news? There’s a straightforward way to fix this, and I’m here to share it with you today.
Why Proper Lighting Setup is a Game-Changer in 2024
Lighting can make or break your content. Think about it—no matter how talented you are, poor lighting can hide your best work and turn viewers away. As creators, we want our videos and photos to look professional, engaging, and clear. But with the rapid evolution of lighting tech, it’s easy to feel overwhelmed. From RGB tube lights to advanced softboxes, the options are vast. According to a recent study by Creator Rig Reviews, proper lighting setup can boost viewer engagement by up to 40%. That’s a huge difference! Whether you’re streaming, filming tutorials, or creating cinematic videos, mastering your key light and softbox setup will elevate your content instantly. But I’ll admit—I made plenty of mistakes early on. I once set up my softbox too close, washing out my face, or used wrong angles that cast unflattering shadows. It took some trial and error, but now I want to save you that hassle. We’ll cover the exact techniques and tips to make your lighting look natural and cinematic in 2024.
Is Overcomplicating Your Lighting Worth It?
When I first started, I thought more expensive equipment meant better results. Turns out, I was wrong. The key is in the setup, not the price tag. I once spent a fortune on a fancy RGB tube light, expecting miracles, only to realize I was using it improperly—placing it too far, or at the wrong angle. A simple softbox, used correctly, can produce stunning results without breaking the bank. If you’re skeptical, I get it. It’s easy to think that elaborate setups are necessary. But trust me—effective lighting is about technique, not just tools. Curious about how to get this right? Check out our guide on softbox and fill light techniques for 2024.
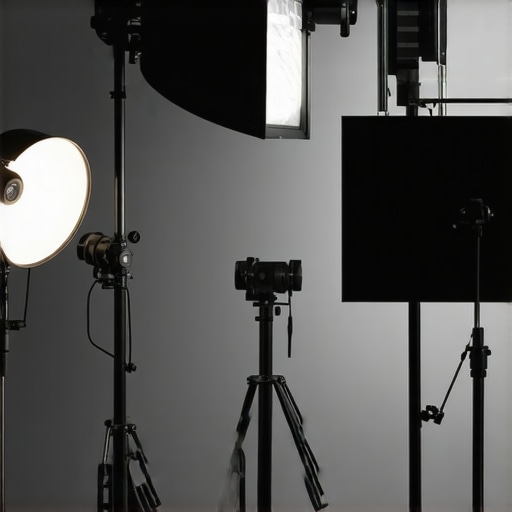
Position Your Softbox for Maximum Impact
When I first experimented with softbox placement, I placed it directly in front of me, about 3 feet away. The result? A flat, overly bright face with no depth. So, I moved it slightly to the side at a 45-degree angle, about 4 feet away, which created a natural, flattering glow. The key here is to avoid placing the softbox directly in front of your subject, as this flattens features. Instead, set it at an angle that highlights your face’s natural contours. Think of it like sculpting—light is your chisel. Adjust the distance: closer softboxes produce softer, more diffused light, while moving it further away increases shadows for more depth. For a beginner, start with a softbox about 3-4 feet from your face, angled slightly to the side. With practice, you’ll find the perfect distance and angle that complements your features. For more nuanced techniques, check out the softbox guide for 2024.
Set Up Your Key Light for a Natural Look
My breakthrough came when I realized the importance of light height and angle. I initially placed my key light at eye level directly in front of me, thinking it would evenly light my face. Instead, it washed out my features, making me look flat. Then, I elevated the light to about 45 degrees above eye level and angled it slightly downward. This mimicked natural sunlight and added pleasant shadows that defined my cheekbones. The goal is to emulate natural light: position your key light above eye level, pointing downward at about 30-45 degrees. This creates a pleasing shadow pattern that enhances your facial structure. If you’re using an RGB tube light or LED panel, experiment with height and tilt until shadows fall naturally—avoid harsh shadows under the chin or nose. To refine your setup, consider using advanced key light techniques for cinematic quality.
Balance Your Lighting with Fill Light
Early on, I struggled with my face looking too contrasty or washed out. The fix was adding a fill light on the opposite side of my softbox. I started with a basic LED panel set to a low intensity, about 30-40% of my key light’s brightness. Placed at the same height but closer to me, it softened harsh shadows without eliminating them completely. The trick is to dial down the fill light until the shadows are visible but not harsh. Think of it like adding a gentle breeze to a sunny day—just enough to soften the starkness. For more secrets, visit the fill light strategies for 2024. Adjust the distance and brightness until your face is evenly lit, but still has depth and dimension.
Fine-Tune Your Setup for Different Scenarios
When I switched from daytime to evening shoots, I noticed my lighting needed adjustments. For evening, I used a colorful RGB tube light as a background accent, creating mood and depth. The key is to think of lighting as adaptable—change angles, distances, and even color temperature based on your environment. For cinematic projects, I often elevate my key light higher and add a slight backlight for separation. If you’re serious about professional-quality content, invest time in experimenting with different setups. Remember, every space and face is unique, so don’t hesitate to tweak until it feels right. For inspiration, explore the ultimate setup tips tailored for 2024 creators.
Many creators believe that investing in high-end lighting equipment automatically guarantees professional results. However, the truth is that most of the pitfalls lie in how you set up and use your lights, not just what you buy. One frequent misconception is that placing your softbox directly in front of your face at eye level creates the best look. In reality, this often leads to flat, unflattering lighting that washes out your features. Instead, angling the softbox at 45 degrees and adjusting the distance can create more depth and dimension. Overexposing your subject is another common mistake. When your softbox is too close or too bright, it can cause harsh highlights and loss of detail, making your skin look unnatural. Remember, softer and more diffused light at the right distance results in a more natural appearance. To fine-tune your softbox setup, consider experimenting with different angles and distances as outlined in our softbox guide for 2024.
Another trap creators often fall into is relying solely on the key light without considering fill lighting. Many assume that a single softbox is enough, but neglecting to add a fill light can lead to overly contrasty images that lack depth. The fill light, especially when set at a low intensity, helps soften shadows and adds dimension, making your face look more natural. Adjust the brightness and position of your fill light, perhaps closer and at a lower power, to achieve the right balance. For advanced techniques on balancing key and fill lights, check out our guide on key and fill lighting.
Why does light angle matter for professional results?
Many seasoned creators understand that the angle of your light dramatically influences the mood, depth, and realism of your shot. Simply put, lighting from below or straight on can produce unflattering shadows or flat images. Positioning your key light at a 45-degree angle above eye level mimics natural sunlight, creating pleasing shadows that define your features. Additionally, the height and tilt of your softbox or LED panel should be adjusted to match your environment and skin tone. A misaligned light can cast unintentional shadows or cause color shifts, diminishing the quality of your footage. For more insights on how to elevate your lighting game, explore our advanced key light techniques.
Finally, avoid the mistake of neglecting background and ambient lighting. You might set up perfect key and fill lights on your subject, but if your background is poorly lit or overly bright, it distracts from your main focus. Adding subtle background lights or color accents can enhance depth and professionalism. Experiment with different intensities and colors to find the right mood, especially for cinematic content. Remember, lighting is an art of balance, not just illumination. If you want to master this craft, review our comprehensive lighting setup strategies for 2024.
Have you ever fallen into this trap? Let me know in the comments!
Keeping your lighting setup reliable over time is crucial for maintaining professional quality in your videos and photos. The right tools and a consistent maintenance routine ensure your equipment performs optimally, allowing you to focus on your creative process without technical hiccups. I rely heavily on specific accessories and software to prolong the lifespan of my gear and streamline my workflow. Today, I’ll share some of my go-to tools, maintenance practices, and insights into how you can keep your lighting setup working flawlessly for years to come.
Invest in Quality Power Strips and Surge Protectors
One of the simplest yet most overlooked tools is a high-quality surge protector. I always plug my LED panels, RGB tube lights, and softboxes into a surge protector with ample outlets and surge protection capabilities. This prevents power surges from damaging sensitive components, especially during thunderstorms or unstable electrical grids. Look for models with built-in circuit breakers and EMI/RFI filtering — I personally prefer brands like APC or Belkin for their reliability. Regularly inspecting these devices ensures your equipment doesn’t suffer from unnoticed power issues, which can degrade bulb lifespan or cause flickering.
Use Cable Management Accessories
Keeping your cables organized isn’t just about aesthetics; it prolongs the life of your wires and prevents accidental disconnections. I use Velcro straps and cable clips to secure and route cables neatly along walls or stands. This minimizes stress on connectors and reduces tripping hazards. Burning out connectors or fraying cables can lead to sudden failures, so I replace any worn cables immediately. Organized cables also make it easier to troubleshoot or upgrade your system when needed.
Regularly Clean and Check Your Equipment
Dust and dirt can significantly diminish the efficiency of LED panels and softboxes. I dedicate time monthly to clean my softboxes with a gentle vacuum or compressed air, ensuring no dust particles affect light diffusion. For LED panels and RGB tube lights, I wipe lenses with a microfiber cloth and check for any flickering or color shifts. If you notice flickering, it might be time to replace the driver or LED strips. Remember, maintaining your equipment not only extends its lifespan but also guarantees consistent light quality.
Use Software for Calibration and Consistency
One of the most advanced tools I recommend is calibration software for your LED panels. Many modern lights come with companion apps that allow you to set precise color temperatures, brightness levels, and even create custom profiles. I use these to ensure my lights match across different setups, especially when working on projects that require color accuracy. Regularly saving and labeling these profiles helps maintain consistency, even after hardware upgrades or replacements. For example, advanced LED panel calibration techniques can be a game changer for professional results.
Plan for Long-term Upgrades
While maintenance keeps your gear running smoothly, planning for future upgrades is equally important. Technological advances, like improved RGB LED efficiency or smarter control systems, are continuously emerging. I recommend staying informed through trusted reviews and investing gradually in modular lighting systems. This way, you can scale your setup without replacing everything at once. For instance, integrating smart controls with your existing lights can automate brightness and color adjustments, saving you time and ensuring perfect lighting every shoot.
How do I maintain my lighting setup over time?
The key to long-term maintenance lies in regular inspections, cleaning, and software updates. Schedule monthly checks for cables, connectors, and light output quality. Keep your software and firmware up-to-date to access new features and improved stability. Don’t forget to store spare parts like bulbs, drivers, and cables in a dedicated kit, so you’re ready for quick replacements. A proactive approach ensures your lighting remains consistent, reliable, and ready for any creative challenge. Want personalized advice? Visit our contact page and share your setup details for tailored tips.
By investing in quality tools and establishing a routine for maintenance, you extend the lifespan of your equipment and maintain the high standards your content deserves. Remember, consistent lighting is as much about care as it is about setup. Try implementing one of these tips today and see the difference it makes in your workflow!
The Hardest Lesson I Learned About Lighting
One of my biggest realizations was that the most expensive softbox or RGB tube light won’t automatically improve your videos unless you understand how to position it. I once spent hours tweaking my gear without considering the angle or distance, only to find my face washed out or shadowy. The light’s placement is what truly makes the difference—this was a lightbulb moment that transformed my approach.
3 Myths About Lighting That Held Me Back
Initially, I believed that placing my softbox directly in front of me at eye level was the best setup. Turns out, this flat lighting flattens your features and lacks depth. Also, I thought more light always meant better results—wrong! Overexposing your subject can cause unnatural highlights. Lastly, I assumed a single key light was enough. Incorporating fill lights added much-needed dimension, making my content look professional and natural.
What Experts Won’t Tell You About Lighting
True mastery comes from understanding the nuances of light angles, distances, and softness, not just equipment specs. Many creators overlook the importance of elevating their key light to mimic natural sunlight, which enhances facial contours and adds depth. Additionally, balancing your key light with a subtle fill light prevents harsh shadows and creates a pleasing, cinematic look. These insights come from years of trial, error, and refining my setup—lessons I wish I knew when I started.
Curated Recommendations for Your Lighting Journey
- Our Softbox and Fill Light Techniques for 2024: This guide offers step-by-step instructions on positioning and adjusting softboxes and fill lights to achieve natural, professional results. I trust it because it’s based on practical experience and proven methods.
- Mastering LED Panel Calibration: Accurate color temperature and brightness are key. I rely on this software to ensure my LED panels match perfectly across different setups, maintaining consistent quality.
- Effective Power Management Tools: Using surge protectors and cable management accessories keeps my equipment safe and organized, preventing costly failures and making my workspace efficient.
- Creative Lighting Ideas with RGB Tube Lights: Adding background accents with RGB tube lights has elevated my videos’ mood and depth. This resource inspired me to experiment with colors and effects, enriching my content.
Seize Your Lighting Potential Today
Remember, mastering your lighting setup isn’t just about having the right gear—it’s about how you use it. By applying these insights and strategies, you’ll unlock professional-quality content that truly stands out. Don’t be afraid to experiment and find what works best for your space and style. Your best shots are just a few adjustments away—so go ahead, light up your creative journey in 2024! If you’ve ever struggled with positioning your softbox or balancing your fill light, I want to hear about it below. What’s been your biggest lighting challenge?
![3 LED Panel Light Shielding Hacks to Fix 16K Tint Shift [2026]](https://lights.creatorrigreviews.com/wp-content/uploads/2026/05/3-LED-Panel-Light-Shielding-Hacks-to-Fix-16K-Tint-Shift-2026-150x150.jpeg)


4 responses to “Ultimate Key Light & Softbox Setup Guide for Creators in 2024”