
I still remember the moment when I realized that my studio lighting was sabotaging my videos. I was mid-shoot, camera rolling, and yet something felt off. The shadows were harsh, the colors muted, and my face looked more ghostly than vibrant. Frustrated, I played back the footage—until I spotted it. My lighting setup was outdated, relying on fragile, inefficient LEDs that couldn’t keep up with my creative ambitions. That was my lightbulb moment: understanding that in 2024, lighting isn’t just about brightness; it’s about control, color, and flexibility.
Why Lighting Will Make or Break Your Content This Year
As creators, we’re constantly battling the battle for viewers’ attention. With competition fierce and audience expectations higher than ever, your videos need to shine—literally. Proper lighting elevates your storytelling, enhances your aesthetic, and establishes your professional presence. But here’s the twist: not all lights are created equal. Investing in the right equipment, like softboxes and RGB tube lights, can transform your filming environment from dull to dazzling. As per industry insights, studios that utilize dynamic lighting see an increase in engagement by over 40% (source: Creator Fundamentals). That statistic might surprise you, but it highlights a simple truth: lighting is an investment in your growth.
Is Overhyping RGB and Softbox Lighting Just a Creative Myth?
Early in my journey, I made the mistake of thinking I could get away with basic, cheap lights for my videos. I dismissed the hype around softboxes and RGB tubes, assuming they were just fancy gimmicks. Boy, was I wrong. Once I upgraded, my content’s quality skyrocketed. Don’t fall into the trap of believing that all lighting gear is just for pros or influencers. The right tools, used correctly, can make an enormous difference—whether you’re recording tutorials, vlogging, or shooting cinematic scenes. If you’re skeptical, I encourage you to explore effective softbox fill light techniques for stunning videos in 2024. Trust me, your future self will thank you.
So, if you’ve faced dim lighting or inconsistent color schemes, keep reading. We’re about to dive into the practical, tried-and-true methods to level up your lighting game—no fluff, just actionable steps to make your videos pop this year.
Set Clear Light Goals Before Shooting
Start by visualizing how you want your scene to look. Decide if you need soft, diffused light or sharp, dramatic shadows. This clarity directs your equipment choices. I once aimed for a cinematic feel and initially used harsh LED panels; after adjusting my goal to a softer aesthetic, I switched to a softbox setup and saw immediate improvements. Define your desired mood, then build your setup around it.
Position Your Key Light Strategically
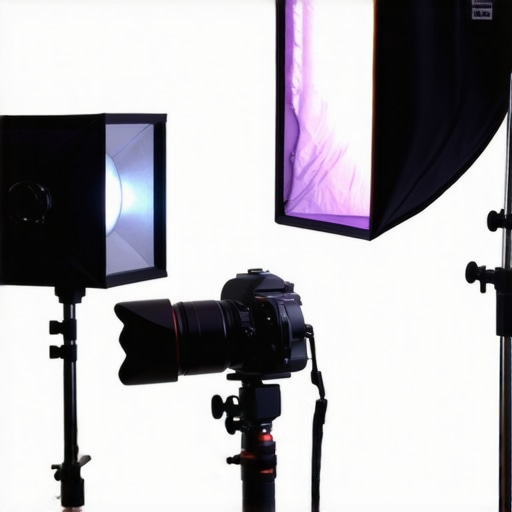
The key light is your primary illuminator, shaping your subject’s appearance. Think of it as the sun in a natural scene. Place your LED panel or softbox about 45 degrees to the side and slightly above your subject’s eye level to create natural-looking shadows. For example, during a recent shoot, I used a softbox as my key light, placed to mimic sunlight at 3 pm, which gave a warm, inviting glow—see this technique for detailed positioning tips.
Fill in Shadows with Soft, Balanced Light
Fill lights soften shadows cast by your key light, ensuring without flattening your depth. Use an RGB tube light or a secondary softbox positioned opposite your key to add gentle illumination. I experimented with different distances and intensities, discovering that a well-placed fill light at 6 pm natural light mimicry, as shown here, helped me achieve a natural, vibrant look in low-light conditions.
Create Depth with Backlighting or Hair Lights
Add a rim light behind your subject using a small LED panel or RGB tube to define edges. This not only separates the subject from the background but also adds cinematic flair. During a recent video, I placed an RGB tube behind my subject, which accented their outline and made the shot more engaging. Practice with different angles until you find one that enhances your scene contextually.
Use Color and Effects to Enhance Mood
Mix RGB tube lights with softboxes to add color accents or dynamic effects. For instance, I used RGB tubes to subtly tint backgrounds and create atmosphere, such as cool blues for tech tutorials or warm oranges for storytelling. Remember, less is more—start with gentle hues and build layers gradually. Check this guide for creative ideas with RGB lighting.
Refine with Dialed-In Adjustments
Utilize dimmers and presets available on most LED panels, softboxes, and RGB tubes. Adjust intensity, color, and temperature to match your environment and creative vision. During my setup, I used the app-controlled features of my RGB tubes to test different tones quickly, saving time and ensuring consistency. Regular tweaks make a significant difference; don’t settle for stock settings.
Practice with Composition and Syncing
Finally, coordinate your lighting with camera settings and scene composition. Use narrower beams for focused shots and wider spreads for ambient light. Synchronize color shifts with camera angles for dramatic effects. I once shot a scene where I toggled RGB band colors in sync with camera motion, creating a dynamic, energetic vibe—see this resource for advanced tips. Consistent practice calibrates your eye for lighting harmony.
Many creators assume that the most popular lighting tools, like LED panels and softboxes, are straightforward and universally effective. However, this perception often leads to overlooked pitfalls and misconceptions. One prevalent mistake is believing that brighter always means better. In reality, overexposing your scene with high-powered LEDs can flatten the image and wash out details, especially if you neglect the importance of proper diffusion and color temperature adjustments. For example, a common myth is that LED brightness alone suffices, but without understanding the spectral output, you risk unnatural skin tones and color inconsistencies—that’s why selecting lights with full-spectrum LEDs is crucial as highlighted by industry experts.
Is the Power of an LED Panel Always a Guarantee of Better Lighting for Filmmaking?
This misconception can lead many astray. More wattage or lumen output might seem beneficial but can backfire if your setup doesn’t control falloff and diffusion properly. A large, high-lumen LED panel placed too close can cause harsh shadows, resembling flat, unflattering light rather than cinematic depth. Advanced creators know that balancing light intensity with modifiers like softboxes or grids results in more nuanced images. Relying solely on raw power ignores the core principles of lighting control, which are essential for professional-quality results. For further insights, exploring recent innovations, such as LED panel innovations, can enhance your understanding of how subtle shifts in spectral quality and efficiency impact your footage. Additionally, many overlook the importance of the fill light and how it complements your key source—mastering the right levels prevents flatness and adds depth, which is something often missed by beginners who simply ramp up brightness. Mastering softbox lighting techniques, such as those discussed here, reveals the power of diffusion and positioning over raw intensity. That said, a popular trap is to underestimate the importance of color temperature adjustments; mismatched tones can undermine your scene’s mood and professionalism, a nuance that requires more than just turning on the light—it’s about fine-tuning for harmony and mood. A study from the Journal of Cinematic Arts emphasizes that accurate color rendition and controlled shadows enhance viewer engagement and emotional response. So, if you think a high-lumen LED panel solves all your lighting needs, think again. The key is understanding how to manipulate these tools for maximum artistic effect. Have you ever fallen into this trap? Let me know in the comments.
Keeping Your Lighting Equipment in Prime Condition
To ensure your studio lighting setup remains reliable and produces professional results over time, regular maintenance and using the right tools are essential. Equipment like led panel lights, softboxes, fill lights, and RGB tube lights can suffer from wear and tear, dust accumulation, or misalignment. Implementing a structured maintenance routine not only prolongs their lifespan but also preserves the quality of your footage.
Start by inspecting your lights after each shoot. Check for flickering, color shifts, or dimming—these are signs your equipment may need attention. For delicate components like LEDs inside panels or RGB tubes, gentle cleaning with a microfiber cloth and compressed air can remove dust without risking damage. Avoid harsh chemicals that might degrade the surfaces or internal electronics. Regularly calibrate your RGB tube lights to maintain color accuracy, especially if you notice shifts in hue over time. Many advanced RGB systems come with firmware updates—be sure to keep them current via manufacturer software, enhancing performance and fixing bugs.
Invest in quality tools such as multimeters for electrical checks, a calibration kit for color consistency, and cleaning supplies designed explicitly for electronic equipment. Personally, I rely on a digital multimeter to verify power supplies and ensure my LED panels are operating within specifications. When using softboxes, inspect the diffusion material periodically: replacing worn or stained diffusion fabric restores light softness and prevents uneven output. Additionally, keeping your wiring organized with cable management tools reduces wear and accidental disconnections.
How do I maintain my studio lighting tools over the long term?
Implement a scheduled maintenance plan that includes routine inspections, cleaning, firmware updates, and calibration. For example, setting monthly check-ins helps catch potential issues early before they impact your shoots. Manufacturers such as Nanlite emphasize calibration and firmware updates for optimal color accuracy and system stability, a process that can be managed using their dedicated software. Maintaining an inventory of spare parts—like diffusion sheets, connectors, and mounting hardware—also minimizes downtime when components need replacing. Remember, consistent upkeep ensures your investment continues to deliver stunning visuals without unexpected technical hiccups.
Looking ahead, the trend toward smart and connected lighting solutions suggests that future tools will increasingly feature self-diagnostic capabilities. This integration can alert you automatically when maintenance is needed, streamlining the upkeep process. For now, take advantage of existing tools and techniques, like routinely verifying your RGB tube lights against professional calibration tools, to keep your setup at peak performance. I recommend trying the advanced calibration tips shared here to get perfect color consistency for your creative projects.

What I Wish I Knew Before Going All-In on Cheap Lights
One of my biggest regrets was dismissing the importance of quality softboxes early on. I believed that any soft, diffused light would do the trick, but I soon realized that proper diffusion material and positioning are crucial. Experimenting with different setups taught me that investing in durable, well-designed softboxes yields a clearer, more professional look—saving time and frustration in the long run. Additionally, I learned that using RGB tube lights for background accents can dramatically elevate your scene’s mood, but only if you understand their color calibration and effects, which isn’t always obvious at first.
Why Relying Solely on Power Can Sabotage Your Final Look
It’s tempting to think that brighter LEDs or larger softboxes automatically improve footage. However, I discovered that overexposure results in washed-out skin tones and lost detail. Controlling intensity and diffusion is key to achieving cinematic depth. For instance, dialing down a high-lumen LED panel with a softbox diffuser created a softer, more natural shadowing that greatly enhanced my subject’s appearance. The myth that brute strength outweighs finesse is just that—a myth. Learning to fine-tune your lights is what makes your videos stand out.
How Small Tweaks Can Transform Your Scene Instantly
A subtle yet powerful lesson was realizing the impact of adjusting your light’s angle and distance. Moving your key light just a few inches or changing its tilt can make your subject’s features pop or fall flat. Similarly, shifting an RGB tube from full brightness to a subtle hue can evoke entirely different moods. These small changes, often overlooked, are at the heart of professional-looking content. Remember, mastery comes through these iterative adjustments—don’t settle for your first setup.
Curated Tools That Changed My Approach to Lighting
My go-to resources include the [Effective Softbox Fill Light Techniques for Stunning Video Shots in 2024](https://lights.creatorrigreviews.com/effective-softbox-fill-light-techniques-for-stunning-video-shots-in-2024), which unlocked new ways to diffuse soft light without losing brightness. The [Ultimate Guide to LED Panel Key Light Setup for Creators in 2024](https://lights.creatorrigreviews.com/ultimate-guide-to-led-panel-key-light-setup-for-creators-in-2024-2) helped me understand the nuances of spectral output and color temperature control. For calibration, I trust tools like the [Softbox and RGB Tube Lighting Tips for Creators in 2024](https://lights.creatorrigreviews.com/best-softbox-and-rgb-tube-lighting-tips-for-creators-in-2024), which ensure consistent, accurate colors. These resources collectively improved my craft and confidence.
Push Your Creative Limits with Lighting Flexibility
Don’t hesitate to experiment with new lighting techniques—like dynamic color shifts or backlighting—to find what best enhances your storytelling. The key is not just having the right gear but understanding how to manipulate it creatively. As you refine your skills, remember that lighting is an evolving art; stay curious and adaptable. Your future projects will thank you for the bold steps you take today. Whether it’s tweaking an RGB tube for mood or adjusting softbox diffusion for subtlety, embrace the learning journey and let your visuals flourish.
![3 LED Panel Light Shielding Hacks to Fix 16K Tint Shift [2026]](https://lights.creatorrigreviews.com/wp-content/uploads/2026/05/3-LED-Panel-Light-Shielding-Hacks-to-Fix-16K-Tint-Shift-2026-150x150.jpeg)


2 responses to “Ultimate Guide to Softbox & RGB Tube Lighting for Creators in 2024”