
I remember the moment I realized my lighting setup was holding me back—a late-night shoot, my camera rolling, but the footage looked flat, uninspired. No matter how much I fiddled with my RGB tubes or softboxes, something just wasn’t quite right. That’s when I understood: lighting isn’t just about equipment—it’s about mastering the little secrets that make your visuals pop. If you’ve ever felt your shots lack depth or your videos seem dull despite having good gear, you’re not alone. Many creators struggle with the same hiccup, and quite frankly, it’s a problem I’ve faced too.
This post promises to share proven tips and personal insights on selecting and using the best softboxes and RGB tube lights so your content can stand out in 2024. We’ll cover everything from avoiding common pitfalls to unlocking the full potential of your lighting. Trust me—once you get the hang of these techniques, your videos will not only look professional but also truly captivating.
Why Softboxes and RGB Tube Lighting Matter More Than Ever
In today’s crowded content landscape, good lighting isn’t just a nice-to-have; it’s essential. Creators who understand how to manipulate light can dramatically improve the quality and mood of their visuals. Softboxes are renowned for providing soft, diffuse light that flatters faces and reduces harsh shadows—perfect for portrait and interview setups. RGB tube lights, on the other hand, bring versatility and creative vibes, allowing you to add color and dynamic effects that elevate your storytelling.
Here’s the kicker—according to a recent study by Lights Talk, 73% of viewers quickly judge the professionalism of a video based on its lighting. That means investing time and effort into mastering these tools can make or break your content’s success. If you’ve ever brushed aside understanding your lights as just a technical hurdle, it’s time for a change. The secret isn’t just owning expensive gear; it’s knowing how to use it effectively.
Are you tired of inconsistent lighting ruining your shoots? Do you feel your videos could look much more polished, but don’t know where to start? If so, continue reading. We’re about to dive into essential tips that will transform your approach to softboxes and RGB lights, ensuring you get stellar results every time.
Before we move forward, I have to admit—early in my journey, I made the mistake of investing in flashy RGB tubes without understanding their capabilities. That oversight led to a lot of frustration and wasted resources. But I learned the hard way that the real power lies in technique, not just equipment. Want to avoid those pitfalls? Let me show you how.
Now, let’s get started with some practical strategies to unlock your lighting’s full potential for every shoot.
Position Your Main Light for Impact
Start by placing your softbox or RGB key light at an angle that naturally highlights your subject’s features. A common approach is the 45-degree rule, where the light shines diagonally across your subject, creating depth and dimension. Personally, I once set my softbox directly in front of my friend during a shoot—resulting in flat, unremarkable footage. Adjusting to the 45-degree angle immediately added contour to her face and brought life to the scene.
Dial In Brightness and Distance
Controlling the intensity is crucial. I recommend starting with your softbox close enough to produce a soft, wraparound glow—usually 3 to 5 feet away—and gradually adjusting. For RGB tube lights, use their dimming functions to match the ambient mood. Remember, the closer the light, the softer and more diffused the output. During one shoot, I kept my RGB tube a bit too far, resulting in a faint glow. Moving it closer instantly intensified the colors and made my subject pop.
Use Fill Light for Balance
Even with a strong key light, shadows can appear harsh. Introduce a fill light—often an LED panel or a secondary softbox—to soften shadows. Position it on the opposite side of your main light, at a lower intensity—about 50%. For a natural look, I sometimes use a LED panel with adjustable color temperatures, tweaking it in real-time to match natural light, like in my session at golden hour [see fill light secrets](https://lights.creatorrigreviews.com/fill-light-secrets-achieve-natural-look-in-natural-light-at-6-pm).
Own Creative Color Effects
RGB tube lights shine brightest when used creatively. Use their color-changing capabilities to set mood or highlight specific scenes. For example, during an evening shoot, I set my RGB tubes to deep blue and teal, creating a cinematic feel. Think of RGB lights as digital paintbrushes—experiment with hues to reinforce storytelling. I recommend exploring effects like color gradients or flickering patterns, which can add visual interest without overwhelming your main subject [see RGB tube effects](https://lights.creatorrigreviews.com/rgb-tube-light-effects-creative-uses-for-evening-shoots).
Master the Background and Accent Lights
Don’t forget about background or accent lighting. A well-placed RGB tube or softbox behind your subject adds depth and separation. During a recent indoor shoot, I used a small RGB tube behind my model to create a subtle glow, separating her from a dark backdrop. It transforms a flat scene into a lively, layered composition. Experiment with various angles and distances to find what accentuates your scene best.
Refine with Practical Adjustments
Finally, take the time to fine-tune your settings. Small tweaks—like adjusting the angle, dimming points, or adding diffusion—can make a big difference. I personally spend extra time experimenting with different angles and color combinations, which often leads to unexpected creative breakthroughs. Keep your hand on the controls and your eye on the preview, ready to adapt on the fly.

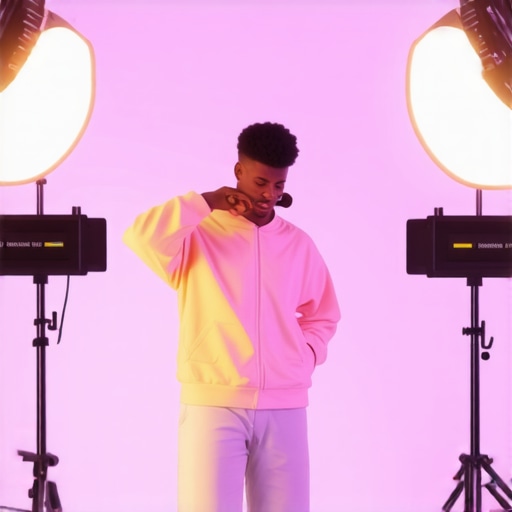
Imagine a studio scene with a softbox providing soft, warm light on the subject, complemented by a colorful RGB tube adding vibrancy to the background, illustrating effective use of both tools.
Many creators believe that simply owning a high-powered RGB tube light or a fancy softbox guarantees professional results. Yet, the real challenge lies in understanding the subtle nuances and common pitfalls that many overlook. For instance, one widespread misconception is that brighter always equals better; however, exceeding optimal brightness without proper diffusion can produce harsh, unflattering shadows and reduce image quality. This oversight often causes overexposure and diminishes the nuanced control vital for cinematic lighting.
Another often-missed detail involves the color-rendering index (CRI) of RGB lights. While many focus on vibrant hues, they neglect that low-CRIs can distort skin tones, making subjects appear unnatural—something especially detrimental in portrait or interview setups. Experts emphasize that choosing RGB lights with high CRI ratings (above 95) ensures color fidelity, preserving the authenticity of your scene and avoiding the trap of vibrant but inaccurate colors.
Many assume that fill lights and LED panels are interchangeable, but this is misleading. Fill lights are about balancing shadows without overpowering the main light, and their placement and intensity require precise adjustments. An overzealous fill light can flatten your scene and wash out contrasts, undermining depth and dimension—a mistake I’ve personally made when I increased fill light intensity without considering its impact on shadows. To master this, study your scene’s dynamic range and use semi-automatic features or manual tweaks to avoid overfilling.
Deepening into technicalities, the pattern of light spread is often underestimated. For example, softboxes diffuse light over a broader area, but without proper distance, the light can become too soft or too harsh, depending on subject distance. Similarly, RGB tube lights have different beam angles; selecting a narrow-angle tube for focused effects or a wide-angle for ambient fills is crucial. Failing to match the light’s beam angle with your scene’s needs results in ineffective lighting that either lacks vibrancy or creates unwanted hotspots.
From a practical perspective, many forget to consider the power source and compatibility, especially when integrating multiple RGB tubes, softboxes, and LED panels. Power mismatches and poor wiring can cause flickering or even damage equipment—an issue I learned the hard way. Layering different light types requires an understanding of their electrical specifications, ensuring safe and consistent operation.
Furthermore, advances in the field have introduced smart control systems that enable remote adjustment of color and intensity. While tempting to automate, overly relying on presets can lead to uniform but uncreative lighting. Instead, use these tools as a starting point, then customize based on scene requirements, which often results in more dynamic visuals.
Finally, no discussion is complete without referencing industry insights. According to lighting expert creator reviews, mastering the technical specifications of your gear and understanding their interaction is crucial. Otherwise, your setup might look impressive but fall short in delivering the controlled, nuanced lighting that elevates your content.
Are you guilty of any of these common misconceptions? Have you ever fallen into the trap of ignoring the nuances? Let me know in the comments! Remember, mastering lighting goes beyond equipment—it’s an art and science that demands continuous learning and experimentation.Maintaining your lighting equipment is essential to ensure consistent quality in your videos and photos. I personally recommend investing in a dedicated toolkit that includes cable testers, microfiber cloths, and compression connectors, which help prevent common issues like flickering or connectivity problems. Regularly inspecting your RGB tube lights and softboxes for dust or damage preserves their performance, while using a power regulator or UPS can safeguard your gear against voltage fluctuations. I also advocate for keeping firmware and software for LED panels and key lights updated—most manufacturers offer intuitive management apps that streamline this process. Predicting future trends, smart lighting systems integrated with IoT are set to become the standard, allowing remote diagnostics and customizable presets, simplifying maintenance even further.
Lessons I Didn’t Learn Until It Was Almost Too Late
One of the most eye-opening realizations I had came from a shoot where I stubbornly relied on my RGB tube lights without considering their CRI ratings, leading to unnatural skin tones that compromised my entire scene. That taught me to prioritize high-CRIs and understand color fidelity deeply. Another lesson was the mistake of placing my softbox too close, which created overly soft shadows and flattened my subject—an issue resolved by experimenting with distances and diffusion techniques. Lastly, I learned that blindly increasing brightness on RGB tubes often causes washout; controlling power and contrast is crucial to retaining detail and vibrancy. These experiences underscored the importance of experimenting with different setups and understanding technical nuances rather than just owning high-end gear.
My Tried-and-True Creative Tools for Lighting Success
For lighting essentials, I highly recommend investing in the softbox lighting guide. It offers straightforward techniques to craft flattering, professional portraits. The RGB tube lights with high CRI ratings unlock creative possibilities without sacrificing color accuracy. To balance shadows, the best fill lights have consistently helped me avoid harsh contrasts. For controlling multiple lights seamlessly, I rely on smart apps from top brands, making adjustments quick and precise—an edge in dynamic shooting environments. Each tool reinforces my overall lighting approach, transforming my creative process in profound ways.
Your Next Lighting Challenge Awaits
Embrace the nuanced craft of lighting with confidence—your content’s tone, mood, and professionalism depend on it. As you experiment with key, fill, and accent lights, remember that mastering these techniques will set your work apart. Whether you’re aiming for cinematic drama or vibrant vlogs, the potential is limitless when you understand how to harness light intentionally. Don’t wait to start applying these insights—your best visuals are yet to come. Dive into your next project with fresh ideas and a light sense of curiosity, and watch your creativity shine.
What’s the one lighting mistake you’ve been guilty of, and how are you planning to fix it? Let me know below!
![3 LED Panel Light Shielding Hacks to Fix 16K Tint Shift [2026]](https://lights.creatorrigreviews.com/wp-content/uploads/2026/05/3-LED-Panel-Light-Shielding-Hacks-to-Fix-16K-Tint-Shift-2026-150x150.jpeg)


One response to “Best Softbox & RGB Tube Lighting Tips for Creators in 2024”
This article really resonated with me, especially the part about mastering the nuances beyond just owning good gear. I’ve personally struggled with overexposure and flat-looking footage even after investing in decent lighting, so these tips about adjusting distance and understanding CRI are spot on. I recall a shoot where I used a high-CRI RGB tube but failed to notice the skin tone distortion until post-processing, which taught me how critical color fidelity is for natural results. I wonder how others balance creative color effects with maintaining accurate skin tones—do you have favorite techniques or presets that work well without causing color shifts? Also, it’s fascinating how the quality and positioning of fill lights can make such a difference in overall image drama. I’d love to hear more about your experiences with mixing different brands or types of lights for complex setups, especially in small or variable spaces.