
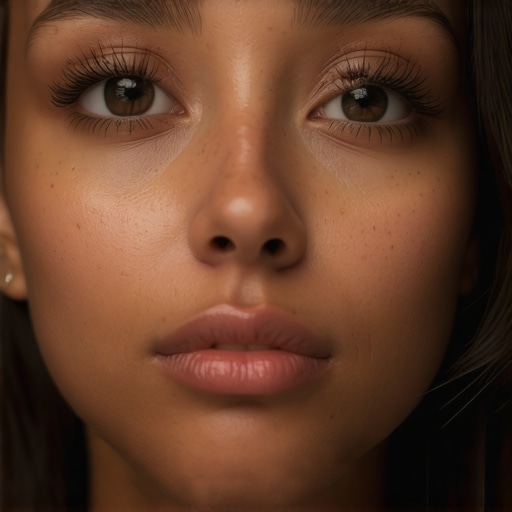
Ever stare into your monitor after a shoot, only to be greeted by an unforgiving shadow running down one side of the face? I know that feeling all too well—it’s that sudden, sinking realization that your lighting setup has failed you again. The culprit? Usually, it’s a classic case of one-sided face shadows, a sneaky problem that can turn even the most beautifully shot video into a flat, unprofessional mess. It’s like trying to paint a portrait with a single light source—no matter how talented you are, shadows will always tell on you.
Why Lighting Mistakes Are More Common Than You Think
When I first started, I thought I could get away with a simple key light and call it a day. Boy, was I wrong. That one blurry, harsh shadow on one cheek was the first sign I was missing something crucial. It wasn’t until I dived into the correct use of fill lights that I realized how much those subtle adjustments could save my shoots. If you’ve found yourself battling with uneven lighting or shadowy faces, trust me, you’re not alone. Good lighting isn’t just about having the most expensive gear; it’s about knowing how to angle and balance your lights effectively. According to cinematography expert John Alton, proper fill lighting can elevate a scene from amateur to cinematic in seconds—which underscores the importance of mastering these fill light rules for 2026.
The Promise: Your Shortcut to Flawless Lighting
Today, I’m going to share with you three essential fill light rules that will help you banish those annoying shadows once and for all. Whether you’re working with small LED panels, RGB tubes, or softboxes, these principles are universally applicable. By the end of this post, you’ll understand how to position, balance, and customize your fill lights to achieve even, natural-looking faces that tell your story without distractions. No more guessing or wasted shots—just consistent, professional results that will make your viewers focus on your content, not your shadows.
Is Proper Fill Lighting Really Worth All the Hassle?
I remember making a critical mistake early on—overusing my fill light, which washed out my subject’s skin tones and made them look flatter than a pancake. It might sound counterintuitive, but I learned that too much fill can be just as damaging as too little. That’s why understanding the right balance is key. If you’ve ever felt skeptical about the importance of fill light, question no more. I’ll show you how to get it right without turning your setup into a lighting lab. For more insights, check out my guide on softbox lighting techniques that elevate your natural glow, or explore how to optimize your RGB tube lights for creative effects.
Now that I’ve shared my story, are you ready to stop the frustration and start transforming your lighting? Let’s dive into the rules that will change the way you light forever.
Position Your Fill Light Strategically
Begin by placing your fill light approximately 45 degrees off the camera axis, slightly below eye level. This angle softens shadows and adds dimension without flattening the face. I once used a small LED panel set too close, which created harsh shadows and accentuated wrinkles—I corrected this by moving the light back and lowering it, resulting in a natural glow that enhanced my subject’s features.
Balancing Intensity for Natural Results
Adjust your fill light’s brightness to be about 1 to 2 stops lower than your key light. Use a light meter or camera histogram to gauge this balance. I once overpowered my key with a bright fill, washing out skin tones. After dialing down the fill, the skin looked lively and vibrant. For precise control, consider using a dimmer or adjusting the light’s power output—many LED panels allow for fine-tuning, as discussed in Fill Light Secrets.
Choose Diffusion to Soften Shadows
Never shoot without diffusion—softboxes or diffusion gels on LED panels spread light evenly, avoiding hard-edged shadows. During my first shoot, I used a bare LED panel, which created unflattering, stark shadows. Adding a softbox or diffusion material transformed the harsh light into a gentle luminance that accentuated facial features naturally. You can also modify existing softboxes with gel grids to control spill and improve focus, much like in softbox grid hacks.
Control Spill and Ambient Light
Use flags or barn doors to prevent unwanted light from spilling onto backgrounds or reflections. I once shot against a white wall, but spillover from my fill caused unwanted glare. By setting up flags, I confined the light to the face, keeping the background dark and emphasizing my subject. This technique aligns with positioning key and fill lights to eliminate distractions, similar to tips in softbox angles for glasses wearers.
Fine-Tune for Different Skin Tones
Adjust your LED panel’s Kelvin temperature to match skin tones—around 3200K for warmer hues or 5600K for daylight balance. I once used a daylight-balanced LED for a warm-toned portrait, resulting in a cool, washed-out appearance. By switching to warmer settings, I achieved a healthy, vibrant glow. Remember, a slight tweak can make a huge difference, and many lights offer custom presets to speed up this process. For expert color calibration, explore fill light color and exposure rules.
Many creators assume that selecting high-powered LED panels or RGB tubes guarantees perfect lighting. However, one widespread misconception is that more brightness equals better results. In reality, overpowering your subject can wash out skin tones or create unflattering hotspots, especially if diffusion or proper positioning isn’t used. For example, some believe that switching to the newest, brightest LED panels automatically improves footage, but without understanding the spectral quality or color rendering index (CRI), the results may still be off. According to professional cinematographers like Philip Bloom, mastering light quality and placement matters far more than raw lumens.
A common trap is neglecting the importance of diffusion. Many think that a bare LED panel provides clean illumination, but harsh light produces hard shadows and highlights, which can be unflattering or unnatural. Using softboxes or diffusion gels can dramatically improve the softness and naturalness of your light, as discussed in the article about softbox techniques.
Another misconception revolves around RGB tubes. Some assume that simply setting vibrant colors enhances creativity, yet without precise calibration and understanding of color temperature, you risk unnatural hues or flickering. Advanced users pay attention to the tube’s green tints and proper diffusion layers to achieve the intended mood without artifacts. An often-overlooked nuance is the need for consistent color calibration across multiple RGB tubes to create seamless effects—something expert videographers swear by.
For softboxes and key lights, there’s a tendency to limit adjustments to mere brightness. But subtle changes in height, angle, or diffusion material can alter the mood entirely. For instance, slightly tilting a softbox downward can reduce eye glare, a technique recommended by top lighting experts. Also, overusing key lights at full power without fill or backlights can flatten the subject, destroying depth. Mastering these nuanced positions results in more cinematic, professional footage.
Have you ever fallen into this trap? Let me know in the comments! Understanding these hidden nuances helps elevate your lighting game from basic to expert, ensuring your visuals stand out and look polished every time.
Investing in quality LED panels, RGB tubes, softboxes, and key lights is just the first step—keeping them in peak condition requires deliberate effort and the right tools. Over time, dust, overheating, and regular wear can diminish performance, leading to inconsistent results. That’s why I rely on specific maintenance techniques and recommended tools to ensure my lighting setup remains reliable and professional. One essential tool I swear by is a microfiber cloth combined with a gentle air blower. This duo effectively removes dust from LED panels and diffusion materials without scratching or damaging surfaces. Regular cleaning prevents dust buildup, which can cause overheating and color shifts—a subtle but critical factor in maintaining accurate skin tones and color consistency.
In the journey to perfect your video lighting, the most valuable insights often come from our own pitfalls. After years of experimentation and learning the hard way, I’ve uncovered some deeply personal lessons that transformed my approach to lighting with LED panels, fill lights, RGB tubes, softboxes, and key lights. Here are the top secrets I wish I knew earlier—lessons that can save you time, money, and frustration on your creative path.
When Less Is More: The Danger of Overlighting
I used to think that brighter was better, cranking up my LED panels and RGB tubes to achieve vivid colors and sharp contrasts. But I soon realized that overpowering my subject washes out skin tones and strips away natural depth. Learning to balance my lights improved not just the image quality but also the emotional tone of my videos. Now, I focus on achieving subtlety, understanding that strategic placement and diffusion often trump raw brightness. This realization was a game-changer—proof that in lighting, restraint often leads to richness.
Angles Matter More Than You Think
One of my biggest eye-openers was discovering the impact of softbox angle and height. I used to set my softboxes directly in front, resulting in flat, unflattering faces. When I started experimenting with slight tilts and lower heights, I uncovered a wealth of depth and dimension that made my subjects pop. The golden rule of positioning—about 45 degrees off-axis and just below eye level—can elevate your lighting from basic to cinematic. Small shifts, big results, as they say.
Diffusion Is Your Best Friend
Clean, harsh light can sabotage even the most expensive LED panels. My early experiments with bare lights led to unflattering shadows and highlights, especially on skin. Adding diffusion filters or softboxes softened those shadows, creating a natural, flattering glow. I learned to invest in quality diffusion materials and to avoid direct, unfiltered light. Soft, well-diffused light is the cornerstone of professional-looking video, making it a non-negotiable for serious creators.
Color Temperature and Skin Tone Will Make or Break Your Shot
Initially, I overlooked the importance of matching Kelvin temperatures to skin tones, often settling for default daylight settings. This oversight resulted in unnatural hues and a disconnect between subject and environment. Once I started fine-tuning my RGB tubes and LED panels—matching warm or cool tones with precise calibration—I noticed a remarkable improvement. Achieving authentic skin colors isn’t just about gear; it’s about understanding and controlling color temperature for each shot.
Strategic Use of Fill Light and Control of Spill
My early setups lacked control over spill and ambient light, leading to distracting reflections and background glare. Incorporating flags, barn doors, and careful positioning allowed me to contain my fill light strictly where I wanted it—on the face. This discipline helped emphasize my subject and eliminate background distractions, elevating my video quality. Learning to control spill and ambient light is critical—don’t overlook it, or your shot may suffer unnecessarily.
Insider Wisdom: Lessons That Changed My Perspective
- Overlighting ruins natural look: Less is often more—trust your eye rather than the volume knob.
- Angles can make or break depth: Slight adjustments in softbox position can reveal hidden facial contours.
- Diffusion isn’t optional: Investing in quality diffusion alters the entire mood and tone of your footage.
- Color calibration saves post-production time: Matching Kelvin temperatures on your RGB tubes or LED panels ensures skin tones stay true.
- Control spill actively: Using flags and barn doors can turn a good shot into a great one by preventing unwanted reflections.
My Essential Toolkit for Lighting Success
- High-quality diffusion materials and softboxes—I depend on softbox techniques for their versatility and natural look.
- Color calibration tools—such as the X-Rite ColorChecker to match skin tones effectively.
- Flags, barn doors, and reflectors—to actively control spill and shape the light precisely.
- Adjustable LED panels and RGB tubes—featured in latest LED innovations for their adaptiveness and color fidelity.
- A reliable light meter—to measure and refine lighting ratios, ensuring consistent results.
Time to Transform Your Lighting Game
Lighting isn’t just about equipment; it’s about the craft, the intuition, and the subtle adjustments that elevate your footage from average to cinematic. These lessons I learned through trial, error, and relentless curiosity, and I hope they inspire you to experiment boldly and thoughtfully. Remember, every shift—no matter how small—can have a profound impact. Embrace the imperfections, learn from your mistakes, and keep pushing your creative boundaries.
![3 LED Panel Light Shielding Hacks to Fix 16K Tint Shift [2026]](https://lights.creatorrigreviews.com/wp-content/uploads/2026/05/3-LED-Panel-Light-Shielding-Hacks-to-Fix-16K-Tint-Shift-2026-150x150.jpeg)


