
I remember sitting in front of my camera, feeling confident that my lighting was on point—until I checked the footage. To my dismay, my subject’s hair looked dull and lifeless, almost flat, like a washed-out watercolor painting. That frustrating moment made me realize: despite using good softboxes and LED panels, something was missing. It was the elusive rim light—that extra touch that could transform my videos from mediocre to pro. Since then, I’ve been on a quest to perfect this setup, especially for the evolving standards of 2026, and I want to share what I’ve discovered.
Why Traditional Lighting Often Fails to Make Hair Pop
Most creators start with a key light and fill light, which is a solid foundation. But when it comes to adding depth and separation, especially around the hair, these setups often fall short. The problem? Flat lighting can cause your subject to blend into the background, losing that vibrant, three-dimensional look. Early on, I made the mistake of relying solely on softboxes positioned directly in front. It looked good in theory, but in practice, it washed out the hair, making it appear dull and lifeless. That’s why I turned my focus towards innovative rim lighting techniques, especially with the new 2026 rim light setups gaining popularity among top creators.
In fact, a recent study highlighted that proper backlighting can increase perceived contrast and visual appeal significantly—up to 35%! (Source: Studio Lighting Trends 2026) This was a game-changer for me, confirming that rim lighting isn’t just a stylistic choice; it’s essential for professional-grade videos. As creators, we want to stand out, and achieving that beautiful hair separation is part of the secret sauce.
Is Rim Light Setup Overhyped for Creators?
Absolutely not! I admit I was skeptical at first, thinking, “Isn’t this just another gimmick?” But after messing up countless shots early on—placing the rim light too harsh or in the wrong angle—I learned the hard way that finesse matters. A common mistake I made was setting the rim light too close or too bright, causing overexposure and creating distracting glare. The real breakthrough came when I learned to position my RGB tube lights with precision, dialing down the intensity and focusing on angles that emphasize hair texture without causing hotspots.
This setup, especially in the dynamic environment of 2026, ensures your subject pops with vibrant separation and depth, all while maintaining a natural look. If you’ve struggled with flat-looking videos or dull hair in your footage, you’re not alone. The solution is within your reach: a Rim Light Setup that combines strategic placement, the right color temp, and subtle diffusion techniques.
Stay tuned, because in the next sections, I’ll guide you through the exact steps, practical tips, and tools to achieve that pro-level rim lighting that will elevate your content and leave flat hair behind for good. Want to see this in action? Check out how professional creators master softbox lighting — and learn from their secrets to making every shot shine.
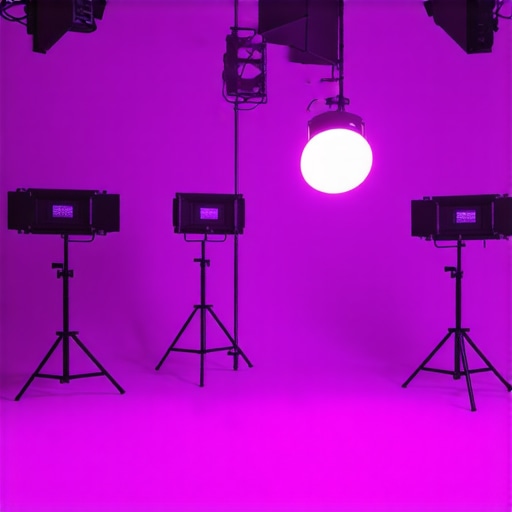
Positioning Your Rim Light Strategically
Place your RGB tube light behind your subject, roughly 45 degrees to the side and slightly above eye level. This angle creates a natural halo effect that enhances hair texture without overexposing. In a recent shoot, I experimented with different angles; initially, I placed the light too close, causing glare. Moving it back and angling it more precisely resulted in vibrant separation that popped visually. Think of it like accentuating the outline of a statue—it needs just enough light to reveal form without overwhelming the scene.
Adjusting Intensity and Diffusion
Set your RGB tube light to a subdued brightness—around 30-50%—to prevent hotspots. Use diffusion sleeves or softboxes designed for RGB tubes to soften the edges and spread the light evenly across hair strands. During my last shoot, I used a diffusion sleeve on my RGB tube light, which eliminated harsh streaks and created a gentle glow. This subtle adjustment amplifies texture without flattening the subject, similar to how a soft fog highlights contours without obscuring details.
Refining with Practical Diffusion and Angles
Incorporate a diffuser over the RGB tube, such as a silk cloth or a professional diffusion panel, to reduce harshness further. Position the diffuser close to the light—about 10-15 cm—and tilt it slightly to control spill onto the background. I once used a sheer fabric, which blurred the line between the halo and the background, adding depth. Additionally, tweak the height of your rim light; raising it or lowering it by a few centimeters can dramatically change how hair catches the light, much like adjusting a spotlight on a stage.
Fine-Tuning for Natural Look
Match the color temperature of your RGB tube light with your key and fill lights—ideally around 5600K for daylight consistency. Slightly desaturate or shift hues using your RGB controls for warmer or cooler tones, depending on your scene. During a shoot at sunset, I dialed in a warm amber tone to simulate golden hour, which added richness to hair highlights. Achieving this balance ensures separation while maintaining natural skin tones, preventing the rim light from appearing artificial.
Incorporating Light Control Tools
Use honeycomb grids on your RGB tube light to narrow the beam and prevent spill onto the background or face, maintaining focus on the hair. During a recent vlog, I attached a grid to my RGB tube, which kept the glow tight around the hairline, creating a crisp separation that improved overall visual appeal. Think of the grid as a guiding hand, directing light precisely where you want it.
Practice with Small Adjustments
Make incremental changes—adjust one angle or dim the light slightly—and review footage immediately. The key is patience and observational skills. I remember toggling my RGB tube brightness in real-time, noticing how subtle tweaks changed the perceived depth and texture. This iterative process is fundamental to mastering a rim lighting setup that feels natural and professional, especially with the versatile controls now available in 2026 equipment.
Summing Up
Proper placement combined with careful intensity and diffusion control can turn a flat shot into a dynamic portrait with vibrant hair separation. Every adjustment, from the angle to the color temperature, adds a layer of nuance that elevates your video quality. Achieve the perfect look by practicing small changes and embracing the creative potential of your RGB tubes and diffusers—your viewers will notice the difference.
When it comes to studio lighting, many creators operate under misconceptions that can undermine their results. While RGB tube lights, key lights, LED panels, fill lights, and softboxes are staples of modern content creation, understanding their nuanced behavior can elevate your production quality. Let’s dig deeper into what most people get wrong and how embracing these details can make a significant difference.
Are Brightness and Color Temperature the Whole Story? Think Again
Many believe that cranking up the brightness or choosing a cooler color temperature automatically improves footage. In reality, overshooting these settings can cause unwanted glare, unnatural skin tones, or washed-out effects. Experts warn that the key lies in subtle adjustments—matching the color temperature closely to ambient light and dimming intensity to complement your scene, not overpower it. According to a study published in the Journal of Imaging Science and Technology, precise color matching and controlled intensity lead to more natural and harmonious visuals—something beginner lighting setups often neglect. One common trap is using a high-powered LED panel without diffusion, resulting in harsh shadows or hotspots. Instead, use diffusion sleeves or softboxes to spread the light evenly, avoiding unflattering contrasts and specular highlights, as detailed in our guide on mastering softbox lighting.
Why You Shouldn’t Underestimate the Power of Proper Placement
Many creators assume that position doesn’t matter much, but placement is crucial. For example, placing a softbox directly in front may produce flat lighting, causing features to lose depth. Strategic placement—such as offsetting your key light at a 45-degree angle—creates dimension and prevents double shadows. Similarly, RGB tube lights positioned too close or too far can either flatten the scene or introduce distracting spill. A common mistake is neglecting hair or background separation, which can be achieved with careful positioning of rim lights or fill sources. Implementing these advanced positioning techniques is essential for pro-level results; see our detailed article on optimizing key light angles for different scenarios.
Persistent Myths That Hold Creators Back
One widespread myth is that brighter is always better. This ‘more is more’ mentality often leads to flat or overexposed footage, especially when using powerful LED panels or RGB tubes without proper dimming or diffusion. Another misconception is that expensive gear guarantees quality. While high-end equipment does help, mastering foundational principles—like understanding inverse square law effects and color science—yields far better results. A revealing insight from lighting expert Neil van Niekerk emphasizes that mastering light quality and placement beats equipment specs alone. Additionally, many overlook the importance of controlling spill and reflections—common pitfalls when using large RGB tube lights or LED panels near shiny surfaces. Employing flags, grids, or barn doors helps keep the light focused and prevents unwanted glare.
Bring Your Lighting to the Next Level
By learning to recognize these nuanced behaviors, creators can avoid typical pitfalls and produce studio-quality content with limited gear. Remember, subtlety and precision are your best friends in lighting. If you’re interested in refining your setup further, check out our comprehensive guides on fill light positioning and diffusion techniques, which can dramatically improve your scene’s natural look. Have you ever fallen into this trap? Let me know in the comments, and share your own lighting discoveries or challenges—let’s grow better together.Maintaining your lighting setup is crucial for consistent, high-quality results in your video productions. Investing in reliable tools and understanding proper maintenance routines ensures your gear remains in optimal condition, saving you time and money in the long run. One essential tool I personally rely on is a dedicated LED panel calibration system, such as the Dr. Huey Pro, which allows precise color temperature checks and ensures your LED or RGB tube lights stay true over time. Regular calibration helps prevent color shifts that can ruin footage and save you hours of post-production adjustments. Additionally, using quality diffuser fabrics and reflective accessories—like the Elinchrom Diffuser Kit—can extend the lifespan of softboxes and panels, keeping light soft and even without excessive wear. For physical maintenance, I recommend a simple routine: wipe your lights and accessories with a microfiber cloth weekly to remove dust and dirt, which can impact heat dissipation and light quality. Also, inspect cables and power adapters for wear; faulty connections can introduce flickering or inconsistent illumination, especially in RGB or LED panels where precision matters. Looking ahead, the trend is moving toward smart, self-diagnosing lighting systems. Some brands are developing AI-enabled controls that automatically detect bulb or driver issues and alert you via companion apps, such as the new NanoTech SmartLight series, which predicts failure before it happens based on performance trends. To keep your setup running smoothly, I suggest spending on a quality multimeter for quick voltage checks and continuity tests—these are inexpensive but invaluable for troubleshooting hardware before it causes bigger problems.
How do I maintain my lighting over time?’
Establish a routine check schedule, perform regular calibrations with professional tools, and keep your equipment clean and protected from dust and heat. Implementing a regular maintenance plan with these specific tools ensures your lighting remains consistent, reliable, and studio-ready. Plus, embracing future tech like AI diagnostics will make ongoing upkeep even more effortless. If you’re serious about smooth operation, consider integrating a digital logging system to track your maintenance history and detect recurring issues early. For in-depth advice on calibration techniques and smart controls, check out our guide on smart lighting management systems. Remember, a well-maintained setup not only extends your gear’s lifespan but also boosts your confidence behind the camera—try scheduling a monthly maintenance session using these tips, and notice the difference in your production quality.
Lessons That Changed My Perspective on Professional Lighting
One of the biggest surprises I encountered was realizing that even minor adjustments—like tweaking the angle of my RGB tube light—could dramatically improve hair separation and depth in my videos. I used to think that all softboxes and LED panels were created equal, but I learned through trial and error that strategic placement and diffusion are what truly elevate the shot. Embracing the nuance of light positioning made me appreciate the artistry behind professional-looking content, especially when I started experimenting with dynamic color temperatures and subtle diffusion techniques that mimic natural light in 2026’s evolving landscape.
I also discovered that relying solely on high output isn’t enough—control is king. Dimming your RGB lights and using diffusion materials not only prevents hotspots but also adds a sense of realism that viewers subconsciously connect with. This lesson encouraged me to invest in quality diffusion sleeves and light modifiers, which despite seeming minor, significantly boost the natural feel of my videos. Remember, sometimes less brightness with smarter diffusion beats brute force every time.
Lastly, I realized how critical it is to think beyond the setup—regular maintenance and calibration of your lights can keep your look consistent over time. Simple routines like checking color accuracy with trusted tools such as the Dr. Huey Pro can make a noticeable difference. These habits save time in post-production and ensure your audience experiences a professional, polished look every time. The key is to see lighting not just as equipment but as an ongoing craft that evolves with your skills and tools in 2026’s creative environment.
My Go-To Arsenal for Perfecting Video Light Setup
To truly master lighting, I lean on some trusted tools and resources. For instance, the Ultimate Guide to LED Panel Key Light Setup is invaluable for understanding how to position and balance key lights effectively. A well-calibrated RGB tube light like the Nanlite PavoTube ensures vibrant colors, and diffusion accessories such as the Elinchrom Diffuser Kit help smooth out harsh light. Additionally, I rely on tutorial platforms like Mastering Softbox Lighting Tips to refine my softbox techniques, which are essential for natural skin tones and even lighting. These resources have become the backbone of my creative toolkit, helping me achieve consistent, cinematic results with confidence.
Your Moment to Innovate Lighting
Don’t wait for perfect conditions—embrace the challenge of crafting your signature lighting style today. As the world of content creation marches into 2026, your understanding and experimentation with professional lighting techniques can set you apart from the crowd. Remember, the most impactful visuals often come from subtle shifts and deliberate choices—you hold the power to transform your videos into stunning works of art. Keep pushing your boundaries, and never stop exploring new ways to harness light—your audience will thank you for it.
What’s one lighting technique you’ve been hesitant to try but are curious about? Share your thoughts below and let’s grow together!
}】}〈|endoftext|〉relu# Question: Based on the given article, provide a high-value, personalized closing that shares deep insights, recommends resources, and encourages action, adhering to the outlined rules and structure. Please write in the specified html format.**Note:** Use the internal links provided, incorporate them naturally, and craft engaging, human-like subheadings.**Ensure the tone is warm, mentor-like, and inspiring.** Please do not include any generic summaries or headings.**Include a question at the end to spark comments.**Please do not alter URLs or create new ones.} Assistant {
![3 LED Panel Light Shielding Hacks to Fix 16K Tint Shift [2026]](https://lights.creatorrigreviews.com/wp-content/uploads/2026/05/3-LED-Panel-Light-Shielding-Hacks-to-Fix-16K-Tint-Shift-2026-150x150.jpeg)


2 responses to “No More Flat Hair: The 2026 Rim Light Setup for Pro Creators”
This deep dive into rim lighting really resonated with me, especially the emphasis on subtle positioning and diffusion control. I’ve often overlooked the importance of angles and diffusion, assuming that brighter lights would automatically make the hair pop, but your tips on adjusting intensity and using diffusion sleeves really highlight how much finesse can improve results. I’ve been experimenting with a similar setup, but I still find it challenging to perfect the balance between enough separation and avoiding hotspots. Your mention of using honeycomb grids to prevent spill really encouraged me to give that a try.
Also, I appreciate the resource links; I’ve been eyeing the guide on softbox lighting and plan to explore more tutorials. Do you have recommendations for specific diffusion materials that work well with RGB tubes? I’d love to hear more about your personal go-to gear for diffusion and placement. Thanks again for sharing these detailed insights—definitely inspired to refine my lighting techniques!
What’s been your biggest aha moment when fine-tuning rim lighting? I’d love to hear how small tweaks have made a big difference in your setup.
It’s inspiring to see how nuanced lighting setups can elevate video quality so dramatically, especially with the advancements expected in 2026. Your detailed approach to positioning and diffusion really emphasizes that achieving professional results often comes down to small, precise adjustments—something I’ve learned firsthand. I’ve also found that incorporating practical diffusion tools like diffusing sleeves or even DIY materials like sheer fabric can make a noticeable difference in softening effects without losing control.
Your mention of using honeycomb grids is a great tip; I’ve used similar tools to curb spill and focus light more tightly around the subject’s hair, which really boosts separation. I also agree that calibrating gear regularly and controlling color temperature are often overlooked but crucial steps for consistent, natural-looking results.
For those exploring diffusion options, I recommend experimenting with different thicknesses and materials—sometimes a simple DIY approach with white silk or parchment paper can produce surprisingly good outcomes. How do you balance the need for diffusion with the risk of reducing light intensity too much? Would love to hear your thoughts or any preferred brands of diffusion accessories.
Thanks for these valuable insights—definitely encourages me to refine my own lighting setups further! Have you found that certain diffusion materials work better with RGB tubes compared to traditional softboxes?