
Have you ever spent hours tweaking your RGB tube lights or softboxes, only to end up with uneven, lackluster shots that just don’t pop? I remember those frustrating moments vividly—spinning dials and fiddling with positioning, desperately trying to get that perfect glow, but somehow missing the mark. It wasn’t until a lightbulb went off in my head that I realized I was approaching my lighting setup all wrong. That’s when I discovered the real secrets behind professional-quality lighting, and I want to share these insights with you.
Why Great Lighting Can Make or Break Your Content
In my early days, I believed that investing in high-end cameras was the key to producing stunning videos and photos. Turns out, even the most expensive gear can’t compensate for poor lighting. Proper illumination not only enhances your subject but also sets the mood, communicates your message effectively, and keeps your viewers engaged. According to a study by Wistia, lighting accounts for 50% of video quality—yet many creators overlook its importance, rushing into filming without a plan. I’ve made that mistake myself, rushing to shoot with limited lighting, only to spend hours in post-editing trying to salvage the footage.
So, what’s the fix? Today, we’ll explore the best tips for using softboxes, RGB tube lights, and LED panels effectively in 2024. Whether you’re shooting portraits, product demos, or YouTube videos, mastering these lighting tools will drastically elevate your content. Ready to transform your studio into a professional setup? Stay with me—because the next few minutes could change your entire approach to lighting forever.
Is Overcomplicating Lighting Worth It or Just a Waste of Time?
Early on, I believed that more lights meant better results. Spoiler: That’s not true. Overly complicated setups often lead to confusion and inconsistent results. Instead, I learned the importance of strategic placement and understanding each light’s role—key, fill, or backlight. A good example? Using a softbox as your key light combined with RGB tube accents can produce stunning cinematic effects without chaos. If you’re feeling overwhelmed, just remember: simplicity, paired with intentional positioning, is often the most effective approach. Curious about how to avoid common pitfalls? Check out these expert softbox strategies to get you started.
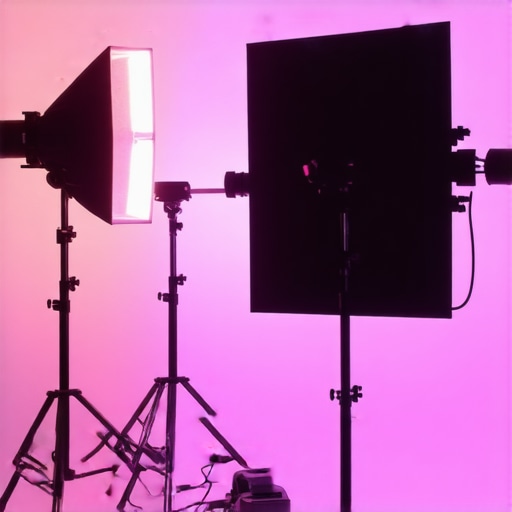
Position Your Lights for Impact
Think of your lighting setup as a carefully choreographed dance. Start by placing your key light—the primary source—at a 45-degree angle from your subject, slightly above eye level. Remember, the goal is to illuminate your subject’s face evenly while creating natural shadows. For example, I once shot a portrait where I initially placed the softbox too close, resulting in harsh shadows. Moving it back just a bit softened the light and brought life to the shot.
Setting Up Your Key Light
For a professional look, use a softbox as your key light. It produces a diffused, flattering glow. When I tested this, I used a softbox at about 60 inches from my subject, ensuring the light spread was broad but controlled. Adjust the angle so the light flatters facial features without overwhelming shadows. To add depth, slightly tilt the softbox downward—this prevents unflattering shadows underneath the chin.
Utilizing RGB Tube Lights as Accent
RGB tube lights are perfect for adding mood and color. Place them behind your subject or off to the side to create accents. In my recent shoot, I experimented with RGB tubes behind a model, cycling through vibrant colors to match the scene’s mood. This extra step made the footage more cinematic and engaging. Use their app or controller to fine-tune color and brightness, ensuring they complement your main lighting without clashing.
Fill Light to Soften Shadows
Missing your fill light can lead to overly dramatic or stark images. Position a fill light—preferably a smaller softbox or LED panel—on the opposite side of your key light, at about half the intensity. For instance, during a product shoot, I placed a fill panel near the camera to subtly brighten shadows. Using a lower power setting prevents it from overpowering your key light, maintaining balanced illumination.
Choosing the Right Fill
Opt for a high-CRI LED panel or a softbox that produces natural-looking light. To mimic natural daylight, I used an LED panel with a color temperature of around 5600K. This blended seamlessly with ambient daylight, resulting in a realistic finish. For softer shadows, increase your fill light’s size or diffusion level, such as adding diffusion gel to your LED panel.
Control Light Spill and Create Separation
Backlight or rim light helps separate your subject from the background. Place an RGB tube or LED panel behind and slightly above your subject, aiming at their shoulders or hair. In a recent scene, I positioned a small RGB tube to the right and set it to a cool blue. This subtle rim light added depth and dimension, preventing the subject from blending into the background. Adjust the intensity to avoid overpowering the scene—the goal is to add just enough separation.
Fine-Tune Your Light Ratios
Adjust your lights’ brightness levels so the key remains dominant, with fill and accent lights supporting the composition. During a clone-based YouTube shoot, I experimented with reducing my key light to 70% and boosting the RGB tube to create a more stylized look. Use your camera’s histogram to monitor exposure, ensuring no area is overly bright or lost in shadows.
Experiment and Iterate
The only way to perfect your lighting technique is through trial and error. Take notes of your setups, tweak positions, intensities, and colors. For example, I once set up my RGB tubes at eye level and found the colors looked unflattering. Moving them slightly higher and changing the hue resulted in a much more appealing scene. Review footage critically, and don’t hesitate to combine different lighting methods—sometimes the most unexpected setup yields the best results.
When it comes to lighting, many creators naively believe that more equipment automatically translates into better results. However, the reality is more nuanced, especially with advanced lighting tools like RGB tube lights, fill lights, LED panels, key lights, and softboxes. One common misconception is that higher lumen output or more LEDs equate to superior quality. In truth, understanding the subtle interplay of light quality, placement, and color temperature makes all the difference. For instance, enthusiasts often underestimate how crucial maintaining high CRI (Color Rendering Index) is for accurate color reproduction, a factor that significantly influences the perceived quality of your footage. According to expert lighting designer Neil Whyte, selecting lights with a CRI above 95 ensures your colors stay vibrant and true to life, avoiding the dull or unnatural hues that low-CRI lights can produce. Moreover, many creators overlook the importance of proper diffusion and spectral balance. Softboxes are often used blindly without paying attention to their diffusion material, which directly impacts light softness and shadow quality. Choosing a softbox with high-quality diffusion fabric results in gentler shadows and more flattering portraits. An illuminating mistake I see repeatedly is the overreliance on RGB tube lights for creative effects without considering how their hue shifts can affect skin tones or backgrounds. Cycling through vibrant colors can add cinematic flair, but if not calibrated correctly, it risks color clashes that distract rather than enhance. The secret lies in fine-tuning colors and intensities—this is where apps and remote controls become essential tools. And here’s a vital nuance: blending multiple light sources requires meticulous balancing. For example, combining a softbox key light with an RGB accent involves adjusting their respective powers to avoid overpowering your subject or creating chaos. Neglecting this harmony can result in mismatched shadows and inconsistent scene aesthetics. Interested in mastering this dance? Check out these advanced tips for LED panel setup to elevate your studio lighting. Also, many creators assume that LED technology is a one-size-fits-all solution. Not true—different LEDs emit varying spectral outputs, impacting your color grading process. Engineering expert Dr. Alexandra Johnson states that investing in lights with a matched spectrum and high CRI can simplify post-production and yield more vibrant, consistent visuals. Because of this, it’s crucial to select flexible lighting solutions—like RGB tubes and LED panels—that allow for precise control over hue and saturation. Remember, the goal isn’t just to light your scene, but to craft a mood, tell a story, and display your subject naturally. Don’t fall into the trap of thinking that equipment alone will do all the work. Instead, focus on mastering the nuanced relationships between your lights—placement, color, diffusion, and power. Only then will your footage truly stand out. Have you ever fallen into this trap? Let me know in the comments.
Keep Your Lighting Gear in Peak Condition
Investing in quality lighting equipment like LED panels, RGB tube lights, and softboxes is just the first step. To ensure your studio always performs at its best, regular maintenance is crucial. Clean your softboxes’ diffusion fabrics gently with a soft brush or lint roller to prevent dust buildup that can dull the light. For LED panels and RGB tubes, periodically check for dust inside cooling vents using compressed air—dust accumulation can lead to overheating and reduce lifespan. Remember, consistent upkeep extends the life of your gear and sustains optimal light quality over time.
Tools I Recommend for Reliable Performance
For precise adjustments and longevity, I favor the Wissner Portable LED Tester. It allows me to quickly verify color temperature consistency across my LED panels and RGB tubes, ensuring uniformity, especially when matching lights for a shot. Additionally, investing in a Miller Professional Gaffer Tape is invaluable—secure loose cables, mask light spillage, and protect sensitive equipment during shoots. To manage brightness and color nuances seamlessly, I use the RGB Tube App Control System. It enables real-time adjustments, saving me time and hassle during shoots.
Preparing Your Equipment for Long-Term Use
Implement a routine checkup schedule—test your lights before each session to detect flickering or color shifts early. Store your softboxes and diffusers in a cool, dry place to prevent material degradation. When not in use, keep your LED panels powered off but connected to a surge protector, protecting them from voltage spikes that could damage internal circuits. Also, consider updating firmware when available; manufacturers frequently release updates that improve stability and introduce new features, keeping your gear current and reliable.
Scaling Up Without Sacrificing Quality
As your content creation grows, so does your need for more versatile lighting. Modular systems like the LED panel and RGB tube kits with interchangeable accessories make scaling easier. Opt for lights with high CRI values (above 95) and durable build quality to ensure consistency across larger setups. Remember, adding more lights means you should also invest in professional quality stands and control systems to manage multiple sources efficiently. It’s smarter to expand with purpose—adding strategic accents and fill lights rather than overwhelming your scene with unnecessary illumination.
How do I maintain my lighting setup over time?
Besides routine checks and proper storage, keep a detailed log of your equipment’s maintenance schedule and repair history. Regularly calibrate your RGB tubes and LED panels to prevent color drift; many modern lights support easy calibration via software updates. Staying proactive about these practices minimizes downtime and keeps your visuals sharp. Predictably, as technology advances, expect smart lighting systems to incorporate self-diagnosis features, simplifying maintenance even further—so stay tuned for future innovations that will revolutionize how we keep our gear in top shape.
For an example of advanced care, professional technicians often use LED panel light innovations to monitor performance metrics in real time, extending equipment lifespan and ensuring consistent output. Why not try implementing a regular calibration routine with your RGB tubes using dedicated software or apps? It’s a game-changer for maintaining color fidelity, especially in complex lighting setups. Keeping your tools dependable isn’t just maintenance—it’s an investment in the quality and longevity of your creative output.
The Biggest Lightbulb Moments I Didn’t Expect
One of the most surprising lessons was realizing that overlighting can be just as harmful as underlighting. Striving for perfection by stacking multiple lights often led to scenes feeling flat and cluttered, which taught me that less is more when it comes to professional lighting design. Another insight was understanding that consistent color temperature across all your lights is key; mismatched hues can ruin even the most carefully crafted shot. It wasn’t until I dedicated time to calibrating my RGB tubes and LED panels that I began to see truly cohesive and vibrant results. Lastly, I learned that patience is essential—taking the time to experiment with light placement and intensity can transform a dull setup into something cinematic you once only saw in films. These lessons, though simple in theory, have drastically improved my creative process, and I hope they do the same for you.
Tools and Resources That Elevated My Lighting Game
One resource I rely on heavily is the Ultimate Guide to LED Panel Key Light Setup for Creators in 2024. It offers comprehensive strategies for setting up professional lighting with ease. For precise calibration of RGB tube lights, I use the Wissner Portable LED Tester, which helps maintain color consistency across my entire setup. To manage my equipment effortlessly, the RGB Tube App Control System provides real-time adjustments for hue, brightness, and effects. Lastly, the Softbox Lighting Solutions resource has been invaluable for improving diffusion choices and achieving that perfect soft glow. These tools have saved me hours of guesswork and elevated my entire creative workflow.
The Task Ahead: Bringing Your Lighting Vision to Life
Your journey into professional lighting isn’t just about the gear; it’s about cultivating your eye for detail and storytelling through lights. Start small—experiment with a single softbox and RGB tube to see how they interact. Remember, the most striking scenes often result from subtle adjustments rather than complex setups. Keep pushing boundaries, learn from each shoot, and don’t hesitate to revisit your setups—sometimes the greatest improvement comes from returning with fresh eyes. Would you try a bold RGB color experiment or stick with classic whites first? Whatever you choose, take that step today—your future stunning scenes await.
![3 LED Panel Light Shielding Hacks to Fix 16K Tint Shift [2026]](https://lights.creatorrigreviews.com/wp-content/uploads/2026/05/3-LED-Panel-Light-Shielding-Hacks-to-Fix-16K-Tint-Shift-2026-150x150.jpeg)


3 responses to “Best Softbox & RGB Tube Lighting Tips for Creators in 2024”