
Have you ever stared at your own videos and thought, “Why does my face look flat or dull, even after spending hours editing?” I’ve been there. One moment I thought I had the perfect shot, and the next, I realized my lighting was working against me. That lightbulb moment—when I finally understood that good lighting isn’t about expensive gear but knowing how to use what I have—changed everything for me.
Unlock the Secrets to Flattering, Professional-Quality Illumination
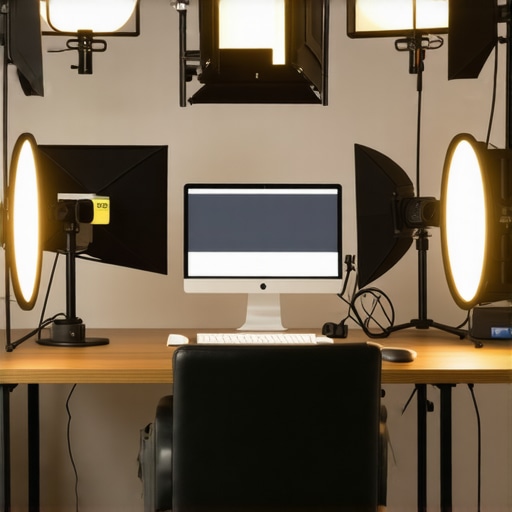
In 2024, lighting remains the cornerstone of compelling videos and photos. Whether you’re a budding content creator or a seasoned pro, mastering your softbox and LED panel setup can make the difference between something mediocre and content that truly stands out. But what’s the real magic? It’s not just choosing the right equipment—it’s about understanding how to position and modify your lights to enhance your subject naturally and attractively. Today, I promise to share my tried-and-true tips, along with some common pitfalls to avoid, so you can finally get that studio-quality glow without blowing your budget.
Is Softbox and LED Lighting Actually Worth the Hype?
One mistake I made early on was assuming that all lights are created equal. I spent hundreds on flashy gear, only to find that I was overcomplicating things. It wasn’t until I focused on understanding the best softbox techniques and how to manipulate LED panels effectively that I saw real improvements. Trust me, you don’t need the most expensive gear—just the right knowledge. For more insights on softbox lighting, check out this comprehensive guide.
Now, if you’ve ever struggled with harsh shadows, flat images, or uneven lighting, you’re not alone. Many creators face this challenge, but there’s good news: with a few adjustments, you can transform your setup and level up your aesthetic. Let’s dive into the essential tips that will make your lighting game a breeze.
Position Your Main Light for a Flattering Look
Start by placing your key light at a 45-degree angle to your face, slightly above eye level. This angle creates natural shadows that accentuate your features. I once set my softbox directly in front of me, causing flat, uninteresting light. When I moved it to a side angle, the difference was night and day. Use a boom arm or adjustable stand to fine-tune height and angle. Remember, a slight tilt downward helps prevent unwanted shadows on your forehead and unflattering reflections.
Use a Softbox to Mimic Natural Light
Think of a softbox as a window that diffuses daylight. To set up, attach the softbox to your light source securely, then position it approximately 45 degrees to your face, about 2-3 feet away for a soft, even glow. Avoid placing it too close, which can wash out details. During my last shoot, I struggled with harsh shadows until I switched to a softbox, which delivered a smooth, professional look. For portraits, this guide offers excellent positioning tips.
Add Fill Light to Reduce Shadows
While the key light defines your face, a fill light softens the shadows on the darker side. Use a smaller softbox or a reflector to bounce light back onto the shadowed areas, mimicking overcast daylight. Alternatively, a dimmed LED panel set to a lower brightness works well. I once used a white foam board reflector, and it instantly made my face appear more dimensional without flattening features. For natural results, aim for a fill that is about half the intensity of your key light, which you can achieve through fill light techniques.
Incorporate RGB Tube Lights for Creative Effects
RGB tube lights can add mood, color, or separation from the background. Place them behind or beside your subject, adjusting hue and brightness. For example, a subdued blue on one side can create depth, while vibrant reds can energize a scene. I experimented with an RGB tube light during an evening shoot, and a quick change in color transformed my footage from dull to dramatic. Use a diffuser or softbox attachment on the RGB tube for softer illumination, similar to traditional softboxes. Discover creative RGB techniques to elevate your visuals.
Balance and Test Before Shooting
Even with perfect equipment, testing is crucial. Turn on all lights, stand in front of your camera, and review your setup. Adjust angles, distances, and intensities until your face is evenly lit with natural-looking shadows and highlights. I once spent an hour tweaking my LED panel’s brightness and angle before realizing it was too harsh from one side. Utilize your camera’s LCD or a monitor to spot issues early. Remember, a well-balanced setup reduces post-production editing — making your work more efficient and professional.
Many photographers and videographers are quick to accept simplified advice about lighting setups, but the reality is more nuanced than popular myths suggest. One pervasive misconception is that brighter lights always result in better images. In truth, overexposing with high wattage or intensity can wash out details and create unflattering results, especially when combined with improper positioning. Advanced practitioners understand that controlling light quality and direction often outweigh sheer brightness, in line with insights shared by lighting expert Neil van Niekerk who emphasizes moderation and precision in softbox techniques.
Another common trap is believing that expensive gear guarantees professional results. While quality equipment makes a difference, misusing even premium lights can sabotage your efforts. It’s about mastering fundamentals—like distance, angling, and diffusion—rather than relying solely on high-end gear. For example, improper placement of your key light can cause unnatural shadows or flat appearances, regardless of the light’s cost. This echoes the findings in recent studies on visual perception, indicating that perceived quality depends more on how lighting is manipulated than on its raw technical specifications.
Why Using RGB Lights Without Proper Planning Can Backfire
Many creators fall into the trap of adding vibrant RGB tube lights without understanding their role in the scene. They assume that colorful accents automatically elevate their visuals, but without deliberate placement and color choice, RGB lighting can become distracting or clash with your main illumination. Effective use of RGB lights involves understanding complementary color schemes and color temperature balance. for instance, pairing a cool blue RGB light with a warm key light can create a pleasing separation and depth in your shot. Overusing vivid colors without context, however, risks making your footage look amateurish. For more strategies on integrating RGB tube lights seamlessly, check out this guide.
Beware the trap of neglecting light modifiers—diffusers, flags, and gels. Many underestimate their importance; this oversight can lead to harsh shadows or color casts that require extensive correction in post-production, wasting valuable time and resources. Proper modifiers are the secret behind achieving nuanced, professional-quality lighting. When positioned thoughtfully, they can soften shadows or enhance colors without additional editing, resulting in more natural and compelling visuals. Survey data indicates that creators who skillfully employ modifiers save hours editing and produce more consistent results. If you’re aiming for a truly refined look, incorporating these tools is essential.
Finally, advanced users often make the mistake of assuming that once they’ve adjusted position and intensity, their setup is perfect. In reality, lighting requires ongoing testing and adjustment, especially when working with dynamic scenes or changing ambient conditions. Regularly reviewing footage through your camera’s monitor or an external display ensures your lighting maintains the desired effect throughout the shoot. Remember, lighting is both an art and a science—perfection lies in the details. To refine your skills further, explore this comprehensive resource. Have you ever fallen into this trap? Let me know in the comments.
Once you’ve invested in quality lighting components like softboxes, LED panels, or RGB tube lights, keeping them in prime condition is essential for consistent results and durability. Regular maintenance not only extends the lifespan of your equipment but also ensures that your lighting remains predictable and professional. Personally, I rely on a combination of proactive cleaning routines and the right tools to preserve my setup. For example, I use compressed air to remove dust from delicate electronic parts and a microfiber cloth for wiping lenses and diffusers without scratching. Investing in a few specialized tools pays dividends in the long run.
One tool I highly recommend is a digital multimeter, which helps test the electrical integrity of your LED panels or RGB controllers periodically. Especially when you notice flickering or color inconsistencies, these troubleshooting steps prevent minor issues from becoming costly repairs or replacements. Additionally, using a surge protector guarantees that your lights aren’t damaged during power fluctuations—a common cause of premature equipment failure. These small but vital precautions make a significant difference over time.
Beyond physical maintenance, software updates play a crucial role. Many modern LED panels and RGB lights have embedded firmware that needs regular updating to fix bugs or unlock new features. I check manufacturers’ websites every few months and apply updates as soon as they’re available, ensuring my lights perform optimally and securely. For advanced users, exploring the settings for calibration or custom profiles can fine-tune color accuracy and consistency across different sessions.
How do I maintain my lighting system over time?
Maintaining your gear effectively involves a multi-layered approach: routine cleaning, electrical checks, firmware updates, and proper storage. When not in use, store lights in protective cases to prevent dust buildup or physical damage. During shoots, keep an eye out for overheating; most LED panels have built-in thermal protections, but ensuring proper ventilation enhances their lifespan. Also, periodically inspecting cables and connectors for wear and tear helps avoid unexpected failures that could disrupt your projects. Embracing these practices makes your lighting setup more reliable and saves you money in the long run.
Looking ahead, I predict that as smart lighting technology evolves, maintenance may become even more automated. Future fixtures might self-diagnose issues via integrated sensors, alerting you through apps before problems escalate. Meanwhile, mastering current tools and routines remains critical. If you’re serious about creating professional-quality content, dedicate time to developing a maintenance routine—it’s a small effort with big payoffs. Try setting a monthly checklist using a multimeter and cleaning supplies, and see how much smoother your shoots become. For more technical insights, check out this detailed guide.
How I Learned That Small Adjustments Can Make a Big Difference
One of the most overlooked lessons I discovered was that even minor tweaks in light positioning could dramatically improve the mood and professionalism of my videos. It’s not about having the fanciest gear but knowing how to utilize what you have to create flattering, natural-looking illumination. Trial, error, and keen observation have been my best teachers on this journey.
Why Your Favorite Creator Swears by Simple Modifiers
Using diffusers, flags, and gels transformed my lighting setup, turning harsh shadows into soft, cinematic glows. These tools may seem small, but their impact on the final output is profound. Embracing modifiers helped me avoid the flat, unappealing look that comes from neglecting light quality — a tip I wish I had known earlier. For enhancing your setup, exploring this guide is invaluable.
What I Wish Someone Told Me About RGB Lighting
Incorporating RGB tube lights added creative flair to my scenes, but I learned that deliberate placement and subtle color choices are key. Overuse or random colors can distract rather than elevate. By understanding color schemes and using RGB lights thoughtfully, I created depth and mood without overwhelming the viewer. If you’re looking to experiment with color, check out these expert tips.
Tools That Turn Good Lighting Into Great
Maintaining my equipment with regular cleaning, firmware updates, and electrical checks has extended its lifespan and saved me frustration. Investing in a multimeter for troubleshooting, surge protectors for safety, and proper storage solutions are small steps that protect your investment and ensure consistent results. For a comprehensive approach, see this resource.
Keep Pushing Your Lighting Skills Further
The world of creative lighting is constantly evolving, and staying curious is your best asset. Whether it’s refining your setup, experimenting with new tools, or mastering subtle adjustments, every step improves your craft. Set regular reviews of your lighting—notice what works and what doesn’t—and don’t hesitate to revisit trusted guides like this article. Your journey toward studio-quality video begins with small, intentional improvements today. So, are you ready to take your lighting to the next level?
![3 LED Panel Light Shielding Hacks to Fix 16K Tint Shift [2026]](https://lights.creatorrigreviews.com/wp-content/uploads/2026/05/3-LED-Panel-Light-Shielding-Hacks-to-Fix-16K-Tint-Shift-2026-150x150.jpeg)


5 responses to “Best Softbox & LED Panel Lighting Tips for Creators in 2024”
This article hits close to home, especially the part about softbox positioning and understanding how to manipulate the light. I used to think that simply adding more light was the key to better footage, but I realized that controlling the angle and diffusion makes all the difference. The tip about placing the key light at a 45-degree angle slightly above eye level really changed how my videos look—more natural and flattering. I also found that adding a fill light—sometimes just a white foam board reflector—helps in softening shadows without overcomplicating the setup. I’m curious, how do others manage to keep their lighting consistent when working outdoors or in unpredictable environments? Adjusting in real-time can be tricky, but I’d love to hear some practical tips for adapting lighting on the go without sacrificing quality.
I totally relate to the challenge of maintaining consistent lighting in unpredictable environments. Over time, I’ve found that using portable light modifiers like collapsible diffusers and bounce cards really helps stabilize the scene without needing to tweak everything on the fly. For outdoor shoots, I often use a small reflector to bounce natural light back onto my subject, which adds a flattering fill without relying completely on my gear. Additionally, setting up some quick adjustable stands or clamps for my lights makes it easier to tweak angles quickly. Have you ever tried using battery-powered LED panels? They’re super handy because they allow you to control and position your lights freely, regardless of power source. I’d love to hear if anyone has other tried-and-true methods for outdoor lighting that’s both portable and effective—sharing different approaches really broadens our toolkit for those tricky shoots.
I completely agree with the importance of proper light positioning and diffusing techniques. I’ve learned that even small tweaks, like adjusting the height of your softbox or adding a simple bounce reflector, can dramatically improve the quality of your shots. I’ve also started experimenting with controlling ambient light, especially during outdoor or in-home shoots, to avoid harsh shadows and uneven lighting. One thing that shifted my perspective was realizing that diffusion isn’t just about the softbox itself but also about how you angle and distance the light source. Do others find that experimenting with different diffuser materials, like grid cloths or even DIY options, makes a noticeable difference in your results? I’d love to hear about your experiences or tips for controlling natural and mixed lighting conditions to keep a consistent cinematic look.
I really appreciated this detailed breakdown of softbox positioning and the emphasis on understanding light angles. Having experimented with lighting setups myself, I found that small adjustments—like moving the softbox slightly higher or lower—can completely change the mood of a shot. It’s interesting how these nuances not only improve the look but also save time in post-processing. I’ve also started integrating RGB strip lights behind my subjects to add some creative color separation, and I agree that planning and moderation are key; overdoing it can easily become distracting. A question I have is, how do you guys decide when to use RGB lighting versus more traditional or neutral tones? Do you prefer to keep RGB as a subtle enhancement or make it the focal point? Would love to hear your experiences on balancing creative effects with overall scene harmony.
This article really resonated with me because I’ve experienced that frustration of flat, dull lighting even after hours of editing. Like many, I initially thought buying expensive equipment was the answer, but I’ve learned that proper positioning and understanding how to manipulate my lights make all the difference. A technique that’s worked wonders for me is using a smaller softbox as a fill light in combination with my main softbox, especially when I want softer shadows that still highlight my features naturally. Also, I’ve started experimenting with adding subtle RGB accents behind me to create depth without overpowering the scene. My biggest challenge now is balancing natural ambient light with my artificial sources, especially during indoor shoots at different times of the day. How do others recommend managing this balance for consistent quality? It’s an ongoing learning process, but mastering these fundamentals has definitely elevated my content quality.