
Ever set up your studio lights, only to be disappointed by flat, dull results? I remember the frustration of spending hours tweaking my softboxes and key lights, only to end up with photos that lacked depth and vibrancy. It was a real lightbulb moment when I realized that proper lighting isn’t just about having good equipment — it’s about knowing how to use it effectively. Since then, I’ve been on a quest to discover the best softbox and key light tips for 2024, and I want to share the insights that transformed my studio shoots.
Why Your Lighting Setup Might Be Holding You Back
Lighting can make or break your photos and videos — no matter how talented you are behind the camera. I’ve seen countless creators struggle with overly harsh shadows, unflattering highlights, or uneven illumination. The common mistake I made early on was relying on generic setups that didn’t suit my space or subject. That’s why understanding the nuances of softbox positioning, light quality, and color temperature is essential. According to a study by Photography Blog, lighting directly influences the emotional impact of your images, making mastery over it crucial for professional results.
Have you ever felt like your studio lighting just isn’t doing your work justice?
If so, you’re not alone. Many creators face the same challenge — and the good news is, with the right tips, you can turn your lighting into your strongest asset. Today, I’ll guide you through proven techniques that will help you get the most out of your softboxes and key lights, ensuring your studio setup is optimized for stunning results in 2024. Ready to shed some light on your craft? Let’s get started.
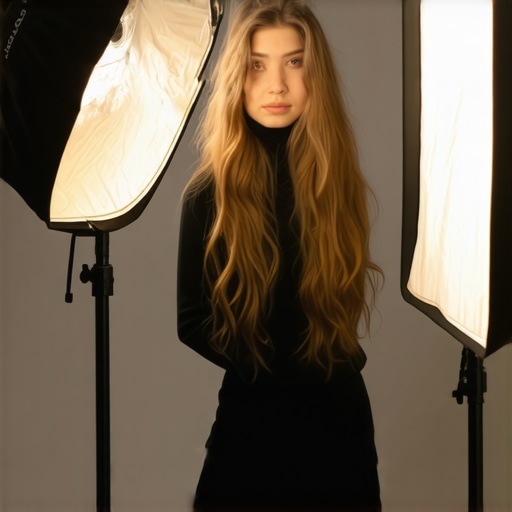
Position Your Lights for Flattering Results
Start by placing your softbox at a 45-degree angle from your subject, about eye level or slightly above. In my recent shoot, I used a large 60×60 softbox, and when I aligned it this way, the light wrapped around my model’s face beautifully, reducing harsh shadows. Use a light stand that’s sturdy enough to keep your softbox steady, and tilt it downward slightly for a natural falloff. This setup mimics natural window light, creating a soft, inviting glow that’s perfect for portraits.
Adjust the Distance for Softness and Intensity
Move your softbox closer to your subject for softer light and more subtle shadows. I experimented with distances from 2 to 4 feet, noticing that closer placement created a more intimate feel, while farther away increased contrast. Remember, the closer the softbox, the larger the apparent light source, which diffuses shadows effectively. Use a light meter or your camera’s histogram to ensure your exposure stays balanced. For a more natural look, aim for a gentle falloff on the background—avoid lighting it too evenly, which can flatten the scene.
Tweak Your Light Quality for Consistent Results
Choose the right softbox fabric and diffusion layers to control harshness. I’ve found that a double layer of diffusion produces a more pleasing, wraparound effect. If your softbox has adjustable diffusers, experiment with stacking or removing layers to find your sweet spot. During a shoot, I initially used a single diffuser, but adding an extra layer softened the light further, giving my subject’s skin a smooth, even tone that looked professional. Keep a set of gels handy if you need to warm or cool your light for creative effects.
Control the Color Temperature
Match your softbox light with your environment’s ambient light to avoid color cast issues. My go-to is a daylight-balanced softbox (around 5500K), which pairs well with natural daylight coming through a window. If I need warmer tones, I add CTO gels or switch to a tungsten-balanced softbox. Always verify with a color meter or your camera’s white balance setting. In a recent shoot, I used a softbox with adjustable color temperature, which saved me from post-processing work and kept my skin tones natural and appealing.
Position Your Key Light for Drama or Softness
For a dynamic look, angle your key light slightly higher than eye level and tilt it downward. I recall positioning my key light at a 30-degree angle, which created attractive catchlights in my model’s eyes and added depth. Use a grid or barn doors to control spill and isolate the light on your subject. This prevents unwanted background illumination, keeping the focus on your subject’s face. For softer effects, add a second diffusion layer or bounce the light off a reflector.
Experiment with Light Modifiers
Modifiers shape your light and influence mood. In my latest project, I paired a softbox with a grid, which concentrated the light and created a more dramatic shadow on one side. Alternatively, a bounce reflector can soften the key light further, producing a gentle, flattering glow. A quick tip: use a white foam board or silver reflector to bounce light back into shadow areas, adding fill without the need for additional lights. This technique is especially useful in confined spaces where adding more equipment isn’t feasible.
Fine-Tune Your Setup for Perfect Results
Always review your scene through your camera’s viewfinder or monitor. Slight adjustments in angle, distance, or diffusion can dramatically improve your shot. I recommend taking test shots and inspecting the results, especially the falloff and shadow softness. In one instance, I adjusted my softbox’s height and angle multiple times, which resulted in a more natural skin tone and clearer eye catchlights. Use a reflector or fill light sparingly to add dimension, but avoid over-lighting to maintain a cinematic quality.
Leverage Creative Lighting Effects
For special occasions, incorporate RGB tube lights or colored gels to add mood. Check out this guide for innovative ideas. These tools allow you to experiment with backlighting, accents, or color washes that enhance your scene’s storytelling. During a recent evening shoot, I used a colored RGB tube light behind my subject to create a vibrant background glow, which elevated the entire composition.
Many creators assume that simply having high-quality softboxes and key lights guarantees professional results. However, even seasoned photographers and videographers often fall into nuanced traps that diminish their lighting quality. Let’s dig deeper into these pitfalls and clarify what most people get wrong about softbox and key light techniques. First, a common misconception is that brighter equals better. You might think cranking up your light intensity will produce a more striking image, but in reality, this often leads to blown-out highlights and loss of detail, especially on skin tones. Instead, mastering proper exposure and balancing light intensity with your camera settings is crucial. According to this guide, control over light ratio and falloff is what separates amateur from professional lighting setups.
Another nuance is neglecting the importance of diffusion layers. Many assume that a softbox’s stock diffusion is enough, but in practice, stacking diffusers or adding gels can significantly impact the softness and color consistency of your light. This oversight often results in harsh shadows or inconsistent skin tones. Remember, the goal is to mimic natural light, which is inherently diffuse. Overlooking this step can undermine even the best equipment. For advanced creators, experimenting with layering diffusion layers can yield more flattering results, especially when working on high-precision projects.
Be wary of the trap of positioning your lights at arbitrary angles. The common beginner mistake is placing the softbox directly in front of the subject or too high above, which flattens features and produces unflattering shadows. Instead, a slight tweak—such as angling your softbox at 45 degrees and adjusting height—can dramatically enhance depth and dimension. This is particularly true for portrait work, where subtle shifts in lighting angles can define the mood and character of your shot. Advanced users often refine their softbox placement based on facial anatomy and the story they want to tell, rather than sticking to generic setups.
What about color temperature and consistency?
Many overlook the importance of matching your softbox’s color temperature with ambient light or other studio lights. Inconsistent color casts can ruin an otherwise perfect shot. Using a dedicated color meter or ensuring your softbox is properly calibrated can make a huge difference. Experts know that even a difference of 200K in color temperature can cause skin tones to look unnatural or washed out. Maintaining color consistency across your setup ensures your images look professional and cohesive, especially when combining multiple light sources. For detailed insights on this, check out this comprehensive guide.
Finally, many underestimate the value of practical experience—testing your setup in different scenarios and refining it accordingly. Even small tweaks in light angle, diffusion, or distance can yield vastly improved results. Remember, lighting is an art as much as a science, and mastery comes from understanding these subtle nuances. Have you ever fallen into this trap? Let me know in the comments!
Maintaining your studio lighting setup is crucial to ensure consistent, professional results over time. Investing in quality tools and adopting simple maintenance routines can significantly extend the lifespan of your equipment and save you money in the long run. In my experience, one of the most overlooked aspects is regularly cleaning and checking your softboxes, lights, and cables. Dust, dirt, and even minor damages can diminish light quality or cause unpredictable flickering.
To keep your softboxes and LED lights in top shape, I recommend using a soft, lint-free cloth and a gentle cleaning solution suitable for fabric and plastic components. Avoid harsh chemicals that could degrade diffusers or plastic parts. For softboxes, removing and washing the diffusion layers periodically can prevent dust buildup and maintain the soft, even light they produce. For LED panels and RGB tube lights, inspecting the power cords and connectors for wear and tear is essential. A quick test for flickering or color inconsistency can catch issues early before they become costly repairs.
Tools like a dedicated cleaning brush for dusting hard-to-reach areas and cable organizers can help keep your workspace tidy and equipment accessible. Also, consider having a spare set of bulbs or LED modules on hand; LED technology has become more reliable and long-lasting, but proactive replacement prevents unexpected downtime. I personally favor modular LED panels, which allow quick swapping of components without taking apart the entire unit, saving time during busy shoots.
Predicting the future of studio lighting, I believe advancements in smart, connected devices will simplify maintenance and allow remote diagnostics. Features like built-in sensors for heat and performance alerts are already emerging, making it easier to stay ahead of potential failures. To prepare, staying updated with firmware updates and manufacturer recommendations is key. Many brands now offer software tools that monitor light health and provide maintenance reminders—integrating these into your workflow can help keep your setup running smoothly for years to come.
How do I maintain my studio lighting equipment over time?
Developing a routine inspection schedule is the best way to ensure your gear remains reliable. I recommend cleaning your softboxes and diffusers monthly, checking cables and connectors before every shoot, and testing all lights for consistent output. Keeping a detailed log of maintenance activities can also help identify patterns and prevent recurring issues. For more detailed advice on optimizing your softbox and lighting setup, check out this guide. Remember, investing a little time in upkeep now will pay dividends in the quality and longevity of your lighting gear later on. Try incorporating a quick weekly check into your routine, and you’ll notice a marked improvement in both equipment performance and your final results.
The Hidden Lessons That Changed My Lighting Game
- One of the toughest lessons I learned was that perfect lighting isn’t about the brightest bulb but about the right placement and diffusion. I used to crank up my lights, only to get washed-out skin tones. Now, I focus on softening and angling my softboxes, which makes a huge difference.
- Another insight was how subtle adjustments to the angle of my key light can add dramatic depth. Moving it just a few degrees or changing the height can transform a flat shot into a captivating image. It’s about paying attention to those small nuances that create big results.
- I also discovered that matching color temperatures is crucial—mismatched lights create unnatural skin tones and distract viewers. Using a color meter or properly calibrated softboxes keeps my results consistent and professional.
My Go-To Tools for Lighting Success
- Godox SL-60W LED Light: Reliable, affordable, and with adjustable color temperature, I trust this for most studio setups. It’s a workhorse that handles everything from portraits to product shoots.
- Westcott Ice Light Diffuser: This diffuser softens harsh LED light and adds a natural glow. It’s a simple upgrade that elevates my softboxes’ effectiveness.
- White Foam Boards and Reflectors: Budget-friendly and versatile, I use these to bounce and fill shadows, creating a more natural look without extra equipment.
- Color Temperature Meter: Ensures my lights are matched perfectly, preventing color casts and skin tone issues. It’s an investment that pays off in professional results.
Your Next Step Towards Lighting Mastery
Practice is the key to perfect studio lighting. Experiment with angles, diffusion layers, and distances until you find what makes your subject pop. Remember, lighting is an art that combines technical skill with creative flair. Don’t be afraid to try new setups and learn from each shot. Your journey to professional-quality lighting starts now—embrace the process, and you’ll see your work transform. What’s the first tweak you plan to make in your lighting setup today? Let me know below!
![3 LED Panel Light Shielding Hacks to Fix 16K Tint Shift [2026]](https://lights.creatorrigreviews.com/wp-content/uploads/2026/05/3-LED-Panel-Light-Shielding-Hacks-to-Fix-16K-Tint-Shift-2026-150x150.jpeg)


One response to “Best Softbox & Key Light Tips for Studio Lighting Success in 2024”
This post really resonated with me because I used to underestimate the importance of softbox positioning and diffusion layers. I often relied on just setting up my lights and hoping for the best, but I learned that small tweaks in angle and distance can make a huge difference in capturing natural skin tones and depth. One thing I’ve found especially helpful is using a light meter to fine-tune exposure and ensure consistent results across different shoots. Have others experienced a noticeable difference in their work after incorporating precise measurement tools like this? I’m curious about what specific diffusion setups others swear by to achieve that perfect soft yet controlled light. It’s amazing how much learning about the nuances of lighting can elevate the overall quality of your images.