
Ever spent hours fiddling with your studio lights, only to end up with flat, uninspiring shots that feel more like a DIY project than professional visuals? I’ve been there—loading my setup with generic softboxes and hoping for magic. But truthfully, that approach often left me frustrated, battling uneven color, dull highlights, and endless trial and error.
One evening, after yet another failed shoot, I had a bit of a lightbulb moment. I realized I was missing out on leveraging versatile, vibrant lighting tools that could give my creative space an edge. That’s when I started exploring the world of
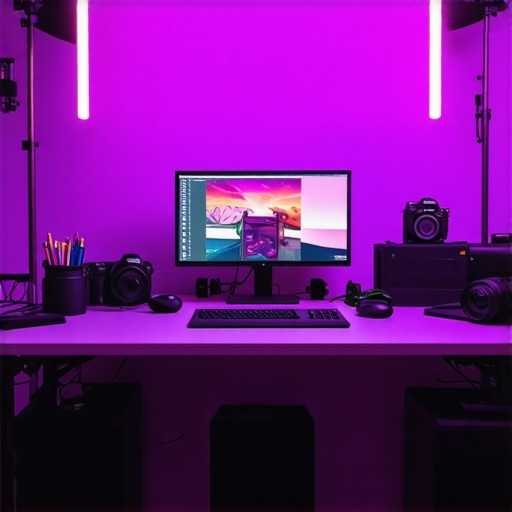
Best RGB Tube & LED Panel Lights for Creative Studio Setup 2024
, and let me tell you—it’s a game changer. If you’re tired of lackluster lighting holding back your projects, you’re in for a revelation.
But here’s the kicker—many creators jump into lighting upgrades without understanding the nuances. Early on, I made the classic mistake of choosing equipment based solely on hype or price, neglecting how these lights actually interact with my space and subject. This oversight cost me time, money, and missed opportunities to elevate my visuals.
Today, I’ll guide you through the essential considerations for selecting the right RGB tube and LED panel lights, share personal insights, and help you avoid my rookie mistakes. If you’ve faced the struggle of inconsistent lighting or simply want your studio to stand out, this upcoming info is for you.
Ready to transform your setup? Let’s dive into what makes these lighting options truly stand out in 2024—and how they can revolutionize your creative process.
Start with a Solid Key Light
Think of your key light as the sun for your setup—it’s the primary source that defines your subject’s shape and mood. To achieve this, position your softbox key light at a 45-degree angle, slightly above eye level. Use a light meter or your camera’s histogram to ensure proper exposure. This step alone sets a professional tone for your shoot. When I tried this during a recent portrait session, adjusting the softbox’s angle and distance instantly improved the naturalness of skin tones, making my subject pop without harsh shadows.
Layer with Strategic Fill Lights
Next, add fill lights to soften shadows and create depth. RGB tube lights offer vibrant color options that can subtly enhance the atmosphere. Place an RGB tube at a lower intensity on the opposite side of your key, dialing down its power until shadows are just nuanced. For example, during an evening shoot, I used a deep blue hue from the RGB tube to evoke a cool twilight feel, which dramatically changed the scene’s mood without additional gear. Remember, the goal is to mimic natural fill—so avoid overpowering your main light.
Diffuse and Soften with Softboxes
To prevent harshness, utilize softboxes to spread light evenly. Mastering softbox techniques helps in creating smooth, flattering illumination. When I experimented with different diffusion materials, I noticed that a thicker diffusion layer softened skin imperfections without losing detail. It’s crucial to test in your space, as larger softboxes provide a more natural wrap around the subject and reduce shadows, especially when working in tight quarters.
Incorporate Color with RGB Tube & LED Panels
Vibrant colors can be intentional or accidental, but understanding how to harness RGB lighting opens creative doors. Use your RGB tubes or LED panels to add accents or fill shadows with complementary colors—think warm yellows against cool blues. For creative effects, try special effects like pulsating or color transitions. During a recent evening shoot, I set my RGB panel to a subtle magenta to highlight the background, which added depth and visual interest, elevating the overall aesthetic.
Balance and Test for Harmony
The key to professional lighting is balancing all elements. Adjust individual lights and test through your camera’s viewfinder or monitor. Use a simple gray card to calibrate your white balance, ensuring colors reproduce accurately. I once overwhelmed my scene with colored lights, but after stepping back and dimming the RGB tubes, I realized the importance of moderation—technique is about enhancement, not distraction. Experiment with angles, intensities, and colors until your scene feels cohesive and intentional.
While mastering key and fill lights, softboxes, RGB tubes, and LED panels is essential, many creators overlook the subtleties that truly elevate professional studio lighting. One common myth is that brighter is always better; however, overexposure can wash out details and flatten the scene. In reality, controlling light intensity and understanding how each light interacts with your space is paramount. For example, focusing solely on high lumen output ignores factors like beam angle and color rendering index (CRI), which influence the quality and accuracy of your visuals. According to lighting expert Michael Brown, “A well-balanced setup considers not just brightness but also the quality and direction of light”. This nuance often escapes beginners who chase the latest hardware without grasping these principles. Additionally, many assume that RGB lights are only for colorful effects, but they excel at subtle tone shifts that add depth and mood when used judiciously. A common trap involves improper placement—placing softboxes or RGB tubes too close or at suboptimal angles can cause harsh shadows or uneven highlights, undermining the scene’s harmony. For advanced creators, questions like “How does the angle of a fill light affect skin texture and overall mood?” become relevant. Studies show that light angle influences perception significantly, which is why skilled lighting involves more than just equipment—it’s about positioning and tone control. Check out this guide to discover how nuanced adjustments can drastically improve your shots. Remember, real mastery involves understanding not just what lights do but how they do it—crucial for creating compelling visuals that stand out. Have you ever fallen into this trap? Let me know in the comments.Keeping your studio lighting setup reliable and effective requires deliberate effort and quality tools. Over time, lights can drift in color accuracy, bulbs may dim, and components can wear out, leading to inconsistent results. To ensure longevity, start by investing in reputable brands like Aputure or Godox, which offer durable LED panels and RGB tubes proven in professional settings. Regularly cleaning your softboxes, reflectors, and lenses prevents dust build-up that can soften or distort light quality. Use a reliable light meter or color calibration tool—such as the X-Rite i1Display—to periodically verify that your RGB and softbox lights reproduce colors accurately, ensuring your footage remains true to life. Replace bulbs or LEDs as recommended by the manufacturer, typically every 1-2 years, to prevent color shifts or intensity loss. For software, employ calibration profiles in your editing suite, using tools like DaVinci Resolve’s color management, to maintain consistent color grading across sessions. Looking ahead, advances in wireless control and intelligent firmware updates are making it easier to keep your lighting system current without manual adjustments.
How do I maintain my lighting investments over time?
Regular maintenance involves physical cleaning, timely replacement of components, and system calibration using industry-standard tools. For example, integrating a dedicated light management app—like Sidus Link—allows remote control and firmware updates, ensuring your lights benefit from the latest features and stability improvements. As your setup grows, consider modular systems that can be expanded or upgraded with minimal hassle. This approach not only saves money but also provides consistent shoot quality. Remember, the key is to regularly review your equipment’s performance and stay updated with manufacturer guidelines. For detailed technical insights, check out this resource. So, take the time now to set up a routine maintenance schedule and start incorporating these tools—your future shoots will thank you for it.
What I Wish I’d Known About Light Positioning When Starting Out
One of my biggest rookie mistakes was underestimating how crucial the angle of my fill lights was for achieving natural-looking results. It took trial and error, and countless subtle adjustments, to realize that minor tweaks in light placement could dramatically impact the mood and depth of my scenes. Embracing the importance of strategic positioning transformed my workflow and saved me hours of frustration.
The Power of Color Subtlety That I Overlooked
Initially, I thought RGB lighting was just for flashy effects, but I learned that nuanced use of color—like warming up a scene with orange hues or cooling it with blue—can evoke emotion and add storytelling layers. Small, intentional color accents from RGB tubes or LED panels can make your visuals resonate more profoundly, as I discovered during my projects that focused on mood-building.
A Critical Softbox Technique That Elevated My Shots
Discovering how to position and diffuse softboxes properly was a game changer. I once used a softbox too close or with insufficient diffusion, resulting in harsh shadows. Learning to experiment with diffusion materials and angles allowed me to create soft, flattering light that enhanced textures and skin tones, elevating the overall professionalism of my work. For detailed guidance, check out this resource.
Why Balancing Is the Secret Sauce
Overexposure and uneven lighting can instantly ruin a shot, which I experienced firsthand. Achieving harmony among your key, fill, and accent lights requires patience, calibration, and a keen eye. Using tools like a light meter or calibration profiles ensures your colors are true and your scene is balanced. Emphasizing harmony over brute brightness has consistently yielded more professional results, and it’s a lesson I wish I had prioritized earlier.
Top Tools That Keep My Studio Lighting Sharp in 2024
- Aputure Nova P300c: Trusted for its color accuracy and brightness, it’s reliable for both creative and professional setups.
- X-Rite i1Display: Essential for maintaining consistent color calibration across all lights and devices.
- Sidus Link app: Enables seamless wireless control and firmware updates, keeping my system up-to-date without hassle.
- Softbox Diffusion Layers: Investing in quality diffusion materials enhances softness and reduces harsh shadows—crucial for flattering portrait lighting.
This Is Your Moment to Light Up the Future
Armed with these insights, you’re better prepared to master studio lighting in 2024. Remember, exceptional visuals come from deliberate choices, intuition, and continuous learning. By implementing these lessons, you’re taking meaningful steps toward creating stunning, professional-quality content that truly stands out. Don’t wait—start experimenting today and watch your visuals evolve. How might repositioning your fill lights change the mood of your next project? Share your experiences or questions below, and let’s light the way together!
![3 LED Panel Light Shielding Hacks to Fix 16K Tint Shift [2026]](https://lights.creatorrigreviews.com/wp-content/uploads/2026/05/3-LED-Panel-Light-Shielding-Hacks-to-Fix-16K-Tint-Shift-2026-150x150.jpeg)


