
Ever spent hours fiddling with your softbox or LED panel, only to realize your shot still looks flat, uninviting, or just off? I’ve been there. One day, I finally understood that good lighting isn’t about having the newest gear but knowing how to use what you have — and sometimes, that means rethinking your entire approach to studio lighting. I remember a frustrating shoot where my lights kept flickering, casting distracting shadows, and making my subject look washed out. It was only after I researched the latest strategies for 2024 that I discovered how crucial the right LED panels and key lights are in creating professional-looking videos and photos. And trust me, this knowledge transformed my setup—and it can do the same for you.
Why Lighting Choices Define Your Studio Success
Lighting isn’t just a technical detail; it’s the soul of your visual storytelling. Good lighting can elevate a simple shot into something cinematic, while poor lighting can ruin even the most expensive camera. As a creator, I learned that understanding the latest innovations in LED panels and key lights is essential—especially in 2024, when technology is evolving rapidly. For example, modern LED panels now offer incredible brightness and color accuracy, which can brighten your studio after midday or create mood lighting effects that stand out. If you want your videos to look polished, knowing how to leverage these tools is non-negotiable. Plus, the right lighting setup saves time and frustration, allowing you to focus on your content rather than battling shadows or inconsistent color temperatures.
Have you ever faced the dilemma of your light being too harsh, too soft, or just not matching the scene? You’re not alone. Many creators struggle with choosing the best key light or fill light, especially when trying to simulate natural light or achieve a cinematic glow. That’s precisely why I decided to dive into the most effective strategies for 2024. From softbox techniques to RGB tube lights for creative effects, there are proven methods that can dramatically improve your results. And yes, I’ve made my share of mistakes—like relying on a single light source that washed out my subject or using outdated equipment that couldn’t keep up with modern demands. But those missteps became lessons that led me to develop a comprehensive approach, which I’ll share today.
Is LED Panel and Key Light Strategy Overhyped or Essential?
Early in my journey, I believed that any LED light would do the trick. Turns out, that’s a rookie mistake. Not all LED panels are created equal, and choosing the wrong key light can make or break your scene. For instance, some LED panels lack the brightness or color fidelity needed for professional work, leading to dull or uneven footage. I learned this the hard way when I invested in a popular but underperforming LED panel, only to realize it didn’t match my camera’s color profile or handle the lighting conditions I faced. That’s why I now prioritize features like high CRI ratings and adjustable color temperatures, which make a world of difference. If you’re serious about elevating your studio game, understanding these details is crucial. Want to avoid my mistakes? Check out the latest innovations in LED panel lighting and key techniques for 2024, which can be a game changer for your setup.
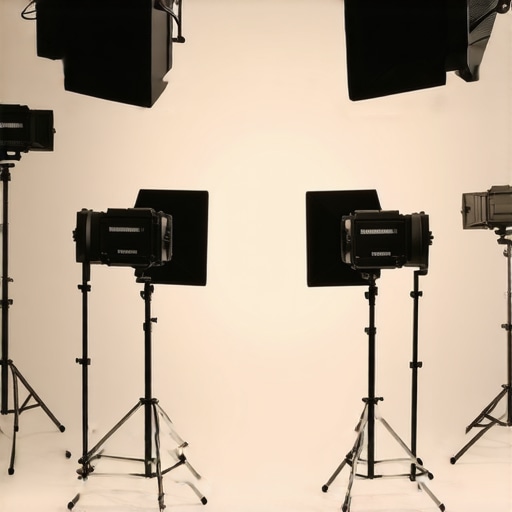
Pick the Right LED Panel for Your Needs
Start by assessing your studio’s environment and your creative goals. Modern LED panels, like those highlighted in 2024 innovations, offer adjustable brightness and color temperature, ensuring you can match natural light or create dramatic effects. When selecting an LED panel, prioritize high CRI ratings (above 95) for accurate color rendering and check for dimming capabilities to fine-tune your lighting. I once upgraded from a budget panel to a high-CRI LED, and the difference in skin tone rendering and overall vibrancy was immediate, especially in midday shoots where ambient light changes quickly.
Positioning Your Key Light for Flattering Results
Think of your key light as the main actor—its placement influences the entire scene. The goal is to mimic natural sunlight, which means placing the light at a 45-degree angle from your subject’s face and slightly above eye level. Use a softbox to diffuse harsh shadows; I recommend mastering softbox lighting techniques from this guide for perfect portraits. I once set up a softbox too close, creating a flat look; adjusting the distance and angle produced a natural, cinematic glow. Remember, experimenting with distance and tilt can help you find that perfect, flattering light.
Refine with Fill and Back Lights
The fill light balances shadows created by your key light. Use a less intense, wider spread light, like an RGB tube, for a softer, natural look, especially in scenes requiring subtlety. For example, during a recent interview shoot, I used a fill light with gentle diffusion to add dimension without overpowering the main light. Check out this guide for creative fill techniques. Additionally, adding a backlight or hair light can create separation from the background, making your subject pop. Position it behind your subject, slightly above, to highlight hair and shoulders, avoiding lens flare by angling it downward.
Experiment with Creative Lighting Effects
Once your fundamental setup is solid, experiment with RGB tube lights to add mood or depth. For instance, in evening shoots, I used RGB tubes to simulate sunset or city lights, inspired by this technique. Adjusting the color and intensity allows you to craft unique atmospheres. Remember, subtlety is key—overusing colored lights can distract, so integrate them thoughtfully to enhance your scene without overwhelming it.
Optimize Your Setup for Different Times of Day
Lighting needs change throughout the day. During midday, natural light is harsh, so supplement with high-quality LED panels that can brighten your scene evenly, as discussed here. For late afternoon or evening, use RGB tubes and softboxes to replicate warm sunlight or cool moonlight, depending on your mood. For example, I once used RGB tubes to mimic evening streetlights, adding realism to a cityscape shot. Adjust your lights’ color temperature and placement to match the ambient light, ensuring consistency and a natural look.
Fine-Tune Your Lighting with Practice
The key to mastering studio lighting is consistent practice and observation. Keep notes on your setups, tweak positions, and test different accessories like diffusers or grids. Over time, you’ll intuitively know how to craft scenes that look professional without expensive gear. Remember, every successful shot is a result of deliberate adjustments and understanding your lights’ capabilities, whether it’s a versatile RGB tube or a powerful LED panel. Dive into more detailed techniques with resources like softbox tips or key and fill strategies to refine your craft.
When it comes to studio lighting, many creators fall into common traps that hinder their results. Let’s dig deeper into what most people get wrong about softboxes, LED panels, RGB tubes, and key lights. Understanding these nuances can save you time and money, and elevate your lighting game. First, there’s a widespread belief that more expensive gear automatically guarantees perfect lighting. In practice, even budget-friendly lights can outperform high-end models if used correctly. The key lies in mastering positioning, diffusion, and understanding each light’s unique characteristics.
Another myth is that a single softbox or LED panel can handle all scenarios. Contrary to this belief, diversity in your lighting toolkit—such as using different modifiers, angles, and color temperatures—offers far better control over your scene’s mood and depth. For instance, a softbox at 45 degrees provides flattering, cinematic light, but supplementing it with RGB tubes or fill lights can add creative flair and dimension. This guide explores how combining different lights enhances your setup.
Now, a common mistake is underestimating the importance of color rendering and spectral quality. Many focus solely on brightness or affordability, but a high CRI (Color Rendering Index) above 95 is crucial for natural skin tones and true-to-life colors. Skipping this detail can result in dull, washed-out footage, no matter how good your setup looks on paper. For advanced creators, understanding the spectral output of your LED panels—especially when mixing different brands—avoids color inconsistencies that can ruin your shots. Check out this article for more insights.
What about the common oversights with RGB tubes and fill lights?
Many think that RGB tubes are just for fun, but their real power lies in subtle, mood-enhancing effects. However, overusing vibrant colors or placing RGB tubes too close can distract viewers. The trick is to use them thoughtfully—like accenting background elements or replicating ambient lighting—rather than making them the focus. Moreover, the placement and intensity matter. For example, positioning RGB tubes behind your subject at a slight angle can add depth without overwhelming the scene. This resource offers advanced techniques for creative use.
Finally, many creators overlook the importance of matching your lighting’s color temperature to the scene’s ambient light. For example, midday sunlight is around 5600K, but many fail to adjust their LED panels accordingly, resulting in unnatural color casts. Always fine-tune your lights to match your scene’s mood and time of day—this is an advanced skill that separates amateurs from professionals. This article discusses how to perfect your fill light for natural results.
Have you ever fallen into this trap? Let me know in the comments! Mastering these subtle yet critical aspects of lighting can dramatically improve your videos and photos, making your studio setup truly shine.
Investing in quality lighting equipment such as softboxes, LED panels, RGB tubes, key lights, and fill lights is just the first step. To keep your studio setup functioning optimally over time, regular maintenance and proper tools are essential. From cleaning your lights to updating firmware and using specialized accessories, staying proactive ensures your lighting remains reliable and performance-driven.
Why Regular Maintenance Matters
Lights and accessories are exposed to dust, moisture, and handling that can degrade their performance. Dust accumulation on LED panels or softbox fabrics can dim light output and affect color accuracy. Moisture or humidity can cause electrical issues or mold growth. Regularly inspecting your equipment allows you to catch problems early—like frayed cables or malfunctioning fans—preventing costly repairs or replacements down the line.
Tools I Recommend for Longevity and Efficiency
First, invest in a microfiber cloth and compressed air for cleaning your LED panels and softboxes. Gently wiping surfaces removes dust without scratching lenses or diffusers. For internal components, a small soldering kit and multimeter are invaluable for troubleshooting minor electrical issues, especially if your lights start flickering or flickering intermittently. I personally rely on a digital multimeter from Fluke, as it provides accurate readings and durability for regular use.
Another tool I find indispensable is a power strip with surge protection. It protects your expensive lighting gear from power surges and provides multiple outlets for organized setup. Additionally, using a firmware update tool—often provided by manufacturers—keeps your lights compatible with new features and fixes bugs. Regular firmware updates can improve color fidelity, stability, and overall lifespan.
How do I maintain my lighting setup over time?
Developing a routine is key. Schedule bi-monthly inspections to check for dust, loose connections, and physical damage. Keep cables organized with Velcro straps or cable management sleeves to prevent wear. When not in use, store your lights in dust-proof cases or covers to avoid unnecessary dirt buildup. Also, calibrate your RGB tubes and LED panels periodically using color calibration tools or software—many modern lights come with companion apps that facilitate this process. This ensures color consistency, especially important if you’re mixing different brands or models.
As technology evolves rapidly, staying updated with manufacturer firmware and software is crucial. For example, manufacturers are continuously improving the spectral output and control features of RGB tubes, making regular updates a smart habit. I recommend subscribing to newsletters or forums dedicated to your lighting brands to get timely updates and tips.
Finally, consider investing in a maintenance kit that includes replacement parts like fans, diffusers, or mounting brackets. Having spare components ready can save you time during emergency repairs and extend the lifespan of your setup. Check out the latest LED panel innovations to see how new features can make maintenance easier and more effective.
Remember, a well-maintained lighting setup not only lasts longer but also consistently delivers the professional look your content deserves. Make it a habit to care for your gear, and you’ll enjoy flawless results for years to come.
< >
>
Lessons I Had to Learn the Hard Way About Studio Lighting
One of the biggest realizations I had was that even the most expensive gear won’t save a poorly thought-out setup. I once spent hours adjusting my softbox, only to find that my shot still lacked depth and warmth. It was a classic case of focusing on equipment instead of technique. Learning to position my key light at the right angle transformed my results overnight. Additionally, I discovered that mixing different lighting tools, like RGB tubes with softboxes, adds layers of dimension that make your scene pop. These lessons taught me that mastery comes from understanding how each piece interacts, not just owning the latest gear.
Another painful lesson was neglecting the spectral quality of my LED panels. Cheap lights with low CRI ratings can make your skin tones look dull. Once I upgraded to high-CRI LED panels, the difference in color accuracy was astonishing—my videos looked more natural and professional. It became clear that investing in quality lighting that matches your scene’s mood is essential. And don’t forget, even the best lights need proper placement and diffusion to avoid harsh shadows or flat images. These insights have allowed me to craft scenes that truly stand out.
My Go-To Resources for Elevating Your Lighting Skills
For anyone serious about improving their studio lighting, I highly recommend checking out this guide on LED panel innovations. It helped me understand which features matter most, like adjustable color temperature and high CRI ratings. I also swear by the comprehensive softbox and RGB tube lighting guide. It offers practical tips on combining tools for cinematic effects. Lastly, for mastering natural-looking fill lights, this resource has been invaluable. These tools and guides have been my secret weapons for consistently professional results.
Your Moment to Shine with Confident Lighting
Now it’s your turn to apply these insights and elevate your studio lighting game. Remember, perfect lighting isn’t about having the most expensive gear but understanding how to use what you have creatively. With patience and practice, you can achieve stunning visuals that captivate your audience. Every successful shoot starts with a simple step: experimenting with placement, diffusion, and color temperature. So go ahead, try new setups, learn from your mistakes, and watch your content transform. The future of your lighting success begins today—are you ready to make it happen?
![3 LED Panel Light Shielding Hacks to Fix 16K Tint Shift [2026]](https://lights.creatorrigreviews.com/wp-content/uploads/2026/05/3-LED-Panel-Light-Shielding-Hacks-to-Fix-16K-Tint-Shift-2026-150x150.jpeg)


3 responses to “Best LED Panel & Key Light Strategies for Studio Lighting in 2024”
I really connected with this post, especially the part about understanding how to use lighting rather than just owning the newest equipment. I’ve found that experimenting with placement and diffusion can dramatically enhance shot quality, even with budget-friendly lights. For instance, I started out with a simple softbox and RGB strip, and by adjusting the angles and diffusion, I was able to achieve much more natural skin tones and depth. The trick is to think of lighting as an artistic tool rather than just a technical necessity. I’m curious, how do other creators manage balancing multiple light sources without it becoming overwhelming or unnatural? Do you have preferred methods for quick adjustments during shoots? I’d love to hear tips for streamlining that process—it can be tricky to keep everything looking cohesive when experimenting with different setups.
This article really resonated with me, especially the emphasis on understanding and mastering light placement and quality rather than just chasing new equipment. I’ve learned that even with older, budget-friendly LED panels, careful positioning and diffusion techniques can yield surprisingly professional results. Like you, I found that adjusting the angle and distance of my key and fill lights makes a dramatic difference in the scene’s depth and warmth. I’d love to hear how others manage to keep multiple light sources cohesive without overcomplicating their setup. Do you have go-to strategies for quick adjustments during a shoot? I find that planning a basic lighting diagram beforehand helps me stay organized and makes on-the-fly tweaks much smoother. It’s fascinating how much room there is for creativity and refinement, even with simple gear—what’s been your most effective tip for balancing multiple lights to achieve a natural look?