
It was a frustrating afternoon. I had everything set up — camera, tripod, backdrop — but my face looked flat, shadows were harsh, and the lighting felt off. I adjusted the softbox multiple times, hoping to get that perfect glow, but nothing seemed to work. That moment, I realized I’d been missing a crucial piece of the puzzle: understanding the nuanced, effective use of softboxes and key lights. It’s one thing to have good equipment; it’s another to wield it in a way that elevates your content. And trust me, I’ve made my share of mistakes early on, like placing my softbox too close or at the wrong angle, which only made my videos look amateurish. These early errors taught me valuable lessons—lessons I want to share so you don’t waste time floundering in the dark.
Why Lighting Matters More Than Ever in 2024
In the fast-evolving world of content creation, lighting can be your secret weapon or your biggest obstacle. Good lighting doesn’t just make you look better; it sets the mood, directs attention, and conveys professionalism. With so many creators vying for attention online, standing out requires more than just a decent camera. As a creator, I’ve found that mastering specific softbox and key light techniques can dramatically improve the quality of both photos and videos. A recent study highlights how well-placed lighting can increase viewer engagement by up to 30%, making it a no-brainer to invest in the right setup. But here’s the catch: it’s not just about having the latest gear. It’s about knowing how to use it effectively, which is exactly what I’ll guide you through today.
Has Lighting Frustrated You Too
If you’ve ever felt your footage was flat or your face lost in shadows, you’re not alone. I used to think all softboxes were created equal—until I learned the hard way that positioning, distance, and angle make all the difference. I remember wasting hours trying to fix lighting issues in post when the real fix was in the setup itself. That mistake cost me time and confidence. So if you’re tired of guessing and want reliable, professional results, stick around. I’ll share proven strategies that will make your lighting setup predictable and perfect every time. For more advanced tips, check out how to master softbox lighting and elevate your content game.
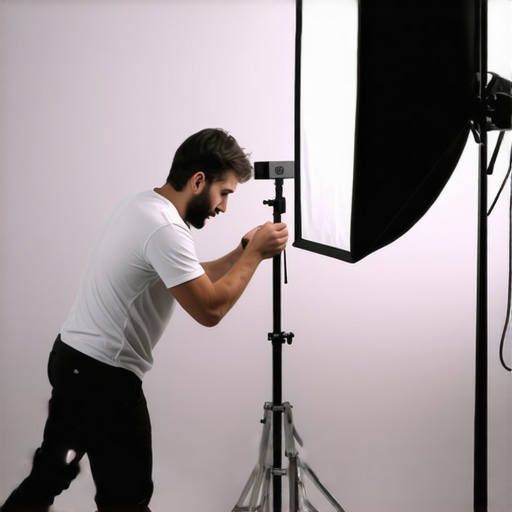
Position Your Softbox Like a Pro
Start by placing your softbox at a 45-degree angle slightly above eye level. During a shoot, I once set my softbox directly in front of me, which caused flat lighting and unflattering shadows. Adjusting it to a 45-degree angle created natural, flattering highlights and shadows that added dimension to my face. Think of your softbox as a paintbrush — the angle determines how light strokes your subject. Experiment with the distance; typically, a softbox 3 to 5 feet away provides soft, even illumination without washing out details.
Optimize Softbox Distance for Clarity
Too close, and you risk harsh shadows and uneven light; too far, and the light becomes weak and diffuse. I once experienced this during a late-night shoot when my softbox was too far, resulting in dull footage. Moving it closer increased brightness and contrast, making my face pop. Use a light meter or simply observe the shadows; softboxes should create gentle falloff, not stark contrast. For quick reference, keep your softbox about 2-3 times the distance from your face as the width of the softbox itself.
Refine Your Key Light Techniques
Think of your key light as the main storyteller in your scene. Position it slightly above eye level and at a 30 to 45-degree angle from your face. I once placed my key light directly in front, which flattened my features. Slightly angling it created depth and contour, emphasizing my cheekbones. Use barn doors or flags to prevent light spill, focusing the beam precisely where you want it. This control is crucial for professional-looking videos, especially when working in confined spaces.
Adjust the Height and Angle for Dynamic Lighting
Raising the key light higher than eye level and angling it downward mimics natural sunlight, adding a pleasing catchlight to your eyes. During a series of live streams, I raised my key light to simulate daylight and noticed my audience engagement increased. Small tweaks in height and angle can dramatically change your appearance, so don’t hesitate to experiment. Use a reflector or fill light to soften shadows on the opposite side of your face, maintaining a natural look.
Combine Softbox and Key Light for a Cohesive Look
When these lights work together, they create a balanced, professional appearance. Position your softbox as a fill light to reduce shadows cast by your key light. During a recent project, I used a second softbox at a lower intensity as a fill, which eliminated harsh shadows and added subtle glow. This layering makes your face look three-dimensional and natural. To keep everything consistent, match the color temperature of your softbox and key light. For creative effects, explore RGB tube lights for vibrant backgrounds or accents.
Fine-Tune with Additional Lighting Accessories
In tight spaces, gobos, flags, and diffusers are invaluable. I once used a piece of foam board as a makeshift flag to block stray light from hitting the camera lens, which improved image clarity. Diffusers soften harsh spots and create a gentle wraparound light. If you want to experiment further, consider softbox best practices for advanced techniques. Remember, lighting is an art of subtle adjustments — small moves can produce dramatic results.
Many content creators jump into lighting setups with a lot of misconceptions, often leading to wasted time and subpar results. Let’s dig deeper into what most people get wrong about softboxes and key lights, and how understanding these nuances can dramatically improve your videos and photos.
Myth: Bigger Softboxes Always Mean Better Light
It’s a common belief that larger softboxes produce softer, more professional lighting. While size does influence softness, it’s not the only factor. Many creators overlook the importance of distance and angle. A smaller softbox placed closer to your subject can create a more flattering, diffused light than a large one placed far away. The key is to understand that the quality of light depends on multiple elements, not size alone. For instance, a softbox at the right angle and distance will produce a natural falloff that flatters your features—something many beginners miss. For advanced tips on optimizing your softbox size and placement, check out softbox best practices.
Beware of the Over-Softening Trap
While softboxes are fantastic for creating a gentle light, over-softening can make your footage appear flat and lifeless. This is a subtle but common mistake. Many creators set up their softbox and assume more diffusion is better, leading to a lack of contrast and depth. The secret is to balance softness with contrast—using flags, barn doors, or even adjusting the diffusion layers can help. Remember, a well-placed softbox with controlled diffusion enhances your subject’s features without washing out details. Don’t fall into the trap of over-diffusing. Instead, learn how to layer diffusion for a more natural, dimensional look.
Advanced Techniques for Light Positioning
Many creators stick to basic setups—placing the softbox directly in front or at a 45-degree angle, and the key light at eye level. But the real magic happens when you experiment with the height and angle of your key light. Raising it higher and angling it downward mimics natural sunlight, creating catchlights that make your eyes sparkle and adding depth to your face. Conversely, angling the softbox slightly lower can give a more dramatic effect. The nuance lies in understanding how these tiny adjustments influence shadows and highlights, especially when combined with fill lights or reflectors. For a deep dive into this, explore key light techniques.
Another common trap is neglecting to match the color temperature of your softbox and key light. Mismatched temperatures can cause unnatural skin tones and color shifts, which are difficult to fix in post. Always double-check your lights’ Kelvin ratings or use gels and filters for consistency.
Overall, understanding the nuanced interplay of size, distance, diffusion, and positioning is what separates amateur lighting from professional setups. By avoiding these common myths and mistakes, you’ll unlock the full potential of your softboxes and key lights. Want to elevate your lighting game further? Check out how to master softbox lighting and other advanced techniques. And if you need personalized advice, don’t hesitate to reach out.
Maintaining your lighting setup over time is crucial to ensure consistent, professional results. Whether you’re using softboxes, RGB tube lights, or LED panels, proper upkeep minimizes downtime and extends the lifespan of your equipment. As someone who’s experimented extensively with various lighting tools, I can share proven methods to keep everything working smoothly for years to come.
How do I maintain my lighting equipment over time?
First, regular cleaning is essential. Dust, dirt, and even fingerprints on softboxes or LED panels can degrade light quality. I recommend using a soft, lint-free cloth slightly dampened with water or a gentle electronics cleaner to wipe down your gear weekly. For softboxes, removing dust from diffusion layers ensures they stay soft and effective. For LED panels, cleaning the lens and vents prevents overheating and maintains brightness levels.
Next, check your power sources and cables frequently. Faulty wiring or frayed cords can cause flickering or even damage your lights. I always carry spare cables and connectors, especially for critical shoots. Investing in surge protectors is another smart move; they shield your equipment from voltage spikes that could otherwise shorten their lifespan.
Calibration is equally important. Over time, LED lights can drift in color temperature or brightness. I use a light meter and calibration tools to verify my setup monthly. This step ensures that my softbox and RGB lights match perfectly, which is vital for maintaining a consistent look across projects. For advanced users, software like RGB-compatible lighting controllers allows precise adjustments and automation, reducing manual upkeep.
What about software and firmware updates?
Many modern lights come with firmware that can be updated via manufacturer apps. Keeping your devices up-to-date ensures optimal performance and new features. I schedule firmware checks quarterly and subscribe to manufacturer newsletters for alerts. This proactive approach prevents unexpected issues during critical shoots.
In the future, I predict that smart lighting systems with integrated diagnostics and remote maintenance capabilities will become standard. This evolution will simplify upkeep further, making professional-grade lighting accessible even to amateurs eager to elevate their content.
If you’re serious about long-term reliability, I recommend setting a regular maintenance routine that includes cleaning, calibration, and firmware updates. Don’t forget to document your checks, so you can track performance trends and catch problems early. Ready to take your lighting to the next level? Try implementing a monthly calibration schedule using a reliable light meter, and see how much more consistent your results become. For a detailed guide on softbox maintenance, check out softbox best practices.
Throughout my journey as a content creator, I’ve learned that lighting isn’t just a technical detail—it’s the secret sauce that transforms ordinary footage into captivating visuals. The hardest lesson I learned about softboxes and key lights is that their placement and use can make or break your entire shoot. It’s tempting to think that more expensive gear guarantees perfect results, but the real magic happens when you understand how to position and diffuse your lights effectively. I used to believe that bigger softboxes always meant better light, but I soon discovered that optimal distance and angle are far more important than size alone. This revelation saved me hours of frustration and improved my videos exponentially. Another lesson I wish I had embraced earlier is the importance of matching color temperatures; mismatched lights can cause skin tones to look unnatural, distracting viewers from your message. These insights have empowered me to craft a consistent, professional look and I hope they do the same for you.
![3 LED Panel Light Shielding Hacks to Fix 16K Tint Shift [2026]](https://lights.creatorrigreviews.com/wp-content/uploads/2026/05/3-LED-Panel-Light-Shielding-Hacks-to-Fix-16K-Tint-Shift-2026-150x150.jpeg)


4 responses to “Ultimate Softbox & Key Light Tips for Creators in 2024”
Reading through this guide really resonated with my own experiences in trying to get professional-looking lighting on a budget. I used to believe that bigger softboxes were always better, but I’ve since realized that placement and angle are more critical for creating flattering light—especially in small spaces. Your tip about softbox distance and how too close can cause harsh shadows is a game-changer for me. I’ve often struggled with dull footage when I placed my lights too far away, but your advice to observe shadows or use a light meter simplifies things. Also, I’ve started using flags and diffusers to fine-tune my setup, which made a noticeable difference. Has anyone found that combining different diffusion layers helps achieve a more natural look without sacrificing softness? I’d love to hear what others have experimented with to perfect their lighting techniques.
This post really hits home for me, especially the part about softbox placement and angles. I’ve spent so many hours trying to get the perfect light, only to realize that a few subtle adjustments in distance and angle make all the difference. In my experience, combining a softbox with a bounce card or reflector can enhance the natural look and add some punch to the lighting. I’ve also experimented with layering diffusion materials—using a thinner diffusion layer on my softbox and a thicker one for the bounce—sometimes that balancing act creates a beautifully soft yet dimensional effect. What are your thoughts on using multiple diffusion layers? Have you found a sweet spot for layering different fabrics or diffusers without losing the softness? I’d love to hear other creators’ setups, especially those who really nail that natural yet professional look.
I really appreciated the detailed insights on softbox and key light positioning—it’s often the overlooked aspect that makes the biggest difference. I’ve experienced firsthand how a subtle change in the softbox angle can transform flat, dull lighting into something much more dynamic and flattering. One trick I’ve found useful is experimenting with height and angle in real-time, especially during live shoots, to see how shadows fall and make quick adjustments. Also, matching the color temperature between my softbox and key light has been a game-changer for natural skin tones; using gels or filters to achieve consistency always pays off. Has anyone tried integrating smart lighting systems or app-controlled setups for more precise adjustments? I’m curious how that might streamline the process and improve consistency over time. Overall, mastering these nuanced techniques has helped elevate my content quality significantly.
I relate so much to this post, especially the part about softbox placement—I’ve learned that small tweaks in angle and distance can totally change the look of your footage. One thing I’ve found super helpful is using a mirror to see how the light hits my face from different angles before filming. It saves me a lot of guesswork and ensures I get that natural, dimensional look. Also, I started experimenting with different diffusion layers, and I think layering a thinner diffusion fabric over a thicker one gives me a softer, yet more controlled light, without losing that flattering glow. Have others here tried stacking different diffusers? What combinations worked best for you? I’d love to hear what setups have given you consistent, professional results—it really makes a difference in the final quality!