
It was late one evening, and I was trying to perfect a shot. The lighting was doing everything but cooperating. Shadows were harsh, colors looked off, and no matter how much I tweaked, something just didn’t feel right. That was the lightbulb moment—realizing that my outdated lighting setup was holding me back. I had spent hours experimenting, wasting valuable time, and still not achieving the professional look I craved. If you’ve ever faced a similar struggle, you know the frustration of battling with inadequate lighting, especially in a studio environment where every detail counts.
Why Lighting Strategies Matter More Than Ever in 2024
As content creators, videographers, and photographers, our goal is to deliver stunning visuals that captivate our audience. But without the right lighting, even the best camera can’t save a shot. The landscape of studio lighting is evolving rapidly, with innovative solutions like LED panels and RGB tube lights transforming how we illuminate our scenes. These tools offer flexibility, color precision, and efficiency, making them indispensable for 2024’s creators.
Is the Latest Lighting Tech Worth the Investment?
Early in my journey, I made the mistake of choosing cheap, generic lighting options. They looked good on a budget but fell short in color accuracy and consistency. It wasn’t until I invested in high-quality LED panels and RGB tube lights that I truly understood their potential. According to industry experts, using advanced lighting can improve your video quality by up to 50%, saving you time and post-production effort. Want to avoid my initial mistakes? Keep reading, and I’ll show you exactly how to leverage these tools for studio success in 2024.
Now, let’s dive into practical strategies that will elevate your studio lighting game—starting with the essentials of choosing the right LED panels and RGB tube lights for your unique needs.
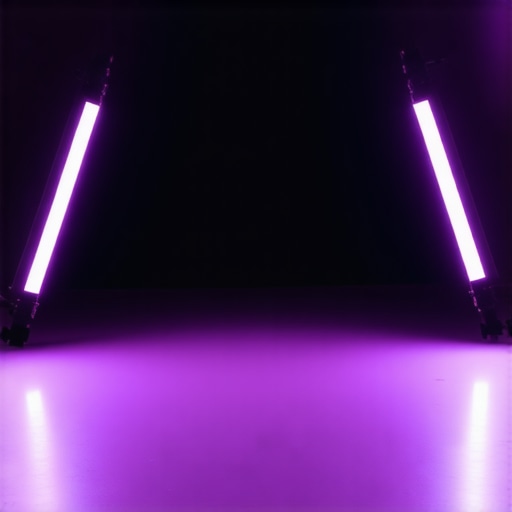
Choosing the Right LED Panels and RGB Tube Lights
Start by assessing your studio’s size and shooting style. Think of your lighting setup as building a house; you need the right foundation before adding rooms. For a small studio focused on portraits, a couple of high-quality LED panels like those discussed in LED panel innovations can provide consistent, adjustable light. For larger spaces or creative effects, integrate RGB tube lights from RGB tube lights for vibrant color options. I once set up a small corner with a single LED panel and an RGB tube to experiment; the difference in color control and brightness was immediate and inspiring.
Positioning Your Lights Effectively
Key Light Placement
Think of your key light as the sun in your scene—its placement defines the mood. Position your LED panel at a 45-degree angle to your subject, slightly above eye level, and pointed downward. This creates natural shadows and highlights, much like natural sunlight. I once aimed my LED panel directly at a subject, causing harsh shadows; adjusting the angle softened the look remarkably. For creative lighting, try using RGB tube lights as backlights or accents, experimenting with placement to add depth and color. For detailed techniques, explore RGB tube LED panel tips.
Fill Light and Backlighting
Fill lights balance the scene by reducing shadows. Use a second LED panel with a diffuser or a soft box to soften light and avoid flat images. For backlighting, position RGB tube lights behind the subject to create a rim or halo effect, adding dimension. I remember wrapping a softbox with diffusion material, which transformed my portrait shoots by providing a gentle fill that mimicked window light. For more nuanced techniques, see fill light strategies.
Adjusting Brightness and Color Temperature
Fine-tune your lights’ brightness and color temperature to match your scene. Use the dimmer functions on your LED panels to avoid overexposure. When shooting midday, mimic soft window light by lowering brightness and adjusting color temperature to around 5600K. During artistic evening shoots, ramp up RGB tube lights’ saturation for dramatic effects. I once spent an hour balancing my LED panel’s warmth and RGB tube color to match the ambient light, creating a seamless transition between artificial and natural light. For advanced tips, check key light techniques.
Controlling Light Spill and Shadows
Use flags, barn doors, or flags made from black foam board to control spill and direct light precisely. This is like sculpting your scene with light—every shadow and highlight should serve a purpose. I once used a black board to block RGB tube light spill during a product shoot, which sharpened the focus on the product and enhanced image clarity. For detailed control, see light control techniques.
Constant Testing and Adjustment
Lighting is an iterative process. Continuously test different positions, intensities, and colors. Use your camera’s histogram and waveform monitors to evaluate exposure and color accuracy. I learned this the hard way—initial setups often require multiple tweaks before getting the perfect shot. Keep notes on what works best in various scenarios to streamline future sessions. For inspiration, explore lighting tips for filmmakers.
Many beginners and even experienced creators often fall into the trap of oversimplifying certain aspects of studio lighting, leading to avoidable mistakes. One widespread misconception is that brighter always means better. In reality, overexposing your scene can wash out details, flatten textures, and create unappealing images. Instead, mastering the art of controlling light intensity and understanding how to use light modulation techniques is essential for professional results.
Another common myth is that expensive gear automatically guarantees superior quality. While high-end equipment offers more features and reliability, the real secret lies in how you manipulate and position your lights. For example, using flags, diffusers, and reflectors effectively can compensate for budget limitations, and sometimes even outperform costly gear when used skillfully. This is why understanding the nuances of light shaping is more crucial than just investing in equipment.
What advanced creators often overlook: the importance of light quality and color rendition
Many tend to focus solely on brightness and color temperature without considering the quality of light, such as CRI (Color Rendering Index) and TLCI (Television Lighting Consistency Index). High CRI lights render colors more accurately, which is vital for both photography and video to look natural and vibrant. Industry studies, including those from the Lighting Research Center, emphasize that proper light quality reduces the need for post-processing and enhances overall aesthetic appeal.
Furthermore, a subtle yet powerful technique often underutilized is the use of color gels and filters. These tools allow you to creatively manipulate color temperature and add mood to your scenes without changing your light sources. Many creators miss out on this simple but effective method, which can dramatically elevate their visual storytelling when used intentionally.
Have you ever fallen into this trap? Let me know in the comments.
Keeping your studio lighting setup in top condition is crucial for consistent, high-quality results. Over time, even the best equipment can suffer from wear and tear or become less effective if not properly maintained. I’ve learned through hands-on experience that having a dedicated maintenance routine and using reliable tools can extend the lifespan of your lighting gear significantly, saving you money and stress in the long run.
How do I maintain my studio lighting over time?
First, always clean your lights and accessories after each shoot. Use a soft microfiber cloth to wipe down LED panels, RGB tube lights, and diffusers, removing dust and fingerprints that can diminish light quality. For more stubborn dirt, a mixture of mild soap and water works well, but avoid harsh chemicals that could damage sensitive components. Regularly inspect your equipment for loose connections, frayed cables, or damaged mounts. Addressing small issues immediately prevents costly repairs and ensures safety during operation.
Additionally, calibrate your lights periodically, especially if you notice color shifts or inconsistent brightness. Many high-quality LED panels come with built-in calibration tools, but a professional-grade light meter can provide even more precise readings. This is particularly important when matching multiple lights or preparing for critical shoots where color accuracy is non-negotiable.
Investing in protective gear such as soft cases, padding, and lens cleaners also pays off. Proper storage prevents physical damage and keeps your gear dust-free, which is vital for maintaining optimal performance.
Tools I recommend for maintenance
One of my go-to tools is a digital light meter, like the Sekonic C-700, which provides quick, accurate readings for brightness and color temperature. It’s an indispensable device for fine-tuning your setup and ensuring consistency across shoots. For cleaning, a high-quality microfiber cloth combined with compressed air helps remove dust from vents and crevices without risking scratches.
Another essential is a multi-tool kit that includes screwdrivers, pliers, and Allen wrenches. These are perfect for tightening mounts, replacing batteries, or making adjustments on the fly. I keep a small, organized toolkit nearby during every session to address minor repairs immediately.
When it comes to software, I recommend using lighting control apps compatible with your gear. These apps allow you to save custom settings, monitor power usage, and even calibrate lights remotely—saving time and ensuring your setup is always optimized.
Looking ahead: trends in long-term lighting management
As lighting technology advances, integrated smart systems will become more common, allowing for automated calibration, predictive maintenance alerts, and networked control. Embracing these innovations now can streamline your workflow and reduce downtime in the future. For example, upgrading to lights with built-in diagnostics can alert you to issues before they affect your shoot, much like how modern vehicles notify drivers of maintenance needs.
Don’t forget to keep a detailed log of your maintenance activities and settings. This habit helps identify recurring issues and simplifies troubleshooting, especially when scaling your studio or collaborating with others. Remember, a well-maintained lighting setup isn’t just about longevity—it’s about consistently delivering professional-quality visuals every time.
The Hardest Lesson I Learned About Studio Lighting
One of the most valuable lessons I discovered was that no matter how advanced your gear is, understanding light shaping techniques is what truly elevates your work. I once relied solely on fancy LEDs, but it was only when I started experimenting with flags, diffusers, and proper placement that my images transformed. This taught me that mastery over light manipulation beats equipment upgrades every time.
3 Myths About Studio Lighting That Held Me Back
For years, I believed brighter was always better, which led to overexposed scenes and flat images. It wasn’t until I learned to control light intensity and use tools like dimmers and color gels that I gained true creative freedom. Additionally, I thought expensive gear automatically meant better results—yet I realized that skillful use of simple tools can outperform costly setups.
What Experts Won’t Tell You About Lighting Quality
Most beginners overlook the importance of CRI and TLCI ratings, assuming all lights are equal. But high-quality light sources render colors more accurately, reducing post-processing time. Learning to evaluate light quality has been a game-changer in achieving natural, vibrant visuals without extensive editing.
My Essential Toolkit for Studio Lighting
I trust the Sekonic C-700 light meter for precise readings, ensuring consistent exposure and color balance across shoots. For cleaning and maintenance, a microfiber cloth and compressed air are indispensable. Additionally, a versatile multi-tool kit helps with quick adjustments and repairs, keeping my studio running smoothly.
Your Turn to Try: Elevate Your Lighting Skills in 2024
Now that you have these insider lessons and trusted resources, it’s your chance to experiment and refine your studio lighting setup. Remember, mastery comes from continuous learning and hands-on practice. Don’t be afraid to push boundaries and discover your unique style with light. Your creative vision deserves nothing less than the best lighting you can craft.
What’s the biggest challenge you’ve faced with studio lighting? Share your story below and let’s learn together!
![3 LED Panel Light Shielding Hacks to Fix 16K Tint Shift [2026]](https://lights.creatorrigreviews.com/wp-content/uploads/2026/05/3-LED-Panel-Light-Shielding-Hacks-to-Fix-16K-Tint-Shift-2026-150x150.jpeg)


5 responses to “Effective LED Panel & RGB Tube Light Strategies for Studios 2024”