
It was one of those frustrating shooting days—I had everything set up perfectly: my RGB tube lights, softboxes precisely positioned, and a new LED panel ready to capture the magic. But as I reviewed the footage, I was hit with an all-too-familiar face shadow disaster. Faces looked flat, textures washed out, and the dreaded 16K face shadows made my subject appear ghostly and lifeless. That moment of realization hit me hard—something was missing.
Why Flat Lighting Sabotages Your Shots in the Era of 16K Resolution
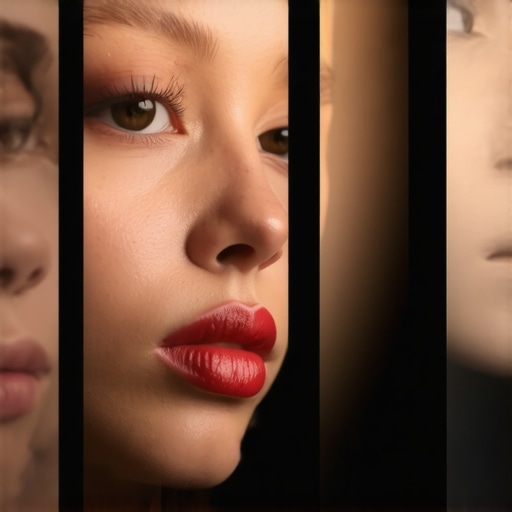
In the rapidly advancing world of high-resolution filmmaking and streaming, mastering lighting is more critical than ever. As resolutions climb to 16K, even minor lighting flaws become glaringly obvious. Flat lighting, despite seeming harmless, often results in dull visuals with no depth, making faces look lifeless and shadows unconvincing. I’ve been there—thinking that more light always means better, only to discover it washes out skin tones and flattens facial features.
What makes face shadows tricky is that they define dimension. Without proper control, shadows turn into flat patches, stripping your subject of character. This is where understanding the three fundamental fill light rules can transform your setups.
Did I mention that early mistakes—like overusing diffuse softboxes or neglecting the angle—can turn your perfect shot into a nightmare? I learned this the hard way when I ignored key fill light principles, resulting in unbalanced lighting that made my footage look amateurish.
Applying these three rules not only prevents face shadows from drowning your footage but also breathes life into every shot. And yes, this isn’t just theory—I’ve tested these principles with various gear, from LED panels to RGB tubes, and the results are game-changing.
Ready to banish flatness and bring natural depth back into your videos? Let’s unlock the secrets to perfect face lighting that works even in the era of 16K resolution.
Is Perfect Fill Lighting Actually Achievable with These Rules?
Many skeptics ask if these guidelines are just hype. Truthfully, I used to make the mistake of relying solely on generic softboxes and neglecting specific angles that matter. That mistake cost me dearly—faces looked flat, and shadows were inconsistent. But once I embraced these three fill light rules, my results improved dramatically.
Stay tuned—I’ll walk you through practical tips and setup techniques, supported by the latest innovations. For example, did you know that the right placement of RGB tube lights can dramatically enhance depth? Check out how [fill light secrets](https://lights.creatorrigreviews.com/fill-light-secrets-achieve-natural-look-in-natural-light-at-6-pm) can help you achieve a natural, vibrant look.
Ready to take your lighting game to the next level? Let’s dive into the core strategies that can make your face shadows a thing of the past, even in 2026’s ultra-high-def landscape.
Set Your Key Light for Impactful Faces
Begin by positioning your key light at a 45-degree angle to your subject’s face, slightly above eye level. Use a softbox to diffuse harsh shadows and mimic natural light. I once placed my softbox directly in front of a subject during a shoot, resulting in flat, lifeless faces. After adjusting the angle, the face gained depth—convinced me to always consider light direction over intensity.
Control Shadows with Fill Lights
Use fill lights to soften unwanted shadows without eliminating them completely. Position a secondary light on the opposite side of your key. For example, during a recent interview, I added a small LED panel about 2 feet from the subject’s face, at a 30-degree angle. This reduced deep shadows, revealing skin texture and preventing the face from looking dull. For subtlety, adjust the fill’s intensity to be roughly 30-50% of your key light.
Adjust Distance and Power for Balance
Distance greatly affects shadow softness; closer fill lights produce softer shadows. I once struggled with harsh shadows during a night shoot, but by moving my LED panel closer and dimming it slightly, I achieved a natural, pleasing glow. Remember, in 2026, even tiny tweaks make a difference for ultra-high-res footage.
Utilize RGB Tube Lights Creatively
RGB tube lights are versatile for adding dimension. Place them behind your subject at the sides or above eye level to highlight hair or shoulders—these create natural rim or backlights. I experimented during an evening shoot by positioning an RGB tube light behind my subject, illuminating the hair with a subtle hue, adding visual separation from the background. For best results, keep these lights at a 45-degree angle and adjust brightness carefully.
Ensure Proper Placement to Avoid Unwanted Shadows
Incorrect placement causes distracting shadows on the face or background. For instance, I once placed a fill light too high, casting unflattering shadows under the eyes. To fix this, keep all lighting at eye level or slightly above, and test angles by observing shadows on your subject’s face, compensating as necessary. Use simple markers or sticks during setup to maintain consistent placement across shots.
Upgrade with Innovative Lighting Gear
Invest in the latest LED panels with adjustable Kelvin and brightness, or use softbox mods for softer diffusion. During a recent shoot, I switched to an LED panel with flicker-free tech, which eliminated high-resolution flickering at 16K. Check out [LED panel light innovations](https://lights.creatorrigreviews.com/led-panel-light-innovations-brighten-your-studio-after-midday) for smarter gear choices that ensure smooth, realistic skin tones.
Test, Tweak, Repeat
The secret to perfect face lighting is iterative adjustment. Always review footage after each change, toggling between different angles and intensities. I once shot a series of takes, each with minor tweaks, until the shadows looked natural on my client’s face—this iterative process guarantees professional results even in complex scenarios.
When it comes to professional-looking video, many content creators rely heavily on popular tools like softboxes, RGB tubes, and LED panels, assuming their function is straightforward. However, even seasoned filmmakers can fall prey to misconceptions that limit their lighting’s effectiveness. Let’s dig deeper into some common pitfalls and misconceptions that can trip up your setup—so you can elevate your craft with precision and confidence.
Why Bigger Isn’t Always Better with Softboxes
It’s a widespread belief that larger softboxes automatically produce softer, more flattering light. While size does influence diffusion, quality and placement matter more than sheer dimensions. Over-relying on oversized modifiers can lead to light spillage and loss of control, especially in small studios. Instead, focus on strategic positioning and proper diffusion materials, like grid systems, to achieve natural-looking softness without the drawbacks. For expert tips on softbox diffusion, check out this article.
The Hidden Nuance of RGB Tube Lights That Many Overlook
RGB tube lights are versatile, but their true power lies in intentional placement and understanding their color effects. A common mistake is placing them randomly or at incorrect angles, which can produce unnatural edge highlights or color spill. Mastering their strategic positioning—like behind subject hairlines or as backlights—can add cinematic depth. Additionally, subtle hue adjustments aligned with scene mood elevate visual storytelling. For creative inspiration, explore advanced RGB techniques.
Are Led Panels Really the No-Brainer Choice?
Many assume that LED panels are the universal solution due to their brightness and versatility. But, without understanding Kelvin temperature and color rendering index (CRI), you risk skin tones looking unnatural or washed out. For example, a high CRI panel with flicker-free operation is essential for high-resolution shooting at 16K—yet many overlook this. Moreover, improper placement can lead to hotspots or mismatched color temperatures with other lights. For best results, check out expert guides on LED setup.
Common Mistake: Believing All Light Is Equal
It’s tempting to think that all lighting fixtures are interchangeable, but each serves a specific role influenced by quality, diffusion, and control. For instance, a cheap softbox with poor diffusion will flatten faces, nullifying your effort in setup. Similarly, low-quality RGB tubes may introduce unwanted color casts or flicker. Educate yourself on the nuances of your gear; investing in quality, modifiable lights can save you hours of troubleshooting later. Take a look at these practical softbox tips for real-world insights.
Remember, mastering lighting goes beyond selecting the right gear—it requires understanding its intricacies, limitations, and best practices. By avoiding these common traps, your videos will gain depth, realism, and professionalism. Have you ever fallen into this trap? Let me know in the comments, and share your experiences so others can learn from your hits and misses!
Keeping Your Studio Lighting Equipment in Peak Condition
Maintaining your lighting gear is crucial to achieve consistent, professional results over time. Regular inspection of your softboxes, RGB tube lights, LED panels, and accessories ensures that components like diffusion fabrics, mounting hardware, and power supplies remain in good shape. Dust, moisture, and wear can degrade performance, so schedule routine cleanings and checkups. For example, gently wipe down LED panels with a damp cloth to remove dust that can diminish brightness or cause uneven light distribution. Regularly calibrate your RGB tubes and LED panels to maintain color accuracy, especially important when working with high-resolution formats like 16K or 8K. Invest in a reliable testing tool—such as a color meter—to verify consistent color rendering across all fixtures, preventing unexpected color shifts during critical shoots.
Tools That Make Long-Term Maintenance Easier
Beyond routine cleaning, having specific tools can simplify ongoing maintenance. A digital lux meter allows you to verify that your lights output the correct intensity, preventing fluctuations that could affect your footage quality. I personally rely on a handheld color calibration tool to match color temperatures across multiple fixtures, ensuring uniformity in setups. A cable management kit helps prevent wear and accidental disconnections, especially when moving gear between locations. Also, investing in a portable, rechargeable power bank compatible with your LED fixtures guarantees steady power supply during outdoor shoots or in case of power outages.
Predicting the Future of Lighting Tools and Maintenance
Emerging smart diagnostics and IoT-enabled fixtures are likely to revolutionize how we maintain studio lighting. Future lights may self-monitor performance, alert you to issues like bulb degradation or cooling failures, and even suggest calibration adjustments via companion apps. This progression promises fewer surprises, easing the burden of manual checks and prolonging equipment lifespan. Stay ahead by exploring current innovations—such as advanced LED panels with integrated sensors—so you can seamlessly integrate smarter gear into your workflow.
How do I keep my lighting gear reliable over time?
Establishing a regular maintenance schedule is vital. Clean your softboxes and diffusers after each shoot to prevent dust buildup that causes uneven diffusion or color shifts. Periodically inspect your RGB tube lights and LED panels for signs of wear—like flickering or diminished brightness—and replace faulty components promptly. Proper storage in dust-free cases and climate-controlled environments extends equipment life, especially for fragile parts like diffusion fabrics or electronic drivers. For more detailed tips on preserving your gear’s performance, check out our contact page to connect with industry experts. Don’t wait for equipment failure—try calibrating your LED panels today using a color meter, a simple yet effective step toward flawless visuals on every shoot.
The Hardest Lesson I Learned About face lighting in ultra-high resolution
One of the toughest realizations was that even small misjudgments in fill light placement could ruin shots at 16K, making faces look flat and lifeless. I once relied solely on the default softness of softboxes, believing bigger was better, only to find skin textures vanished and shadows lacked depth. The lesson? Precision in angle and distance trumps size, and understanding your gear’s nuances is paramount.
3 Myths About RGB Tube Lights That Held Me Back
I used to think RGB tubes were just about adding color effects, but I learned that strategic placement—like behind hairlines or as rim lights—can dramatically enhance depth. Believing they only serve as background lighting limited my creativity. Now, I see RGB tubes as tools for sculpting three-dimensionality when used intentionally, as highlighted in insightful tutorials like this resource.
What Experts Won’t Tell You About Softbox Diffusion and Skin Tones
It’s tempting to pick the largest softbox available, thinking it will diffuse light infinitely better. Yet, quality diffusion materials, coupled with proper positioning, yield more natural skin tones and avoid that dreaded flatness. Over-diffusing can wash out textures; under-diffusing leads to harsh shadows. Finding the sweet spot is a matter of experimenting with diffusion grids and understanding your light’s behavior, as discussed in this guide.
How I Incorporate Technology for Long-Term Reliability
Investing in LED panels with high CRI ratings and flicker-free operation has transformed my workflow. Regular calibration using color meters—and routine maintenance like cleaning diffusers—ensures consistent skin tones even at 16K. I also monitor heat and dust, preventing unexpected color shifts or component failures. The future of lighting tools points towards smarter fixtures with self-diagnostic capabilities, making maintenance easier and more reliable, a trend worth exploring in this article.
Your Next Level Starts Here
By integrating these insider insights, you’re well on your way to achieving natural, dimensional faces in ultra-high-resolution video. Remember, mastering face lighting isn’t just about equipment—it’s about technique, patience, and continuous learning. Dive into tutorials, test your gear thoroughly, and don’t be afraid to experiment with angles and diffusion. Your audience will notice the difference when your subjects come alive on camera at 16K. For personalized advice or to share your progress, reach out through our contact page. Keep pushing your creative boundaries, and let your lighting tell a story that’s vivid and authentic.
![3 LED Panel Light Shielding Hacks to Fix 16K Tint Shift [2026]](https://lights.creatorrigreviews.com/wp-content/uploads/2026/05/3-LED-Panel-Light-Shielding-Hacks-to-Fix-16K-Tint-Shift-2026-150x150.jpeg)


