
I remember the first time I tried to shoot a portrait and ended up with faces that looked more like ghostly masks than vibrant expressions. It was frustrating—every time I thought I had the lighting just right, the subject’s face appeared washed out or unnaturally pale, especially under my LED panel lights. That waking moment of disappointment taught me that managing facial tone is a subtle art, and it’s more complex than just adding more light. It’s about nuanced control—using the right fill light tint to breathe life into dull or flat skin tones, even when working with the latest gear in 2026.
The Power of 4 Fill Light Tints
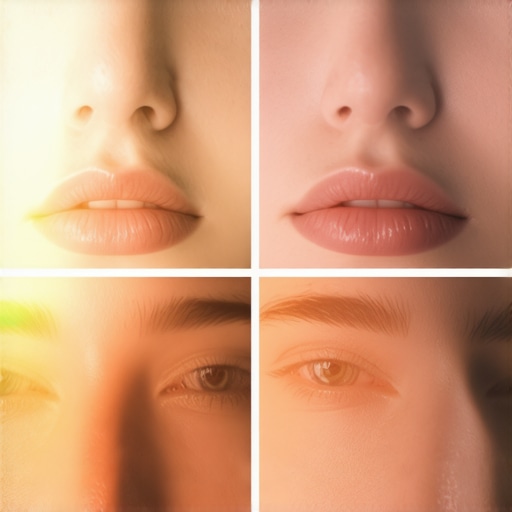
If you’ve been battling pale faces in your portraits, you’re not alone. The solution lies in refining how we use fill light—adjusting its tint to complement the subject’s skin and environment. Today, I promise to share how I cracked the code with four versatile fill light tints that work across various shooting conditions. Whether you’re working with softboxes at dawn, RGB tube lights at sunset, or LED panels midday, these tips can help you craft portraits with warm, natural, and lively tones that truly highlight your subject’s personality.
Is It Really Worth the Effort to Tweak Fill Light Tints?
Early in my journey, I made the mistake of ignoring the importance of color harmony—assuming a simple white fill light was enough. That led to muted or unbalanced skin tones. Once I started experimenting with subtle tint adjustments—adding a touch of amber or magenta—I saw an immediate transformation. According to photography experts, tiny tint variations can significantly influence how skin appears on camera, impacting the overall mood and realism of the image (source). This simple but powerful tweak can save hours of post-processing and elevate your portraits to professional levels.
Now, as we step into the practical aspects, you’ll learn how to choose and apply these four fill light tints effectively—no more ghostly faces, just vibrant, healthy-looking skin that pops in your 2026 portraits. Ready to turn your lighting struggles into confident mastery? Let’s dive into the secrets that can redefine your portrait lighting approach.
Choose Your Fill Light Tint Carefully
Start by selecting a fill light that complements your skin tone and environment. For example, if you’re shooting outdoors at sunset, a warm amber tint will enhance natural warmth. If you’re indoors with cooler ambient light, magenta or subtle pink tints can add vibrancy. I recall a shoot where I used a slight amber filter on my LED panel, which instantly warmed up my model’s skin, making her look more lively. Using a color correction gel or adjusting your RGB tube light’s hue settings can achieve this effect efficiently instead of post-processing.
Adjust the Tint to Match Lighting Conditions
Set your fill light’s tint to balance with your key light source. Think of it like seasoning a dish—you want just enough to enhance without overpowering. When I worked with my softbox as a key light and added a slight magenta tint to my fill, the skin tones looked more natural against the background. If working with RGB tube lights, tweak their hue settings directly—many models let you dial in precise color temperatures or tint ratios. Avoid creating a mismatch that draws attention away from your subject; instead, aim for harmonious tones.
Employ Practical Tools for Tint Control
Use gels, built-in RGB controls, or color filters to fine-tune your fill light. For instance, a simple amber gel can be clipped onto your LED panel or softbox to impart warmth. If stability is key, consider programmable RGB lights where you can save custom tint presets. During a recent indoor portrait, I used a magenta filter on my softbox and found the skin tone popped beautifully, even under harsh overhead lights. Remember, the goal is subtlety; too much tint variation can look unnatural and distract the viewer.
Utilize Fill Light Ratios and Positioning
Controlling the tint alone isn’t enough—you must position your fill light correctly. Keep it at about 45 degrees to the subject, slightly below eye level, to soften shadows on the face. In a messy trial, I placed my RGB tube light too close and with an aggressive magenta tint, which resulted in exaggerated skin color shifts. Adjust the distance and intensity to balance the effect. Experiment with ratios like 1:2 or 1:3—placing more fill light reduces shadows but increases overall ambient, so find your sweet spot for natural skin tones. For detailed ratio guides, check out this resource.
Balance Tint with Post-Processing
Finally, even with well-crafted lighting, minor adjustments during editing can perfect your portraits. Use software tools to subtly refine skin tone hues, ensuring your fill light tint’s effect harmonizes naturally. However, rely primarily on in-camera techniques to save editing time and preserve authenticity. I found that minor tint tweaks, matched with proper positioning, dramatically reduced the need for extensive color correction later. Practical execution beats guesswork—so test your setup before the shoot and adjust accordingly.
Many photographers and videographers often assume that simply choosing the right device—be it a softbox, LED panel, or RGB tube—is enough for perfect lighting. However, this belief overlooks numerous nuanced pitfalls that can derail even experienced creators. One widespread myth is that higher wattage or lumen output guarantees better skin tones; in reality, it’s about quality and placement. I’ve seen countless setups where powerful LED panels were cascaded directly into subjects’ faces, resulting in harsh shadows and unflattering textures. Instead, understanding how to diffuse and position these lights appropriately is crucial—something I explore in detail in my guide on softbox lighting techniques. Additionally, many believe that RGB tube lights are foolproof for color accuracy, but without proper calibration and understanding of color temperature nuances, they can introduce unwanted tints or flickering, as discussed in RGB tube light Hertz fixes. Another common mistake involves neglecting the ambient environment—relying solely on artificial light sources without considering natural reflections or background colors can lead to unnatural skin tones and visual dissonance. On the topic of softboxes, some think that larger size always equals softer light, but the distance from the subject and internal diffusion material matter just as much. An overly large softbox placed too close can create flat, dull lighting, avoiding the depth you want. This ties into the importance of softbox depth strategies. Now, what about the LEDs? The misconception that all LED panels are equally flicker-free is widespread. Yet, many models still suffer from high-frequency flickering, especially at certain shutter speeds, which can ruin high-quality video. Be sure to select models with proven flicker-free performance, as outlined in LED panel fixes. Lastly, the adage that “more lights equal better results” can backfire if not balanced correctly; cluttered or uneven lighting setups lead to inconsistent skin tones and distracting shadows. Balance, calibration, and understanding the interplay between your key light, fill light, and background are essential—this is a mastery that separates amateurs from professionals. Want to elevate your lighting game? Check out my in-depth articles on fill light secrets and key lighting techniques. Have you ever fallen into this trap? Let me know in the comments.
Keeping Your Lighting Setup in Peak Condition
Investing in high-quality equipment is only half the battle; ensuring it remains reliable over time is the key to consistent results. For my own studio, I rely on a combination of regular maintenance routines and precise tools that guarantee longevity and performance. One tool I swear by is the Lenspen Microfiber Cleaning Kit, which I use weekly to keep softbox diffusers and LED panel surfaces free from dust and fingerprints, preventing color distortions and glare issues. Regular cleaning of diffusion materials and reflectors ensures that softboxes maintain their intended softness and that LED panels deliver accurate color rendering aligned with LED panel light innovations. These small maintenance practices protect your investment and save you time during critical shooting moments.
Furthermore, I recommend deploying a spectral meter like the Sekonic C-800 for calibration of RGB tube lights, ensuring that color splits stay precise over long periods. Calibration addresses subtle shifts in hue caused by temperature variations or component aging, which can otherwise introduce unwanted tints or flicker—issues discussed extensively in HDR lighting adjustments. These investments in calibration tools and routine checks prolong the lifespan of your lights and maintain their color fidelity, crucial for immersive visual storytelling.
How do I maintain my lighting equipment over time?
Developing a routine for checking and maintaining your lights is essential. I schedule monthly inspections to wipe down surfaces, check for loose connections, and verify color output consistency across all devices. For example, during a recent update, I used a light-shielding hack to prevent flare buildup, which can degrade diffusion material over time. Keeping spare parts like gels, filters, and cables in organized storage helps me swap them quickly when needed, minimizing downtime. This proactive approach ensures that my softboxes and LED panels perform optimally during shoots, avoiding unexpected color shifts or flickering that could compromise footage quality.
Looking ahead, I believe automation will play a larger role in maintenance, with smart sensors predicting when components require replacement—much like the predictive diagnostics used in high-end cinema lighting fixtures. Adopting such technologies will be a game-changer for freelancers and studios aiming to keep their gear ready without manual oversight.
To implement a robust maintenance plan, start with simple tools like spectral meters for calibration and include regular cleaning schedules using dedicated equipment. Try applying this routine to your RGB tube lights to experience improved color accuracy and stability during long shooting days. Staying vigilant about your tools’ health not only extends their lifespan but also ensures your lighting remains predictable and professional, even after years of use.

Illustration of a professional lighting technician performing routine maintenance on LED panels and softboxes, emphasizing the importance of care and calibration in achieving consistent results.
For in-depth guidance, many top professionals consult resources that detail best practices for maintaining advanced lighting systems. Sharing these routines with your team or fellow creators can foster long-term success and reduce unforeseen technical issues that disrupt your creative flow.
Remember, the right tools and consistent care are foundational to mastering lighting that stands the test of time. Start implementing these habits today to keep your workspace performing at its best—your future shoots will thank you.
Over my years behind the camera, I’ve learned that even the most sophisticated lighting gear won’t save a portrait if the subtle art of tint management is overlooked. A common pitfall is assuming that high-powered LEDs or the largest softboxes automatically deliver vibrant, natural skin tones. The true magic lies in the strategic use of fill light tints, which, when mastered, can turn dull, ghostly faces into lively, authentic expressions that resonate deeply. This insight didn’t come overnight; it was born from countless experiments, mistakes, and moments of revelation, reinforcing the idea that creative success often hinges on nuanced detail rather than equipment alone.
The Unexpected Value of Tint Simplicity in Complex Setups
I used to think complex color gels and multi-hued RGB settings were necessary for professional results. However, I realized that sometimes, simplicity trumps complexity when you understand the core principles—like the four fundamental fill light tints discussed here. These tints serve as the foundation for achieving consistency and vibrancy, especially in unpredictable shooting environments or under mixed lighting conditions. When I adopted a purposeful approach—testing small tint adjustments on a grey card before shooting—I found that not only did my workflow improve, but my confidence skyrocketed, transforming my creative process into a reliable craft.
Embracing Imperfection as a Creative Tool
One of the most empowering lessons I learned is that perfect skin tones are a myth—what matters is intentionality and harmony. For instance, a slight magenta tint on my fill light can breathe life into cool indoor scenes, while a dash of amber warms up early-morning shoots. Recognizing these subtle shifts as part of my creative palette helped me accept imperfections as opportunities for unique expression rather than flaws to hide. This mindset has liberated many of my sessions, allowing spontaneity to flourish and results to feel genuine rather than overproduced, elevating my portraits beyond the technical into the emotional realm.
Now, How Will You Incorporate These Lessons?
As you reflect on your own lighting setups, consider experimenting with the four fill light tints I shared. Think of them as tools for storytelling—each tint telling a different part of your subject’s story, from warmth and vitality to cool distance and serenity. Remember, mastering the art of tint control requires patience and curiosity—try mixing, matching, and refining until the skin tones resonate authentically. Challenging your assumptions and embracing these nuanced techniques can elevate your portrait work in ways you never imagined. Feeling inspired to give it a shot? Share your experiences or questions below—let’s learn together and push our creative boundaries further than ever before.
![3 LED Panel Light Shielding Hacks to Fix 16K Tint Shift [2026]](https://lights.creatorrigreviews.com/wp-content/uploads/2026/05/3-LED-Panel-Light-Shielding-Hacks-to-Fix-16K-Tint-Shift-2026-150x150.jpeg)


