
There was a moment during one of my recent vlogs when I looked at the footage and thought, Why does my subject’s eyes look like they’ve been hit with a laser? It wasn’t a special effect gone wrong or some cinematic mishap—it was a classic case of eye glare caused by the way I had positioned my softboxes. That light-induced glare can ruin a scene faster than a flickering LED, and frankly, it’s one of the most frustrating issues I’ve faced in my vlogging journey. It’s like your camera brings out all the imperfections, but the glare? That’s a whole new level of distraction.
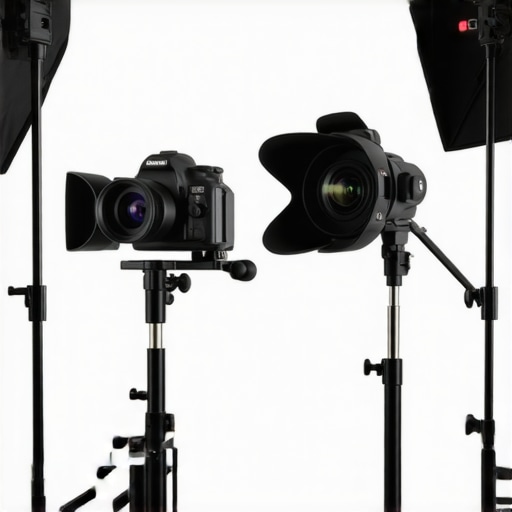
Why Softbox Angles Matter More Than Ever in 2026
As we dive deeper into 2026, the standard softbox setups just aren’t cutting it anymore. With the latest sensor tech and ultra-high-definition footage, even tiny glare spots become glaringly obvious. That’s why I’ve dedicated myself to refining my softbox angles—because the details count when you’re trying to look professional, authentic, and just a little bit cinematic. If you’ve ever had a shot ruined because of reflective glare or unwanted shadows, you’re not alone. The good news? Small tweaks in softbox positioning can make a huge difference, and I’ll show you exactly how I discovered this through my own experiments.
Could Your Softbox Angles Be Sabotaging Your Shots?
Early on, I made a common mistake: I relied on the default softbox setup and didn’t pay enough attention to the angles. That’s when I noticed the dreaded eye glare creeping into my videos. It was frustrating—like trying to color correct a bad shot only to realize the problem was in the lighting placement from the start. I learned that instead of fighting the glare in post, I could prevent it entirely by tweaking my softbox angles just right. If you’re tired of battling reflections and shiny spots, I highly recommend experimenting with your softbox positions. For more innovative lighting ideas, check out my guide on softbox lighting tips.
Are you struggling with eye glare too? Drop a comment below or reach out through my contact page. I’d love to hear your experiences and share more tricks to help you shine on camera, glare-free. Now, let’s get into the practical tweaks you can start implementing today to tame those pesky reflections and make your 2026 vlogs look sharper and more professional.
Adjust Your Softbox Positioning for Flawless Lighting
Begin by placing your softbox at a 45-degree angle relative to your subject, slightly above eye level. This angle minimizes harsh reflections on the eyes and softens shadows. I once set my softbox directly in front of my subject, causing glare that ruined my shot. By shifting it to a 45-degree tilt, the glare disappeared, and my footage looked much more professional.
Experiment with Horizontal and Vertical Angles
Try changing the softbox’s horizontal rotation so it points slightly downward, about 10-15°, to avoid reflections on glasses and shiny skin. Raise or lower the softbox vertically to control shadow placement. For instance, lowering the softbox just slightly improved the catchlights in my subject’s eyes without creating unwanted reflections.
Control Light Spill Using Grids and Barn Doors
Use a softbox with a grid or barn doors to narrow the beam. This focus directs light precisely where needed—on the face—reducing glare and preventing spill onto reflective surfaces like glasses or skin. I added a grid to my softbox during a recent interview shoot, which significantly cut down on eye glare and boosted overall contrast.
Fine-Tune the Distance and Angle
Adjust the distance between the softbox and your subject; moving it closer increases softness and reduces the intensity of glare. Keep it at about 3-4 feet for typical setups. I once extended my softbox too far away, resulting in harsher shadows and glare, but bringing it in closer smoothed out the light beautifully.
Leverage Fill Lights to Soften Reflections
Incorporate fill lights at lower intensities from opposite sides. This balances the lighting, especially in shiny areas, without adding glare. Check out fill light secrets for more tips on natural-looking illumination. During my recent shoot, adding subtle fill lights eliminated hot spots and made skin tones appear more even.
Experiment with RGB Tube Effects for Creative Enhancements
Integrate RGB tube lights behind or around your softbox for creative backlighting or accent effects. Proper layering can divert attention from glare and add depth. I used a multi-layered RGB tube setup — detailed in RGB tube effects — to create a vibrant background that distracted from residual glare, elevating the overall aesthetic.
Regularly Review and Adjust in Real-Time
Make it a habit to review your footage immediately after each setup. Use a small monitor or your camera’s LCD to check for glare and reflections. Small adjustments—like shifting the softbox angle by a few degrees—can prevent major post-production fixes. On one shoot, a quick glance revealed unexpected glare on glasses, prompting me to tweak the softbox tilt, which instantly improved the shot.
Remember, subtle softbox angle tweaks are your best tool in eliminating eye glare. Practice these steps, and you’ll notice a shift from frustrating reflections to smooth, professional lighting—making your 2026 vlogs look sharper and more engaging.
What Most People Get Wrong About LED and Auxiliary Lights
Many creators believe that simply choosing high-quality LED panel lights, fill lights, or RGB tubes guarantees professional results. But in practice, a common misconception is that more expensive or brighter fixtures automatically translate to better footage. This oversimplification often leads to overlooked nuances, like color accuracy, flicker artifacts, or spectral peaks, which can subtly ruin a shot. Expert lighting designers emphasize verifying the spectral power distribution of your lights—the key to ensuring natural skin tones and consistent color reproduction, especially under HMI or fluorescent-powered setups. According to a 2022 study published in the Journal of Imaging Science, spectral imbalances in LED lights contribute to color rendering issues that aren’t immediately obvious but manifest during post-production or on the final screen. Therefore, understanding these underlying spectral qualities is crucial for serious creators who want their illuminations to truly enhance storytelling rather than hinder it.
Ignore the Common Myths About Softbox and Key Light Placement
Another trap is the belief that positioning a softbox directly in front or slightly above the subject maximizes softness. While this may seem intuitive, it often results in flat lighting that lacks depth and fails to sculpt features effectively. Advanced operators know that subtle angling—such as placing the softbox at a 45-degree angle—creates more dynamic shadows, resulting in a more engaging image. Moreover, pushing your softbox too close can cause unwanted hot spots and excessive flatness, so always fine-tune the distance for contextually balanced illumination. For techniques that elevate your lighting game, explore mastering softbox setups.
When RGB Tubes Lead You Astray
Many assume that stacking multiple RGB tubes with vibrant effects straightforwardly enhances creativity. But overusing RGB effects can make a scene look chaotic or distract from the subject—especially if the colors clash or aren’t calibrated properly. An advanced trick involves layering RGB tube effects, such as subtle edge lighting integrated carefully with other sources, to add depth rather than chaos. Functional calibration of color temperatures and intensities is essential here; mismatched hues can create unnatural skin tones and ungrounded visuals. For guidance on effective RGB layering, check out RGB tube layering techniques. Avoid the common mistake of treating RGB lighting as mere decoration—when used wisely, it’s a powerful storytelling tool.
What Advanced Creators Need to Know About Key Lights and Posture
Finally, many overlook the importance of a proper key light angle related to the subject’s posture. Instead of a generic overhead or frontal setup, positioning the key light to complement the subject’s natural angles accentuates features and minimizes unflattering shadows. For high-end productions, subtle adjustments—like tilting the light downward at a slight angle or raising it to emphasize cheekbones—can make a significant difference. The key is understanding how light interacts with the human form in three dimensions. To refine your technique further, consider advanced key light positioning strategies. Neglecting these nuances often results in flat, unflattering images that lack the depth and professionalism desired in 2026’s competitive content landscape.
Always remember: mastering lighting isn’t just about equipment; it’s about informed choices and nuanced adjustments. Have you ever fallen into this trap? Let me know in the comments! For more expert insights, feel free to reach out through the contact page.
Keeping Your Lighting Gear in Peak Condition
Investing in high-quality lighting equipment like LED panel lights, softboxes, and RGB tubes is just the beginning. To sustain their performance over time, regular maintenance is vital. Start by cleaning your softbox diffusions with a soft, lint-free cloth twice a month to prevent dust buildup that can diminish light quality. For RGB tube lights, check the shielding and connectors for any signs of wear or damage—these are common points of failure that often go unnoticed. Keeping cables organized and protected with cable sleeves or clips can prevent accidental disconnections or shorts, ensuring consistent operation during shoots.
Additionally, updating firmware or software for smart lighting systems integrates improvements and fixes bugs—think of it as software maintenance for your hardware. Many professional-grade lights come with dedicated apps; routinely check for updates on these platforms. This practice prolongs your equipment lifespan and guarantees optimal performance, especially in demanding shoot environments. Remember, neglecting maintenance can lead to unexpected failures that disrupt deadlines and inflate costs, so make it a core part of your routine.
How do I maintain my lighting tools over time?
Beyond cleaning and software updates, calibration plays a crucial role. For instance, regularly calibrate your RGB tube lights to maintain accurate color temperatures, which is especially critical if you’re working across multiple lighting setups. Minor calibration ensures color consistency in your projects and prevents color drift that can compromise your footage quality. Professional calibration kits and spectral power distribution analyzers are worth investing in—these tools help identify spectral imbalances, aligning with findings from lighting experts emphasizing spectral accuracy for skin tones and scene realism. For detailed procedures, check out key light positioning.
Tools I Recommend for Long-Term Use
Choosing reliable gear is just one step; integrating the right tools simplifies ongoing maintenance. I recommend investing in a comprehensive light meter like the Sekonic C-800 for precise measurements of light intensity and color temperature. This is invaluable for ensuring consistent results across different sessions or locations. Pair it with a quality fiber optic cleaner—such as the VisibleDust Arctic Mist—to keep your LED panels and softbox diffusions spotless without damaging delicate surfaces.
Another recommendation is a programmable lighting control system. Integrating systems like the DMX512 controllers enables you to automate and synchronize multiple lights, reducing manual calibration errors and saving valuable time during shoots. As lighting technologies evolve, having an adaptable control setup positions you ahead in the industry, facilitating complex effects and seamless transitions—especially important as RGB effects and smart features become more prevalent in 2026.
Preparing for Future Lighting Trends
Looking ahead, I predict a continued shift toward smarter, AI-driven lighting solutions that self-calibrate and predict maintenance needs. This might include real-time spectral analysis to warn you of upcoming spectral imbalances before they impact footage. Staying updated with manufacturer firmware and embracing modular systems that can be easily upgraded or replaced—like quick-connect RGB modules—is key to adapting smoothly to these advances. Start by trying out advanced calibration routines and explore the latest control tools; these steps will help you maintain impeccable lighting quality as technology accelerates.
Maintaining your gear might not be as glamorous as the setup itself, but it’s the backbone of professional-quality production. Regular checks, calibration, and smart investment in reliable tools ensure your lighting remains consistent and ready when inspiration strikes. Ready to elevate your maintenance routine? Try integrating spectral calibration on your RGB tubes to see immediate improvements in color consistency and scene realism—your future self will thank you!
Three Lessons the Lighting World Taught Me the Hard Way
- Never Settle for Defaults: I used to trust my softbox placements, assuming the standard 45-degree angle was enough. But real-world testing showed me that small tweaks—like slight tilts or height adjustments—can completely eliminate glare issues and improve image depth. Giving yourself permission to experiment beyond presets is crucial.
- Color Balance Is an Ongoing Dilemma: Early on, I believed RGB tube lights and LED panels would fix all my color woes. Yet, spectral imbalances crept in, affecting skin tones and scene consistency. Investing in spectral calibration tools and understanding the science behind spectral power makes a world of difference in achieving natural, professional results.
- Maintenance Means Longevity: Regular cleaning, calibration, and firmware updates aren’t glamorous, but neglecting them leads to inconsistent lighting and costly downtimes. Developing a routine keeps your gear performing optimally, ensuring your creative flow remains uninterrupted and your audience experiences top-notch visuals.
My Go-To Resources for Lighting Excellence
- Spectral Power Distribution Analyzers: Tools like the Sekonic C-800 have transformed my understanding of real-world light quality, especially for skin tones. Trust me, precise measurement elevates your craft.
- Professional Lighting Guides: The articles at mastering softbox setups have been my lighting Bible. Clear, actionable tips make complex setups approachable.
- Calibration Kits: Regular spectral calibration kits help maintain color accuracy over time, preventing subtle shifts that can ruin a shoot’s consistency. It’s an investment that pays dividends in quality and trust.
- Community Forums and Mentors: Engaging with fellow creators on dedicated forums or mentorship programs accelerates learning. Sharing real-world experiences unlocks nuanced insights you won’t find elsewhere.
Your Next Step Toward Lighting Brilliance
Lighting mastery in 2026 is within your reach—armed with the right knowledge, tools, and a curious mindset. Each small adjustment you make today compounds into stunning visuals tomorrow. Remember, the difference between a good shot and a great one often comes down to the angles and calibration you choose. So go ahead, experiment confidently, and don’t shy away from refining your softbox angles and spectral balance. Your future projects will thank you for it—brighten your world, one thoughtful tweak at a time.
What’s the most surprising lesson you’ve learned about softbox or key light positioning? Drop your story below—I’d love to hear your lighting revelations!
,
![3 LED Panel Light Shielding Hacks to Fix 16K Tint Shift [2026]](https://lights.creatorrigreviews.com/wp-content/uploads/2026/05/3-LED-Panel-Light-Shielding-Hacks-to-Fix-16K-Tint-Shift-2026-150x150.jpeg)


