
Ever spent hours setting up your shoot only to realize that your subject looks flat, dull, or just doesn’t pop on camera? I’ve been there. I remember a time when I thought I had everything perfect—my camera, my backdrop, the angle—only to see my footage come back looking uninspiring. It was a frustrating moment, and truthfully, I almost gave up on achieving that professional look. Then I discovered the secret: proper fill lighting using RGB tubes and softboxes. Once I cracked that code, everything changed. Your lighting setup can make or break your visuals, especially in 2024, with the incredible tech options available. Today, I’ll share the practical techniques I’ve learned to help you avoid my early mistakes and get that balanced, natural glow you’re craving.
Why Fill Light Matters More Than Ever in 2024
In the past, simple lighting setups worked fine for casual content. But today’s viewers expect more. They crave crisp, vibrant visuals that feel authentic and engaging. That’s where fill light becomes essential. It’s not just about illuminating your face; it’s about shaping your scene, controlling shadows, and achieving that perfect balance. RGB tube lights and softboxes are game changers because they offer versatility and control that traditional lighting simply can’t match. With RGB tubes, you can add creative color accents or subtle hues that enhance mood. Softboxes, on the other hand, provide soft, even light that mimics natural daylight—crucial for portraits and product shots. Combining these tools effectively can elevate your content from amateurish to professional in mere minutes.
Has this ever happened to you? You set up your lights, but the results still fall flat. It’s confusing, right? I used to make a critical mistake early on: I thought more light was always better. Turns out, it’s about smart placement and choosing the right tools. Trust me, mastering fill light is a skill—one that takes practice but pays off big time. Want to learn how to avoid these pitfalls and truly harness the power of RGB tube and softbox lighting? Let’s dive in.
If you’re serious about making your videos, photos, or streams stand out, mastering your fill light setup is non-negotiable. Ready to transform your scenes? Keep reading, and I’ll guide you through the most effective, easy-to-implement techniques for 2024. And if you have questions or hit a snag, don’t hesitate to reach out through our contact page.
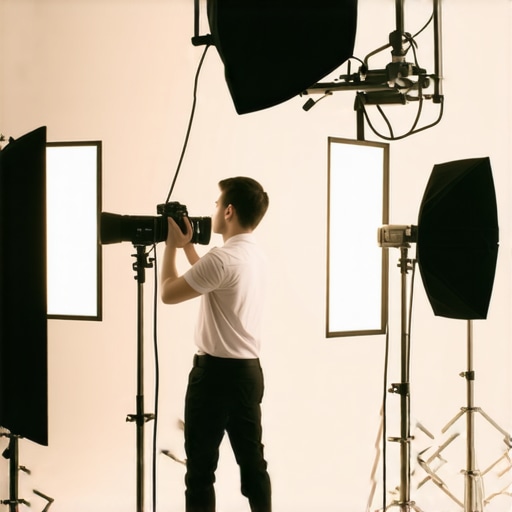
Position Your Fill Light Precisely
Think of your fill light as the gentle hand that smooths out harsh shadows. I recall a shoot where I placed my RGB tube light too far to the side, creating an uneven glow that looked unnatural. To fix this, I moved the tube closer to the subject, about 45 degrees off-center, and at eye level. This placement ensures the light wraps around your face or object, softening shadows without overpowering the key light. Use a softbox on a stand to add a broader, diffused fill that mimics natural daylight. Experiment with distance: closer means softer shadows, farther creates more contrast. For detailed instructions, check our softbox setup tips.
Adjust Your RGB Tube for Creative Balance
RGB tubes aren’t just for color; they’re your creative palette. During my first try, I set the tubes to a static white but found the scene flat. Instead, I toggled between subtle hues—like a warm amber or cool blue—to add depth. Use your RGB app or controller to dial in the right hue and intensity. For natural-looking skin tones, keep the RGB tubes in the warmer spectrum (around 3000-4000K) and balance them with your softbox. This combo creates a balanced, vibrant look that pops without looking artificial. Want more ideas? Explore creative effects with RGB tubes.
Balance Your Scene for a Natural Look
Achieving a natural, professional vibe hinges on proper balancing. I once over-illuminated with my RGB tubes, washing out the scene. To fix this, I reduced the RGB brightness to about 60% and tweaked the softbox to match. A quick tip: use your camera’s histogram to ensure the exposure isn’t too high or low. The goal is to see detail in both shadows and highlights. If shadows are still too stark, slightly reposition the fill light or add a reflector for bounce light. For more advanced tips, see our scene balancing techniques.
Control Shadows with Smart Placement
Shadows are the sculptors of your scene—use them intentionally. During a recent shoot, I placed my softbox too close, creating a harsh shadow on one side. I moved it back a few inches and angled it downward, softening the shadow and making the lighting more flattering. Remember: small changes in angle and distance can dramatically improve the look. Think of shadows as a painter’s brush—use them to add dimension, not distraction. Need detailed positioning advice? Check our shadow control guide.
Fine-Tune Your Settings for 2024
Every scene is different, so calibration is key. Use your camera’s settings—ISO, aperture, and shutter speed—to match your lighting. During my last setup, I lowered ISO and increased shutter speed to reduce grain and keep colors vivid. Also, consider shooting in RAW for maximum post-processing flexibility. For expert recommendations, see our lighting calibration tips. Remember: consistent practice and small adjustments lead to professional results.
Many creators believe that mastering fill lighting is just about stacking as many lights as possible or always opting for the brightest setup. This misconception can lead to flat, unnatural scenes that lack depth and nuance. The truth is, the real skill lies in understanding the subtle intricacies of placement, color temperature, and intensity control. For instance, I’ve seen setups where creators think that RGB tubes should always be set to vibrant colors, but in reality, subtle hues often add more realism and mood—something that often gets overlooked. Check out our comprehensive guide for creative ideas on color blending.
Are You Falling for the Biggest Fill Light Trap?
One common trap is over-reliance on fill lights to fix underexposed shots instead of proper scene planning or key light positioning. This can result in a scene that looks overly flat or artificially lit, destroying the natural feel you’re aiming for. Instead, the focus should be on intelligent placement—placing your RGB tubes and softboxes at angles that complement natural shadows, not eliminate them entirely. Remember, shadows are not enemies; they are tools to add dimension. For more advanced techniques, see our article on key-light techniques.
Another misconception is that high color saturation always adds drama. This is false—subtlety often creates more impact. Overusing vibrant colors can distract viewers and make footage look unnatural. Aim for a balanced approach, adjusting RGB hue and brightness thoughtfully. Experts like Peter McKinnon emphasize that mastery of color control is more about finesse than intensity. Learn more about color finesse here.
How Do Advanced Creators Use Fill Light to Elevate Scenes?
Advanced creators don’t just illuminate; they sculpt scenes. They use RGB tubes and softboxes to create mood, depth, and visual interest—sometimes even mimicking natural lighting conditions, like the glow during golden hour or the cool tones of moonlight. This level of control requires understanding the nuances of color temperature, angle, and dimming. For example, slightly warming your RGB tubes while keeping your softboxes neutral can simulate sunset lighting, adding warmth and richness to your scene. For detailed scene-balancing techniques, see our scene balancing guide.
Be cautious: many get caught up thinking that more complex setups always mean better results. In truth, simplicity combined with precision lighting is often more effective. Practice small adjustments, use your camera’s histogram to check exposure, and remember that sometimes less is more. If you want to avoid common pitfalls, visit our softbox setup tips for professional-looking results.
In the end, understanding these hidden nuances can dramatically improve your lighting skills. It’s about finesse, control, and strategic thinking—not just adding more lights or brightness. So, next time you set up your scene, ask yourself: am I sculpting with light or just illuminating? For ongoing tips and expert advice, don’t hesitate to reach out. Have you ever fallen into this trap? Let me know in the comments!
In the fast-paced world of content creation, maintaining your lighting setup is crucial to ensure consistent, high-quality results. Over time, RGB tubes and softboxes can experience wear and tear, affecting their performance. Regular maintenance, using the right tools, and understanding long-term care can save you money and headaches. Today, I’ll share my tried-and-true methods for keeping your lighting gear in peak condition, so your scenes always look professional and polished.
Stay on Top of Your Equipment with Smart Tools
Investing in quality tools not only makes maintenance easier but also extends the lifespan of your gear. For example, I rely on a digital multimeter to check the continuity and voltage of my RGB tubes. This simple device helps identify early signs of electrical issues before they cause complete failure. Additionally, using a microfiber cloth and compressed air for softboxes and LED panels keeps dust and dirt at bay, maintaining optimal light output. For cable management, I prefer Velcro straps; they’re reusable and prevent tangles that can cause damage over time.
Implement Routine Checks and Cleaning
Set a weekly schedule to inspect all your lights. Look for signs of flickering, dimming, or color inconsistencies. When needed, replace worn-out connectors or damaged lenses. Cleaning your softboxes regularly with a gentle brush or vacuum prevents dust buildup, which can reduce light diffusion quality. RGB tubes, being sensitive to dust and moisture, benefit from occasional wiping with a damp cloth and checking for any cracks or discoloration. These small steps ensure your lights stay bright and accurate, saving you from unexpected failures during critical shoots.
Long-Term Storage Strategies
Proper storage is essential to prolong your equipment’s lifespan. Store RGB tubes in their original boxes or padded cases, avoiding extreme temperatures and humidity. For softboxes, fold and store them in a dry, dust-free environment. I recommend using silica gel packs inside storage containers to absorb moisture. When not in use for extended periods, disconnect power sources and power off all devices to prevent battery drain or electrical issues. These practices keep your gear ready for use whenever inspiration strikes.
Predicting the Future of Lighting Maintenance
As LED technology advances, future tools will likely include smarter diagnostics and self-cleaning features. Some companies are already experimenting with LED panels that monitor their own health and notify you when maintenance is needed via dedicated apps. Staying updated with these innovations can give you a competitive edge. For now, sticking to proven maintenance routines and reliable tools is your best bet to keep your lighting setup working flawlessly in 2024 and beyond.
How do I maintain my lighting gear over time?
The key to long-lasting lighting equipment is diligence. Regular inspections, cleaning, proper storage, and using precise tools like multimeters and dust removers help prevent costly repairs. Remember, a little effort now saves time and money later. Try incorporating a weekly check-in routine and see how much more reliably your gear performs. For advanced tips, visit our privacy policy page to learn more about best practices and future trends in lighting maintenance. Don’t forget, staying proactive is the secret to professional-grade results every time!
Ever felt like your videos or photos lack that professional polish, despite having good equipment? The secret often lies in mastering your fill lighting — a crucial step that can dramatically elevate your visuals. In 2024, with the latest RGB tube lights and softboxes, you have unprecedented control to sculpt your scene with finesse. Today, I’ll reveal the insights that transformed my approach from guesswork to precision, so you can avoid common pitfalls and achieve stunning, natural results every time.
Why Fill Light is Your Best Ally for Stunning Visuals
In the age of high-definition content, viewers expect clarity, depth, and authenticity. Proper fill lighting not only brightens your subject but also shapes the scene, softening shadows and adding dimension. RGB tubes are fantastic for creative color accents, while softboxes ensure smooth, even light. Combining them allows you to craft mood and depth, making your content pop naturally. If you’ve ever set up lights only to find your scene looking flat or overly harsh, it’s time to rethink your approach to fill light.
Learning from Mistakes: The Key to Better Lighting
Early on, I believed more light meant better results. I piled on RGB tubes and cranked up brightness, only to end up with scenes that looked unnatural or washed out. The breakthrough came when I realized the importance of placement and subtlety. Small shifts in angle, distance, and hue made a world of difference. The lesson? Less is often more, and strategic placement beats brute force every time. Want to avoid my rookie errors? Keep reading for the techniques that will change your lighting game.
Tools That Make a Difference in 2024
Creating professional scenes requires the right gear and know-how. I rely on a few trusted tools: a digital multimeter to monitor RGB tube health, microfiber cloths and compressed air for maintenance, and Velcro straps for cable management. These may seem small, but keeping your equipment in top shape ensures consistent performance. For detailed gear recommendations, explore our privacy policy and see which tools stand the test of time.
Shaping Light with Precision and Intention
Effective fill lighting is about finesse. I’ve learned to position my RGB tubes at about 45 degrees, eye level, close enough to soften shadows without overpowering the scene. Adjusting the hue to warm amber or cool blue adds mood, but subtlety is key. Use your camera’s histogram to fine-tune exposure, ensuring detail in shadows and highlights. When shadows are too stark or flat, small changes in angle or distance can transform the scene. Remember, shadows are your friends—they add depth and dimension. For best practices, check this guide.
Honing Your Settings for Natural, Vibrant Results
Every scene is unique, so calibration is essential. I tweak my ISO, aperture, and shutter speed to match the lighting. Shooting in RAW gives me flexibility in post-processing. When RGB tubes are set properly, and softboxes diffuse light evenly, the result is a scene that looks natural yet vibrant. Avoid the trap of over-saturating colors; instead, aim for balance. For advanced tips, explore scene balancing techniques.
Many creators fall into the trap of thinking that brighter equals better. In reality, thoughtful placement and subtle hue adjustments create scenes with depth and authenticity. Overuse of vibrant colors or excessive brightness can distract or distort your scene’s natural feel. Strive for finesse rather than intensity, and your scenes will communicate more effectively.
Advanced Techniques for Scene Sculpting
Master creators use RGB tubes and softboxes to craft mood, mimic natural light, or add visual interest. Slight warming of RGB tubes can simulate sunset, while cooler tones evoke moonlight. The key is understanding color temperature, angle, and dimming levels. Practice small adjustments, and use your camera’s exposure tools to verify results. Remember: simplicity combined with precision often leads to the most compelling scenes. For detailed techniques, see our scene balancing guide.
Don’t fall for the myth that complex setups always mean better results. Sometimes, a simple, well-placed light setup with subtle adjustments creates more impact than an elaborate scheme. Practice regularly, trust your eye, and use tools like histograms to guide your adjustments. Want to keep your lighting in top shape? Visit this article for professional tips.
Finesse and Control Over Shadows and Highlights
Shadows are essential for adding depth, but they must be controlled. I once placed my softbox too close, creating harsh shadows. Moving it back slightly and angling downward softened the scene beautifully. Small positional tweaks can make your scene look more natural and flattering. Shadows should sculpt your scene, not distract from it. For more shadow control advice, see this guide.
Calibration is also crucial. Adjust your RGB brightness and softbox intensity to match the scene. Keep an eye on exposure using your camera’s histogram, and tweak until shadows and highlights are balanced. Consistent practice will make scene shaping second nature.
Looking Ahead with Confidence
Lighting technology in 2024 offers exciting opportunities, from smarter diagnostics to self-cleaning LED panels. Staying informed about these innovations can help you plan for the future. But for now, mastering fundamental techniques—placement, hue, and balance—will always serve you well. Regular maintenance and careful calibration ensure your gear performs reliably, saving you time and stress during critical shoots. To learn more about equipment care, visit our privacy policy page.
Insider Wisdom on Fill Lighting Mastery
- Less is More: I once tried to fill every shadow with light, but the scene looked flat and unnatural. The real magic is in strategic placement and subtlety.
- Color Temperature Matters: Balancing RGB hue with softbox warmth creates depth. Overdoing vibrant hues can distract—finesse wins.
- Shadows Are Sculptors: Harsh shadows can ruin a shot, but soft, controlled shadows add dimension. Practice small positional tweaks to perfect this.
- Tools Make a Difference: Regularly maintaining your gear, using a multimeter, and cleaning your softboxes prolongs performance and saves costs.
My Top Picks for Creative Lighting in 2024
- RGB Tube Lights: Their versatility for color and intensity control makes them indispensable. I trust brands that offer app control for seamless adjustments.
- Diffused Softboxes: They produce the most flattering, natural-looking light, especially when diffused evenly across your scene.
- Multimeters and Maintenance Kits: Keeping your gear in prime condition requires simple tools, but they’re worth their weight in gold.
- Lighting Tutorials and Guides: Continually learning from experts enhances your skills. Our comprehensive tutorials are a great resource for ongoing growth.
Take Action and Elevate Your Scenes Today
Now that you understand the nuances of fill lighting with RGB tubes and softboxes, it’s time to apply these lessons. Practice small adjustments, trust your eye, and aim for natural, balanced scenes that capture attention and evoke emotion. Remember, mastery is a journey—each shoot is an opportunity to refine your skills. Are you ready to sculpt your perfect scene and impress your audience with professional-quality visuals? Share your experiences or questions below—I’d love to hear your story!
![3 LED Panel Light Shielding Hacks to Fix 16K Tint Shift [2026]](https://lights.creatorrigreviews.com/wp-content/uploads/2026/05/3-LED-Panel-Light-Shielding-Hacks-to-Fix-16K-Tint-Shift-2026-150x150.jpeg)


4 responses to “Best Fill Light Techniques with RGB Tube & Softbox Lighting in 2024”
This article really hits the mark on how crucial proper fill lighting is, especially with the advanced tech options we have now. I used to rely heavily on brute force lighting, thinking that cranking everything up would give me that professional look. But I quickly learned that strategic placement and subtlety make all the difference. The tip about positioning RGB tubes at 45 degrees and at eye level resonated with me; I’ve found that minor adjustments can dramatically improve scene depth. Also, combining warm hues with softboxes helps create a natural yet vibrant look, avoiding the flat lighting trap.
Has anyone here experimented with mixing different color temperatures for mood? I’d love to hear how others approach balancing warm and cool tones without overdoing it, especially in scenes that require a more cinematic feel. It seems mastering these nuances really elevates content quality and helps avoid the common pitfall of over-saturating colors or washing out your scene. Truly a valuable read for anyone serious about elevating their visuals in 2024!
This post really resonates with me, especially the part about subtle lighting adjustments making such a big difference. I’ve spent a lot of time experimenting with RGB tubes and softboxes, and I totally agree that placement and color temperature are key to creating a natural look. I often use warm tones as a base but like to layer in cool hues for depth, especially in outdoor scenes where moonlight effects or sunset mimicry can add authenticity. One thing I’ve found useful is toggling the RGB hue during a shoot to see what mood works best in real-time—a kind of dynamic balancing that I think more creators should try.
Have you or anyone here experimented with animated or changing RGB colors for scenes? I’ve seen some creators switch hues gradually to enhance movement or storytelling subtly. It seems like an innovative way to add interest without overdoing it. What’s been your experience with this technique? I’d love to hear if that’s something others have tried and how it turned out.
This article offers some really practical insights into fill lighting techniques, especially the emphasis on subtle placement and balancing. I remember my early attempts—thinking that more light and brighter colors would make scenes pop—but it often resulted in unnatural looks. It’s clear from these tips that achieving depth and a natural glow involves patience and a keen eye for detail. I’ve been experimenting with RGB tubes for mood lighting, toggling between warm and cool hues to match the scene’s vibe. Recently, I’ve tried gradually shifting the hue during shoots to add a dynamic element, which surprisingly enhances storytelling without overwhelming the viewer.
Has anyone here experimented with animated RGB color changes or synced lighting effects to music or movement? I’d love to hear about successful approaches or common pitfalls. It seems like this kind of creative control can genuinely elevate the production quality when done right, but it also raises the challenge of not overdoing it. What’s been your experience with dynamic lighting in live shoots or videos? Looking forward to your thoughts and tips!
This article really dives into the fine art of fill lighting, and I completely agree that strategic placement and subtle hue adjustments bring scenes to life much better than simply increasing brightness. One technique I’ve been experimenting with is combining RGB tubes set to warm tones with cooler softboxes to create a dynamic, multi-layered look that mimics natural lighting conditions, like sunset or moonlit scenes. It takes some practice, but the results are worth it. I also find that toggling RGB hues during a shoot helps me instantly see what mood suits the scene best—kind of like quick testing for a cinematic feel. Have any of you tried syncing RGB lighting with music or movement? I’ve been curious about how creative effects like that can elevate storytelling, but I worry about overdoing it. What’s been your most successful approach to dynamic lighting? Would love to hear your insights!