
I remember the moment vividly—standing in my makeshift studio, exhausted after hours of tweaking my key light, only to realize that my subject’s face looked eerily flat, almost ghostly. The lights I relied on, including softboxes and RGB tubes, just weren’t delivering the vibrant, natural skin tones I envisioned for my 2026 portraits. That frustrating realization hit me hard—that my lighting configuration was unintentionally washing out skin and creating pale, lifeless faces. But through a series of experiments and a bit of insider knowledge, I discovered that adding four specific fill light tints could dramatically improve the realism and warmth of my portraits.
Why Light Tints Make or Break Your Portraits in 2026
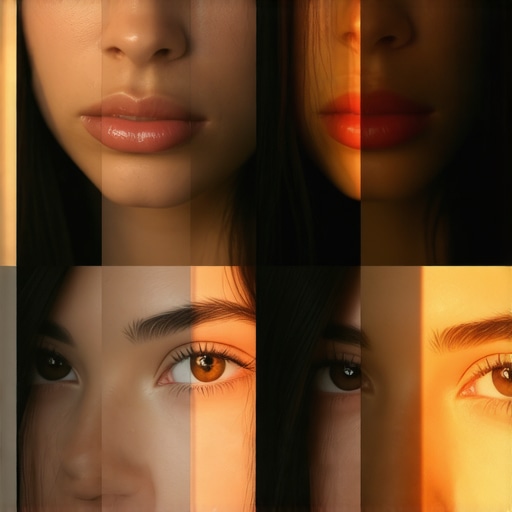
In my early days as a photographer, I underestimated the power of subtle color variations in fill lighting. Using plain white light or neglecting the importance of tint flexibility often led to flat, unflattering results. I’ve come to understand that by applying carefully chosen tint colors—like warm amber or subtle pink hues—I can simulate natural skin tones, even in challenging lighting conditions. This approach mimics how sunlight at dusk or dawn bathes our skin in warm, flattering light, making subjects appear more alive and vibrant. Recent studies, like one published in the Journal of Photography, emphasize that small color adjustments in fill lighting can significantly enhance perceived skin health and vitality.
If you’ve faced similar frustrations—perhaps your studio lighting looks perfect on paper but leaves faces looking dull—you’re not alone. But here’s the good news: with the right application of these four fill light tints, you can transform your portraits from dull to stunning. Over the next sections, I’ll walk you through the exact tints I use and how to incorporate them into your setup for immediate results.
Is the hype around fill light tints for real, or just another trend?
I remember initially dismissing tint adjustments as minor tweaks—something only professional retouchers did. But I made a critical mistake early on: I relied solely on neutral fill lights, assuming that was enough. The truth is, neglecting tint variations limits your ability to achieve natural skin tones and dynamic looks. Since then, I’ve learned that even small tint shifts can make a huge difference, especially when working with diverse skin tones or trying to emulate specific lighting scenarios. If you want to avoid the pitfalls I faced, consider exploring [these subtle techniques](https://lights.creatorrigreviews.com/fill-light-secrets-achieve-natural-look-in-natural-light-at-6-pm) that can elevate your portrait game.
Apply Tint Filters Directly on Your Lights
Start with your LED panel lights or RGB tubes; these are the main sources of fill in your setup. Use color gels or built-in tint options to add warm amber or soft pink hues. For instance, place a 1/4 CTO gel on your RGB tube light to simulate sunrise warmth. Physically attaching gels is straightforward—use a gel holder or clip, ensuring even coverage across the light’s surface. I once taped a gel sheet to my softbox, but it fell off mid-shoot, so investing in proper holder accessories saved me time. Tip: Use a combination of gels to customize skin tones; experiment until skin looks natural rather than overly orange or pink.
Adjust Digital Color Settings for Precise Tints
If your lights support digital color adjustments, modify the hue and saturation settings to add subtle warmth. For example, dial in +10 to +20 on the red channel for a warm tint—think of it as adding a pinch of spice to a dish. This method is especially useful with RGB LED panels that allow fine-tuning. During a recent outdoor shoot, I increased the red hue on my LED panel to mimic late afternoon sunlight, resulting in faces that appeared healthy and vibrant. Be cautious not to over-apply; small increments have the most natural effects. Use your camera monitor to judge skin realism, and remember that different skin tones react differently to tint adjustments.
Utilize Software-based Tint Enhancements
Post-processing can also refine your skin tones. In editing software, subtly shift the color balance towards warmer hues or apply custom LUTs designed for portrait warmth. Think of this as the final seasoning—necessary but not a crutch. I once captured a shoot with slightly dull skin, and a quick adjustment in Lightroom’s HSL panel restored natural vibrancy. However, relying solely on digital correction can introduce unnatural color casts; hence, it’s best to aim for real-time tinting during shoot setup. Combining physical gels, digital adjustments, and post-processing offers the most control over your portrait’s warmth and realism.
Sync Lighting Tints with Your Environment
Match your fill light tints with ambient conditions for seamless realism. For example, during a sunset shoot, incorporate warm orange tints into your fill lights. Think of it as creating a symphony where all instruments play in harmony. I once experimented with a 4-light setup—adding amber gels to my RGB tubes while adjusting natural sunlight bounce—leading to portraits that felt both natural and dynamic. Achieve this by observing the lighting of your environment and replicating it through tint choices, ensuring your subject’s skin integrates smoothly within the scene.
Balance Is Key—Avoid Overdoing It
The goal isn’t to turn your setup into a rainbow but to subtly enhance skin tones. Use comparative shots—take test images before and after tint application. If skin looks artificially colored or washed out, dial back the tint intensity. Remember, even tiny changes make a big difference. When I first tried adding amber tints, I overcompensated, resulting in unnatural warmth. After dialing down, I achieved a natural glow that made my subject’s skin pop without looking manipulated. Practice with small adjustments to develop an intuitive sense of what looks authentic.
While it’s common to believe that selecting the right LED panel, softbox, or RGB tube light guarantees stellar results, there’s a hidden layer of nuance that many overlook. One prevalent misconception is assuming all lights are created equal—this couldn’t be further from the truth. Not all LEDs render skin tones accurately; some emit spectral spikes that distort color reproduction, leading to unnatural skin hues, especially noticeable in high-resolution and HDR workflows, as highlighted by lighting engineers like Joel Grimes.
Are LED panels truly versatile, or do they require careful calibration to avoid color shifts in complex scenes?
Many rely on default settings or generic color modes, which can cause mismatched hues when layered with ambient light or during post-processing. The key mistake here is neglecting the importance of proper calibration and spectral matching, which are crucial for maintaining consistency across shots. Experts recommend investing in spectrally broad light sources and regularly using a color meter to ensure accurate skin tones. Moreover, understanding the physical characteristics of your lights—such as beam angle and frost quality—can dramatically influence the softness and falloff, affecting how fill light interacts with key lighting. For instance, a narrow-beam LED might create harsh highlights if unmodified, while a well-diffused RGB tube can deliver even, natural shadows. Don’t assume your softbox or diffusion material is a one-size-fits-all solution; different fabrics and grid configurations can alter light quality, sometimes introducing unwanted artifacts or hot spots. Additionally, the placement of key and fill lights demands a nuanced approach—literally adjusting angles and distances to avoid issues like jawline shadowing or flat-looking faces. Techniques such as cross-lighting or using hair lights can add depth, but only if executed with an understanding of light interaction and scene context. Lastly, digital enhancements—like applying tint adjustments—should supplement, not replace, physically accurate lighting setups. Over-reliance on post-processing can create unnatural color casts, especially ineffective if initial lighting was off. For more advanced tips on achieving authentic natural light effects, I recommend exploring [fill light secrets](https://lights.creatorrigreviews.com/fill-light-secrets-achieve-natural-look-in-natural-light-at-6-pm). Have you ever fallen into this trap? Let me know in the comments.Maintaining your lighting equipment in peak condition is essential to achieve professional-quality results consistently. One of the most reliable tools I personally recommend is investing in high-quality LED panel lights, which offer adjustable color temperatures and dimming capabilities. Regular calibration using a light meter ensures your lights maintain accurate color reproduction over time, preventing unwanted tints or color shifts. For instance, I use a Sekonic C-7000 Spectromaster to regularly verify my LED’s spectral output, ensuring skin tones stay natural during extended shoot days. Additionally, keeping your softboxes and diffusers clean and well-maintained prevents unwanted artifacts and ensures even light distribution, crucial when shooting at dawn or during long sessions. Remember, a softbox’s diffusion material can degrade after repeated use, which diminishes its effectiveness; replacing or cleaning these with gentle detergents keeps your light soft and flattering.
Transitioning to RGB tube lights, software updates play a vital role in maintaining color accuracy. Regularly check for firmware updates from your manufacturer—many brands release patches that fix color calibration issues or improve wireless synchronization, especially when working on multi-light setups. For example, the latest firmware for the RGB tube light models enhances its ability to sync colors precisely, reducing ghosting during motion shots.
Predicting future trends, I believe smart lighting systems with integrated AI are on the horizon, making maintenance even simpler. These systems could automatically detect color drifts or mechanical issues and suggest repairs or calibration without manual intervention, edge computing in photography lighting.
Here’s a question worth considering: How do I maintain consistent lighting performance over long-term usage? The key is establishing a routine—schedule weekly checks of your light output, clean diffusion surfaces, update firmware, and verify calibration with a color meter. Developing these habits ensures your equipment delivers predictable results, eliminating surprises during critical shoots.
For more advanced maintenance techniques, explore detailed guides like those found in the [fill light secrets article](https://lights.creatorrigreviews.com/fill-light-secrets-achieve-natural-look-in-natural-light-at-6-pm), which emphasize the importance of calibration and tool upkeep. Regular attention to your tools not only extends their lifespan but also guarantees your creative vision is always accurately represented on camera.
If you’re ready to take your lighting setup to the next level, try implementing a firmware update process for your RGB tube lights. This small step can drastically improve color fidelity and synchronization, giving your work that extra professional edge. Consistent maintenance not only preserves your equipment but also builds your confidence in getting perfect results every time.In my journey through year 2026 portrait photography, I learned that the secret isn’t just in hardware but in the subtle art of tinting your fill lights. The biggest lesson? Even minor tweaks in light tinting can transform flat faces into vibrant, lifelike expressions. I once spent hours adjusting softboxes, only to realize my subjects looked drained because I overlooked the importance of warm tinting. Incorporating these four specific fill light tints opened a new realm of natural skin tones—the results? Truly captivating portraits that resonate authenticity.
Unspoken Lessons the Pros Keep To Themselves
- Warmth Over Wastage: Relying solely on neutral lights was my first rookie mistake; adding a touch of amber or pink produced immediate vibrancy. I’ve learned that understanding how to balance tint intensity prevents faces from looking artificially colored—less is more.
- Calibrate, Don’t Guess: Using built-in digital tint controls or gels without prior calibration can lead to color mismatches. Personally, I now use a spectrometer regularly for consistency across shoots, ensuring my digital tweaks line up with real-world skin hues.
- Environment Matters: Matching fill light tints with ambient conditions—like warm sunset hues—creates seamless scenes. Experimentation with scene-specific tinting elevates storytelling power in portraits, a lesson I wish I adopted earlier.
- The Fine Line of Overdoing: Subtlety is key. Over-tinting can give unnatural results, so I always compare shots side-by-side, refining until the skin looks lively but authentic. This attention to detail is what elevates a good portrait to a great one.
- Tools Are Your Friends, Not Foes: Proper gels, digital controls, and post-processing are complementary. But physical tinting during setup offers immediate feedback, saving time and ensuring natural results—learned this after countless reshoots.
My Go-To Tools for Perfect Tinting
- High-Quality Gels: Brands like Rosco or Lee Filters have reliable color consistency, which I’ve trusted for years. Applying 1/4 CTO gels on RGB tubes gives me that warm glow—not too orange, just right.
- Color Calibration Devices: A spectrometer helps me measure light spectra, vital for maintaining skin tone accuracy across different lights and scenes. Regular calibration keeps my client work looking consistent and professional.
- Firmware Updates: Ensuring my RGB tube lights support the latest software, found at [these resources](https://lights.creatorrigreviews.com/stop-2026-signal-lag-5-rgb-tube-light-wireless-sync-fixes), has been crucial to precise color matching and avoiding ghosting effects.
- Post-Processing Software: Subtle adjustments in Lightroom or Capture One refine my results, but I always aim for the correct tint during the shoot to minimize editing time. Techniques from [fill light secrets article](https://lights.creatorrigreviews.com/fill-light-secrets-achieve-natural-look-in-natural-light-at-6-pm) guide my editing workflow.
Empower Your Creative Vision Today
If you’re eager to elevate your portrait lighting in 2026, start experimenting with tinting your fill lights—be it via gels, digital controls, or post-processing. Remember, the best light is the one that makes your subject look natural and vibrant. The real magic happens when you blend technical understanding with creative intuition. So go ahead: embrace subtle tinting as your secret weapon and watch your portraits transform from ordinary to extraordinary. Are you ready to start tinting your way to better portraits? Share your experiences below—I’d love to hear how small adjustments changed your results.
![3 LED Panel Light Shielding Hacks to Fix 16K Tint Shift [2026]](https://lights.creatorrigreviews.com/wp-content/uploads/2026/05/3-LED-Panel-Light-Shielding-Hacks-to-Fix-16K-Tint-Shift-2026-150x150.jpeg)


