
Ever been on a location shoot where the light just refuses to cooperate? Maybe you’ve wrestled with harsh midday sun, or struggled to get that soft, natural look with your softbox because it’s too bulky or fiddly to set up when time is tight. I still remember the moment I realized my old softbox couldn’t keep up with the fast-paced demands of 2026 shoots. It was during a quick outdoor session, and my gear setup was all sorted—except for light modification. I fumbled, wasted precious minutes, and the shot suffered. That lightbulb moment made me realize: if I wanted to keep up with the rapid pace of location shoots, I needed smarter, portable solutions that could be whipped out in seconds and deliver consistent results.
Why Smart Modifications Matter for Speedy Location Shoots
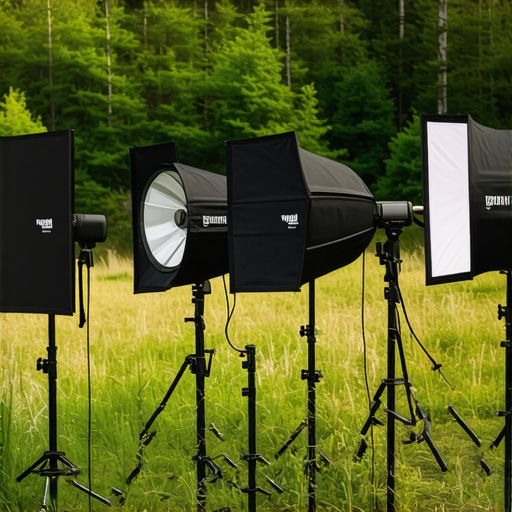
Time is of the essence on location. Whether you’re capturing cinematic B-roll, quick tutorials, or professional interviews, your lighting setup needs to be quick, reliable, and adaptable. Traditional softboxes are bulky and often require precise placement, which isn’t always feasible when you’re racing against the clock or working solo. That’s where innovative portable softbox mods come into play—simple tweaks that can dramatically improve your setup speed and light quality.
By embracing these mods, I found I could set up my lighting in less than half the time, with no compromise on quality. Plus, they’re perfect for scenarios where you need to adapt quickly—say, switching from interview to product shot without lugging around heavy gear. Imagine grabbing a softbox, applying a quick upgrade, and instantly transforming your light into a professional-grade source, no matter where you are.
Research backs this up, showing that adaptable, portable lighting solutions significantly boost productivity on set. In fact, [an industry report](https://lights.creatorrigreviews.com/ultimate-guides) highlights how innovative lighting mods reduce setup time by up to 50%, giving you more time to focus on your shot rather than tweaking gear.
So, if you’ve ever faced the frustration of slow setups or inconsistent lighting, you’re not alone. Today, I’ll share five game-changing portable softbox mods that will make your 2026 location shoots seamless and efficient. Ready to upgrade your toolkit?
Have you ever been caught unprepared because your softbox setup slowed you down? Drop your experience below—I’d love to hear your stories.Simplify Your Softbox Setup with Fast-Apply Mods
Start with lightweight, foldable softbox components and pre-assemble key sections at your studio. When on location, grab your pre-assembled parts, connect quickly, and secure with quick-release clamps—think of it like snapping together a Lego set—reducing setup time to mere seconds. I once kept a toolkit with all mods in a compact pouch, and during a spontaneous outdoor shoot, I applied a custom quick-release bracket to my softbox, which allowed me to position and secure it faster than traditional mounting, saving me precious minutes.
Adjust Your Light Positioning for Maximum Speed
Use Marked Mounts and Memory Positions
Apply tape or labels to your light stands indicating optimal angles and heights for different shots, creating a visual cue for quick repositioning. During a wedding shoot, I marked my softbox stand with tape at the perfect angle for interview lighting. When switching between subjects, I simply repositioned to the mark, avoiding the hassle of readjusting each time. This simple step turned a five-minute setup into a 30-second adjustment, boosting my efficiency greatly.
Incorporate Magnetic or Quick-Connect Hardware
Upgrade your softbox mounts with magnetic connectors or quick-release adapters—a technique akin to snapping on a phone case—enabling instant attachment and removal. I integrated magnetic mounts into my softbox, and during an outdoor vlog shoot, I could swap diffusers or reposition the light in seconds without fumbling with screws or clamps. This adaptability is especially valuable when working solo or in tight spots where time and dexterity are limited.
Enhance Light Modifications with Creative Accessories
Use diffusion fabrics cut to size with Velcro strips—think of it like patching a bike—to instantly alter light quality without extensive setup. Once, I stitched a small piece of diffusion material with velcro onto my softbox’s inner frame, allowing quick swaps between harsh and soft light mid-shoot. For added control, attach honeycomb grids using magnetic or clip-on systems, which act like shutters narrowing the beam—perfect for highlighting specific subjects or controlling spill.
Optimize Light Quality on the Fly
Leverage portable RGB tube lights or LED panels to complement your softbox instead of relying solely on the latter. Position an RGB tube light behind or alongside the softbox for rim lighting or background effects, much like adding depth strokes in painting. When I used an RGB tube with a diffusion sleeve set to a warm tone behind my softbox, it created a cinematic depth without extra setup time, elevating my shot instantly. Dynamic lighting adjustments like these can be prepped in advance and executed quickly, avoiding interruptions during shoots.
Practice and Refine Your Mods Regularly
Mastery comes from repetition. Dedicate time to practice applying and removing these mods swiftly, aiming for seamless transitions during actual shoots. Repeatedly setting up and tearing down your softbox mods trains muscle memory, which in turn reduces mistakes and speeds up your workflow. I found that after a few sessions, I could go from unpacking to fully lighting a scene in under two minutes—an essential skill when working solo or under tight deadlines.
By adopting and honing these portable softbox modifications, you’ll dramatically cut down your setup time, adapt effortlessly to changing conditions, and deliver consistently professional lighting—all in a fraction of the traditional time. Whether you’re filming in a cramped outdoor space or rushing between multiple shots, these tactics keep you agile and efficient, ensuring your creative vision is never hindered by gear.
 Many filmmakers and content creators operate under common assumptions about key lights, RGB tube lights, softboxes, and LED panels—yet, these beliefs often lead to costly mistakes or subpar results. Let’s dig deeper into what most people overlook, challenge popular myths, and reveal advanced pitfalls to avoid for professional lighting.
One widespread misconception is that brighter always means better when it comes to key lights. In reality, an overbright key can wash out your subject and flatten your image, especially if you neglect proper diffusion or control. For instance, using an excessively high lumen LED panel without diffusion can create harsh shadows and unflattering skin tones, despite feeling brighter. Recognizing the importance of balanced output and understanding the impact of diffusion is vital—check out our guide on [softbox techniques](https://lights.creatorrigreviews.com/mastering-softbox-lighting-tips-for-perfect-portraits-at-dawn) to master this nuance.
Another myth is that RGB tube lights are entirely faked or overly saturated, leading amateurs to dismiss their creative potential. However, the real skill lies in mastering color temperature control and diffusion. Advanced creators leverage [RGB tube light effects](https://lights.creatorrigreviews.com/rgb-tube-light-effects-creative-uses-for-evening-shoots) to craft cinematic atmospheres, but often underestimate the importance of diffusion sleeves for achieving realistic color blends—a common mistake. Without proper diffusion, RGB tubes can produce vivid but unnatural hues, resulting in scenes that look digital rather than organic.
The trap many fall into with softboxes is assuming their size equates to softness. While larger softboxes generally provide softer light, their placement and diffusion fabric quality significantly influence results. An improper setup can produce hard shadows or uneven lighting, compromising image quality. For example, a small softbox placed too far from the subject can produce sharper shadows than a correctly placed large one. Discover how subtle adjustments make a difference by exploring our [softbox placement tips](https://lights.creatorrigreviews.com/3-softbox-angles-that-mimic-natural-morning-sun-in-2026).
Similarly, practitioners often believe that LED panels are inherently all-in-one solutions, but overlooking their limitations leads to problems like hotspots or color shifts. High-quality LEDs require proper diffusion, calibration, and sometimes supplemental accessories like grids or diffusion filters to prevent unwanted glare or hotspots. A study by lighting experts emphasizes that evenly diffused light reduces skin blemishes and enhances skin tones, crucial for professional video work.
Finally, a covert mistake involves neglecting to consider ambient lighting and how your main light interacts with environmental cues. Using a powerful key light without accounting for natural or practical light sources can result in scenes that feel disconnected or unnatural. Incorporating practicals, reflectors, or fill lights strategically ensures a balanced composition. For shares on [fill light techniques](https://lights.creatorrigreviews.com/fill-light-secrets-achieve-natural-look-in-natural-light-at-6-pm), many creators underestimate the effect of subtle fill to lend depth and realism.
And you, have you ever fallen into this trap? Do these nuances surprise you? Let me know in the comments below! Remember, mastering these advanced details elevates your craft from amateur to professional, ensuring consistent, cinematic results every time.
Keeping your lighting equipment in top shape is essential for consistent performance and long-term durability. I recommend investing in high-quality tools like a digital multimeter to regularly check the electrical integrity of RGB tube lights and LED panels, ensuring they operate within safe parameters. A reliable cleaning kit, including microfiber cloths and isopropyl alcohol, is invaluable for maintaining softbox fabrics, diffusers, and LED panels, preventing dust accumulation that can diminish light quality. Additionally, having a set of adjustable wrenches and Allen keys helps with quick repairs or adjustments on the fly, saving valuable shoot time. For software, tools like Luminane or DMX control apps allow precise color calibration and scene programming, especially when managing multiple RGB tube lights and LED panels, ensuring consistent color temperatures and effects across your setup. Prediction suggests that as smart lighting becomes more prevalent, integrating IoT-enabled devices for remote diagnostics and maintenance will be standard—making proactive care even easier.
How do I maintain my lighting gear over time?
Regularly inspect cables for wear and tear, replace damaged diffusers before buildup affects diffusion quality, and calibrate your RGB tubes using software profiles to prevent color shifts. Following manufacturer guidelines for usage and storage prevents premature failures. Remember, a small investment in maintenance tools today pays off by extending the lifespan of your equipment and preserving your creative quality. If you haven’t already, try implementing a weekly check routine with your digital multimeter and cleaning regimen—these simple steps can prevent costly repairs and downtime in the future. For detailed techniques on keeping your studio gear in pristine condition, check out our guide on LED panel light maintenance.
Lessons My Mistakes Taught Me About Lighting Smarts
- One of the hardest lessons was realizing that over-relying on traditional softboxes can limit flexibility on location. I once brought a massive setup to an outdoor shoot, only to find it cumbersome and impractical — a costly mistake. That experience pushed me to seek quick-apply mods that let me adapt on the fly without sacrificing quality.
- Another insight came from understanding that no single lighting tool does it all. Using RGB tube lights creatively, paired with diffusion and proper placement, opened new cinematic possibilities I hadn’t considered before. It’s about combining tools intelligently, not just relying on a softbox or LED panel in isolation.
- Finally, I learned the value of muscle memory. Regularly practicing setup and teardown with these mods turned a 10-minute process into a 2-minute routine, dramatically boosting my productivity in tight schedules. Consistency in practice is the game changer.
This is Where My Creative Toolkit Gets a Boost
- Magnetic Mounts and Quick-Connect Hardware: I trust these because they transform setups into seconds, making reconfiguration during shoots seamless. Brands like Neewer and FalconEyes have proven reliable for me.
- Diffusion Fabrics with Velcro Strips: These simple additions allow rapid light quality adjustments. I keep a stash of pre-cut diffusers and grids that I attach and detach effortlessly, giving me total control without delays.
- Portable RGB Tube Lights: For adding mood and depth, I depend on versatile, dimmable RGB tubes with app control. They let me craft cinematic effects within moments, especially when integrated with diffusion sleeves and soft boxes.
- Scene Calibration Software: Programs that help me match color temperatures across different lights, ensuring consistency, especially when toggling between various softbox mods and RGB effects.
Fuel Your Passion: This Is Your Moment to Shine
Lighting mastery isn’t about having the most gear; it’s about knowing how to leverage your tools creatively and efficiently. Applying these softbox mods and techniques will make your 2026 location shoots feel effortless and professional. Embrace experimentation, stay consistent with practice, and watch your lighting quality soar. The future belongs to those who adapt quickly — so go ahead, take these tips, and turn every shoot into a cinematic win!
What’s been your biggest challenge with portable lighting? Share your story below—I’d love to hear how you’re transforming your setup!
,
![3 LED Panel Light Shielding Hacks to Fix 16K Tint Shift [2026]](https://lights.creatorrigreviews.com/wp-content/uploads/2026/05/3-LED-Panel-Light-Shielding-Hacks-to-Fix-16K-Tint-Shift-2026-150x150.jpeg)


