
It was late at night, and I was all set to record my latest cyberpunk-themed video. The neon hues, the shadows, everything seemed perfect—until I looked at my footage and realized my background looked flat and lifeless, like a poorly rendered video game scene. I had spent hours tweaking my softboxes and LED panels, but nothing seemed to bring that vibrant, immersive glow I was aiming for. The realization hit me—my RGB tube lights, which I thought were my secret weapon, weren’t doing their job. Instead of adding depth and color, they made my backdrop appear dull and disconnected.
How to Transform Flat Backgrounds into Cyberpunk Masterpieces
Many creators face this frustrating problem: despite investing in the latest RGB tube lights and accessories, backgrounds remain flat, uninspiring, and lacking that immersive depth that makes cyberpunk visuals stand out. I’ve been there, and after a lot of trial, error, and a few busted softboxes, I finally cracked the code. Today, I want to share the 4 hacks that completely changed my approach—simple tweaks and tricks that can turn your flat, boring backgrounds into vibrant, three-dimensional worlds. Whether you’re filming for YouTube, creating social reels, or just experimenting with lighting effects, these methods will elevate your visuals and save you from throwing money at ineffective gear.
Is RGB Tube Lighting Actually Worth the Hype?
I used to think that just adding colorful lights would automatically give my background depth. Boy, was I wrong. I made the rookie mistake of relying solely on color without considering positioning, diffusion, or shadows. Early on, I believed that brighter meant better, leading to overexposed patches and an unnatural look. It took me a while to realize that proper placement, combined with the right diffusion techniques, is what truly matters. As a helpful tip, check out [this guide](https://lights.creatorrigreviews.com/ultimate-guide-to-rgb-tube-lights-for-creative-studio-lighting) for insights into choosing the best RGB tube lights for your setup.
Are you frustrated because your RGB tube lights aren’t giving you the depth and vibrancy you see in professional cyberpunk videos? Keep reading—I’ll walk you through my personal hacks to fix this persistent issue and unlock stunning backgrounds that pop on camera.
Position Your Key Light Strategically
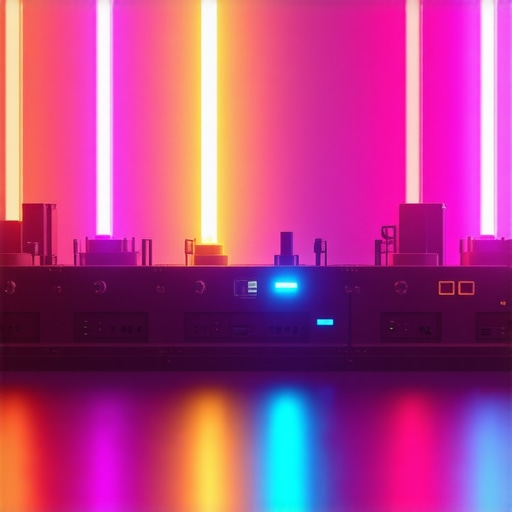
Start by placing your key light at a 45-degree angle from your subject to create depth and dimension. For my shoot, I moved my RGB tube light slightly closer to the backdrop, angling it downward to bathe the scene in a vibrant glow. This setup mimics natural light falloff, preventing your background from turning flat and lifeless. Remember, a well-placed key light not only illuminates your subject but also sculpts the environment around them, making colors pop and shadows add depth. For advanced angle tips, check out key light techniques.
Diffuse for Smoothness
Diffuse your RGB tube lights using softboxes or diffusion sleeves to eliminate harsh edges that flatten space. I applied a softbox to my tubes, which softened their output and reduced unnatural hotspots. To achieve this, I used inexpensive diffusion fabrics wrapped around the lights, which made the colors blend seamlessly into the background. This step gives your scene a cinematic feel and prevents oversaturation. For a comprehensive diffuser method, see softbox lighting tips.
Build Layered Lighting Using Fill Lights
Adding a fill light prevents your background from becoming a washed-out, flat canvas. I set up a smaller RGB panel on the opposite side, controlling its brightness to subtly fill shadows without overpowering the scene. This balance helps to highlight contours and adds a sense of three-dimensionality. Use lower intensity to maintain contrast while preventing dullness. For perfect fill lighting strategies, explore fill light secrets.
Create Visual Depth with Color Recipes
Using different RGB color combinations on your tube lights can simulate depth and mood. I experimented with a spectrum of reds, blues, and purples, creating dynamic layers that lend a futuristic vibe. By controlling the intensity and hue, I avoided the common mistake of uniform flat lighting. This method tricks the eye into perceiving spatial layers, making backgrounds more immersive. To learn various color recipes, visit RGB color recipes.
Fine-Tune Placement for Natural Depth
Finally, adjust your light positions iteratively. Move your RGB tubes to different heights and angles, observing how shadows and colors shift. I found that elevating some lights to mimic overhead lighting enhanced the scene’s realism, while placing others lower created interesting glow effects on reflective surfaces. Over time, this trial-and-error approach helped me discover the ideal setup that made my background pop without looking forced. For placement tips, see light placement hacks. 
Many creators believe that selecting high-end equipment like RGB tube lights, softboxes, or LED panels automatically guarantees professional-quality results. However, the real challenge lies in understanding the subtle intricacies that influence lighting effectiveness. Contrary to popular opinion, gear choice isn’t the sole determinant of a compelling shot. For example, it’s a common misconception that brighter lights always produce better images. In reality, excessive intensity can lead to overexposure and harsh shadows, especially if diffusion and placement aren’t optimized. As explained in this comprehensive softbox guide, diffusing light properly is often more impactful than just cranking up brightness.
Another widespread myth is that RGB tube lights are a silver bullet for vibrant backgrounds. While they do offer creative color control, relying solely on them without considering positioning and layering can result in flat, uninteresting scenes. For instance, using multiple layered lights with varied angles and colors can create depth and dimensionality, a technique well-covered in this article.
Are softboxes always the best choice for diffusing light?
Not necessarily. Many assume a softbox guarantees a soft, cinematic look, but improper sizing or placement can cause undesirable hotspots or flat lighting. Sometimes, using diffusion sleeves or even bouncing light off reflective surfaces achieves a more natural and pleasing effect. Beware of the trap where creators underestimate the importance of softbox positioning—which dramatically influences the final image quality.
Moreover, novice users often overlook the significance of fill lights. Many think their main key light suffices, but neglecting well-placed fill lights can leave shadows too stark or create a double-shadow effect, undermining the scene’s depth. For advanced setups, blending subtle fill lighting with careful positioning produces a realistic and immersive atmosphere, as detailed in this guide.
Finally, over-enthusiasm for LED panel lights can lead creators to ignore their limitations, such as flickering or color tints. Without proper calibration or diffusion, panels might produce unnatural skin tones or distracting flicker. Staying informed about the latest innovations and calibration tricks, such as those outlined in this resource, helps avoid these pitfalls.
So, the key to successful studio lighting isn’t just about equipment—it’s about mastering placement, diffusion, layering, and understanding the subtle nuances that make all the difference. Have you ever fallen into this trap? Let me know in the comments.
Maintaining your lighting setup for consistent performance over time is crucial to achieving professional-quality videos and photographs. I personally rely on a few key strategies and tools that ensure my equipment remains reliable and delivers optimal results. Regularly inspecting cables and connectors is the first step—I use a dedicated lightweight multimeter, like the Fluke 117, which allows me to detect subtle wiring issues and prevent intermittent flickering or power loss. Consistent cleaning of lenses, diffusers, and softbox fabrics with microfiber cloths reduces dust buildup that can cause uneven light diffusion, maintaining the softness and color accuracy essential for vibrant scenes.
For my RGB tube lights, I invest in high-quality diffusion sleeves and replace them every six months. This simple routine keeps color consistency intact and prevents color cast shifts that may occur as diffusions degrade. Additionally, I keep a close eye on firmware updates for my LED panels; many manufacturers release improvements that enhance stability and introduce new features. Regularly updating firmware ensures your gear operates smoothly, reducing long-term maintenance issues.
To keep my softboxes and diffusers in top shape, I use a compressed air blower to remove dust from internal layers—avoiding the buildup that diminishes light quality. I also have a set of replacement bulbs and LED modules from the manufacturer, which I stock based on their lifespan estimates—usually every 2-3 years—so I can swap out components swiftly without downtime.
Looking ahead, the trend in studio lighting is moving towards intelligent, self-diagnostic fixtures with remote firmware management, as discussed in the latest LED panel innovations guide. These advancements will make maintenance simpler and more predictive, reducing unexpected failures.
**How do I maintain my lighting equipment over time?** I schedule quarterly inspections, keep spare parts handy, and stay informed about software updates through manufacturer channels. Adopting proactive maintenance practices not only prolongs the lifespan of your gear but also ensures consistent results, saving you time and money in the long run.
For instance, routine firmware updates for LED panels can resolve flickering issues that are often overlooked, as detailed in this article. I highly recommend trying out the maintenance routines I’ve described—particularly inspecting and replacing diffusion sleeves regularly—to keep your lighting working flawlessly for every shoot. Your future self will thank you when your scenes look just as stunning after months of use.
What I Wish I Knew When Starting Out with Lighting
One of the toughest lessons I learned was that great lighting isn’t just about buying the fanciest gear but mastering how to position and layer it for depth. I wasted so much time chasing brighter RGB tubes, only to realize that subtle placement and diffusion matter more than raw power. This realization transformed my approach—I now focus on balancing light angles and colors to craft immersive backgrounds that feel alive.
Another insight is the danger of relying solely on technology without understanding its fundamentals. For example, I once thought that using multiple RGB lights with vibrant hues alone would create depth. Instead, I discovered that layering different angles and controlling diffusion turned flat scenes into cinematic worlds. Proper layering, as highlighted in this resource, is the secret sauce for backgrounds that pop.
A personal setback was neglecting the importance of consistent maintenance. Over time, dust buildup, loose connections, and outdated firmware turned my setup into a flickering nightmare. Regular inspection and timely updates, inspired by this guide, prevent issues before they ruin your shot. It’s a simple routine that ensures every shot remains sharp, vibrant, and professional-looking.
Understanding that lighting is an art form, not just a technical task, has been transformative. Experimenting with color recipes and different angles allowed me to mimic atmospheric effects like neon glow, foggy dystopias, and moody nightscapes—crucial for cyberpunk aesthetics. Visit this page for inspiring color ideas that elevate your visuals.
Tools That Keep My Lighting Game Strong
My go-to toolkit includes the softbox diffuser—it’s inexpensive but massively improves light softness and color blending. I also rely on a quality multimeter to detect wiring issues early, saving me headaches during shoots. Firmware update notifications from my RGB tube lights are vital; staying current prevents flickering and unlocks new features, as discussed in this article.
When it comes to softboxes and diffusion, I swear by fabric wraps and bouncing techniques that produce natural, cinematic light. For layering and positioning, I use a simple but effective rule: place lights at varying heights and angles, then adjust until depth appears. For a more comprehensive setup guide, check out this resource.
As technology advances, I’m excited about intelligent lighting fixtures with built-in diagnostics, reducing setup and maintenance time. Keeping my gear in top shape with routine checks is crucial—think of it as giving your equipment a regular health checkup, much like you would this practical guide.
Your Next Step in Creative Lighting
Remember, transforming flat backgrounds into cyberpunk masterpieces relies on a combination of understanding, technique, and maintenance. Don’t hesitate to experiment with angles, diffusion, and layering to discover your unique style. The journey towards professional-looking visuals begins with small, deliberate changes that can make a world of difference. You have the tools—now, it’s time to bring your scenes to life with captivating depth and vibrancy.
What’s the biggest lighting challenge you’ve faced when trying to create immersive backgrounds? Share your story below—I’d love to hear how you’re tackling it!
,
![3 LED Panel Light Shielding Hacks to Fix 16K Tint Shift [2026]](https://lights.creatorrigreviews.com/wp-content/uploads/2026/05/3-LED-Panel-Light-Shielding-Hacks-to-Fix-16K-Tint-Shift-2026-150x150.jpeg)


2 responses to “4 RGB Tube Light Hacks to Fix Flat 2026 Cyberpunk Backgrounds”
Reading this post really resonated with me because I’ve faced similar issues with flat backgrounds during my cyberpunk shoots. I’ve learned that positioning lights effectively and adding layers make a world of difference. I especially appreciate the tip about softening the light with diffusion, as harsh hotspots can flatten the scene. I’ve also experimented with color layering, using reds and blues to create depth, which really enhances the immersive feel. One challenge I often encounter is balancing the brightness of different lights without overexposing certain areas; I’d love to hear how others manage their exposure levels while maintaining vibrant colors. Do you prefer manual adjustment or some kind of light meter to get perfect balance? This conversation on tweaking placement and diffusion really helps shift perspective from gear obsession to technique mastery, which is so crucial for creating those compelling cyberpunk visuals.
This post really hits home for me because I’ve been battling flat backgrounds in my cyberpunk videos too. I used to rely heavily on bright, vibrant colors, but I realized that without proper layering and diffusion, the scene still looked dull. The trick is really in positioning and controlling shadows—diffusion sleeves and softboxes make such a difference; they help blend the colors seamlessly and add depth. I’ve found that adjusting the height and angle of my RGB tubes iteratively gives me better control over how shadows and glows fall into place, rather than just turning up the brightness all around. Also, using subtle color recipes like mixing red and blue at different intensities creates that immersive, layered feel I want. I wonder, how do others handle balancing multiple lights to avoid overexposure or color clashes while keeping the scene lively? Do you guys prefer to go manual or use light meters for fine-tuning your setup? Would love to hear some tips from this community to refine my process.