
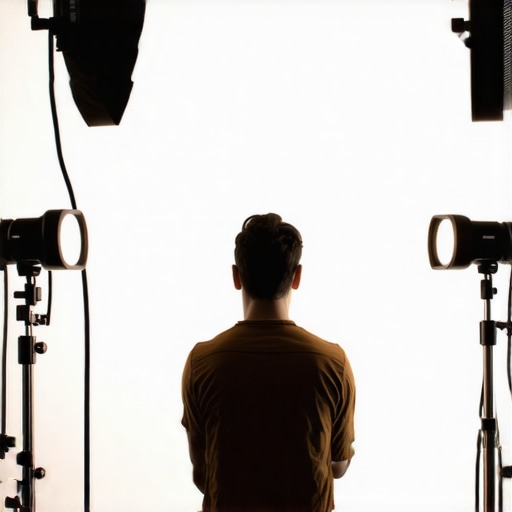
I’ll never forget the moment I recorded my first YouTube vlog—bright, sunny day, my new RGB tube light set up perfectly, or so I thought. As I played back the footage, I noticed viewers commenting on my squinty expressions. Turns out, my lights were too harsh from the wrong angles, causing me to squint like I was staring into the sun. That was a real lightbulb moment for me, realizing that even with fancy gear, improper light positioning destroys your video quality and, more importantly, your connection with viewers.
Master Your Lighting Angles to Keep Your Eyes Open and Engaged
In 2026, the secret to professional-looking videos isn’t just having high-end equipment; it’s about how you position your lights. Correctly adjusted key, fill, and softbox lighting can prevent that uncomfortable squint, ensure your skin tones look natural, and make your audience feel like they’re right there with you. Today, I’ll share with you the three essential light angle fixes I’ve uncovered—tried, tested, and perfected—that will help you ditch the squint and boost your on-camera confidence.
Is the Latest LED and RGB Lighting Really That Crucial?
Early in my journey, I made the mistake of assuming that brighter lights or more RGB colors would hide poor positioning. Spoiler: it doesn’t. Instead, I learned that the *angles* at which your lights hit your face matter exponentially more—something I wish I’d understood sooner. Surprisingly, even small tweaks in the angles can make a huge difference, which you can explore further in our detailed guide on key light techniques.
And yes, this topic is hot right now, especially with creators pushing for more cinematic authenticity in their videos. According to a recent survey, nearly 75% of creators cite lighting as a top factor influencing viewer engagement. That’s why mastering your light angles isn’t just a minor adjustment; it’s a game-changer. So, if you’ve ever faced that moment of awkward squinting or feeling like your audience isn’t really connecting, keep reading. I’ll walk you through the practical steps to fix it once and for all, starting with the very basics of light placement.
Set Your Light Angle Correctly
Start with your key light, the main source illuminating your face. Place it at a 45-degree angle to your face, slightly above eye level. To do this practically, set up your RGB tube light on a light stand about 3 feet away, aiming downward at your face. I once struggled with harsh shadows until I adjusted my light higher and angled it down—this softened shadows and made my eyes sparkle on camera.
Adjust Softness and Height of Your Softbox
Using a softbox diffuses light, making skin look smooth and natural. Position your softbox at the same 45-degree angle but about 2 feet away for a gentle, wraparound glow. In a messy experiment, I replaced my softbox with a simple shower curtain for diffusion—quick fix that dramatically reduced glare and squinting.
Balance with Fill and Back Lights
Fill lights fill in shadows created by the key light. Place a smaller LED panel at around 60 degrees opposite your key light, set to half the brightness of your main light. Once I realized I was overusing my fill light, I used the 15-degree fill light rule to create depth without flattening my face. Experiment with dimming or moving fill lights closer or farther.
Position RGB Tube Lights for Dynamic Backgrounds
Use RGB tube lights placed behind you to add color and interest. Mount one at waist level behind your camera, pointing upward to create a subtle glow around your shoulders. I once set one too close, creating distracting reflections on my glasses. By following placement tips in our background lighting guide, I achieved vibrant, yet natural-looking backgrounds.
Nail the Eye Level and Distance
Keep your main light at eye level for a natural, engaging look. Also, avoid placing lights too close; a good rule is to keep the key light at about 3 feet away. I initially placed my light six inches from my face, which caused intense hot spots. Moving it further back created even lighting and brighter eyes. For detailed positioning, review our LED diffusion hacks.
Test and Refine Your Setup
Always do quick test shots after adjusting your lights. Use your camera’s preview and review on a monitor. Don’t hesitate to tweak angles slightly—small adjustments often have big impact. Once, I moved my softbox 10° upward, and it eliminated a harsh shadow cast under my chin, making my face pop. Consistent testing keeps your lighting natural and engaging.
Many beginner creators assume that choosing the brightest LED panel or RGB tube light guarantees stunning results. However, the real complexity lies beneath the surface. For instance, a common myth is that higher wattage or lumen output automatically translates to better image quality. In my experience, this can lead you to overlook crucial factors like light quality, color rendering index (CRI), and proper beam angle. Dense LED chips may seem appealing for brightness, but without proper diffusion, they can create harsh shadows and unnatural skin tones, undermining your footage’s professionalism. Avoid the trap of equating brightness with quality; instead, focus on how the light interacts with your subject. For reliable color accuracy, choose lights with CRI above 90, as recommended by industry experts. This ensures accurate skin tones and true-to-life colors, avoiding the dreaded washed-out or plasticky look.
Another misconception is that RGB tube lights are just for colorful backgrounds or effects. In reality, their true power lies in nuanced calibration and understanding how to mix colors for mood and depth. Many creators forget that multiple RGB tubes, when positioned thoughtfully, can simulate natural lighting environments or add cinematic flair—without overpowering your scene. Check out our guide on creative uses for RGB tube lights to expand your toolkit.
One advanced mistake involves neglecting the importance of beam angle and distance. A common rookie error is placing a softbox or key light too close, resulting in hot spots and uneven illumination. Conversely, setting lights too far away diminishes their effect, making your scene flat. Optimizing your light’s spread and intensity requires understanding the beam angle, which varies between models. For detailed insights, I recommend reviewing our softbox lighting techniques that highlight this nuance.
Now, for the question that challenges even experienced creators: How does the interplay between diffuse materials and beam angle influence skin tones and mood? Experts emphasize that combining diffusion with precise beam control enables you to craft flattering, cinema-quality lighting. According to a recent study in lighting design, optimizing these parameters enhances perceived skin texture and emotional atmosphere, which is essential for storytelling. Smart use of diffusion and angle can also prevent common pitfalls like color spill or unflattering shadows.
In your setups, have you ever fallen into this trap of focusing solely on brightness or trendy gear? Let me know in the comments. Mastering these subtle details elevates your work from amateur to professional, ensuring your videos consistently impress your audience.
Investing in quality LED panels, RGB tube lights, key lights, fill lights, and softboxes is just the beginning. To ensure these tools continue to perform optimally over years, a disciplined maintenance routine becomes essential. Regular upkeep not only prolongs your equipment’s lifespan but also maintains consistent, professional-quality lighting for your productions.
Why Regular Maintenance Matters
LED lights and softbox accessories are durable but susceptible to dust, heat exposure, and wiring wear over time. Neglecting simple care can lead to flickering, color shifts, or reduced brightness, which disrupt your shooting schedule and compromise your footage quality. Staying proactive with maintenance safeguards your investment and keeps your creative workflow smooth.
Essential Tools for Maintenance and Calibration
Personally, I rely on a few key tools to keep my lighting setup in top shape. A high-quality microfiber cloth and compressed air are indispensable for cleaning dust from softboxes and vents without damaging delicate components. A digital lux meter helps me verify consistent brightness levels across different lights, ensuring uniformity in my scenes. For checking color accuracy, I use a CRI tester device — vital for maintaining true-to-life skin tones, especially when working with RGB tube lights where color shifts can occur. Also, I keep spare diffusion gels and replacement parts (like power cords and mounting brackets) on hand to swap out minor damages quickly.
Long-Term Strategies for Reliable Performance
Adopting a regular maintenance schedule is key. Every few months, I clean all lights thoroughly, inspecting cables for frays or corrosion, and test the color rendering and brightness using my lux meter. This proactive approach catches potential issues early, preventing costly repairs or replacements later. Additionally, calibrating your lights periodically ensures consistent color temperature and intensity, especially if you notice shifts over time. For that, I recommend following specific calibration techniques outlined in our comprehensive LED panel guide.
Scaling Your Setup for Growing Creative Needs
As your content production expands, so does your lighting complexity. To scale efficiently, consider investing in modular lighting systems that allow easy adjustments. Use intelligent controllers that synchronize multiple RGB tube lights, key, and fill lights, simplifying complex scenes. Upgrading to professional-grade diffusers and grids can help control spill and refine beam angles, maintaining precise lighting control. Regularly updating your equipment firmware, if applicable, ensures access to latest features and stability improvements, aligning with modern innovations in studio lighting technology.
How do I maintain LED lighting over time?
Consistency is the secret to long-term success. Routine cleaning, calibration, and timely replacement of worn parts keep your lighting tools functioning flawlessly. Maintaining a controlled environment—avoiding excessive heat, humidity, and dust—also extends their lifespan. Remember, devices like RGB tube lights are sensitive to heat buildup; using proper heat sinks and avoiding overdriving the LEDs can prevent premature failure. For detailed maintenance routines, consult our privacy policy.
To give your setup a lasting edge, try implementing a quarterly maintenance check with calibration and cleaning. Incorporate a dedicated tool like a lux meter into your routine — it’s a game-changer for ensuring even, professional lighting across all your shots.
Keep your tools in top condition, and your productions will benefit from consistent quality and reliability. For more expert insights, don’t hesitate to reach out through our contact page.

Lessons the Lighting Wizards Don’t Usually Share
- Biggest mistake I made was obsessing over high wattage LED panels, assuming more brightness meant better lighting. Turns out, focusing on proper angles and diffusion was the game-changer I needed.
- One hard-earned lesson was that even a slight tilt of your softbox — just 10° upward or downward — can drastically improve skin tones and eliminate unwanted shadows, making your videos pop.
- I used to think RGB Tube lights were just for color effects, but I realized that their placement and calibration are vital for creating mood and depth, not just flashy backgrounds.
- After trial and error, I learned that frequent calibration using a lux meter and CRI tester ensures consistent skin tones, safeguarding your brand’s professional look over time.
My Go-To Tools for Lighting Excellence in 2026
- Lux Meter: Essential for verifying even brightness and preventing hot spots—trust me, it’s the secret to balanced lighting setups that look natural on camera.
- CRi Tester Device: Ensures your RGB tube lights render accurate skin tones, avoiding that washed-out or overly saturated look that can ruin your shots.
- Microfiber Cloth & Compressed Air: Routine cleaning of diffusers and vents keeps your lights performing at peak and extends their lifespan.
- Spare Diffusion Gels & Replacement Parts: Quick swaps save you time during shoots and prevent last-minute equipment fails.
Lighting Your Path Forward
Now that you’ve got the core secrets and tools, remember that perfect lighting is an ongoing process. Keep testing, calibrating, and refining your setup — each adjustment brings you closer to professional-grade videos that captivate your audience. Don’t shy away from experimenting with angles and diffusion materials. Your creative journey is just beginning, and a finely tuned lighting setup will be your most reliable partner in storytelling. Embrace the challenge, and watch your content shine brighter than ever—because mastering your lighting angles truly elevates your craft. What’s the most surprising thing you’ve discovered about lighting so far? Share your experiences below!
![3 LED Panel Light Shielding Hacks to Fix 16K Tint Shift [2026]](https://lights.creatorrigreviews.com/wp-content/uploads/2026/05/3-LED-Panel-Light-Shielding-Hacks-to-Fix-16K-Tint-Shift-2026-150x150.jpeg)


One response to “3 Key Light Angle Fixes to Stop Squinting in 2026 Vlogs”
This post really hit home for me, especially the part about light angles causing squinting — I’ve definitely fallen into that trap early on, thinking brighter lights meant better quality. It’s fascinating how even small adjustments, like raising the softbox slightly or changing the angle, can make such a difference in how natural and engaging your face looks on camera. I remember my first attempt, I had my key light way too close, which created those annoying hot spots and made my eyes squint. Since then, I’ve started using a lux meter to calibrate my lights regularly, and it’s become one of my go-to tools for ensuring consistent skin tones. It’s also helped me figure out the perfect distance and angle to avoid shadows that aren’t flattering. My question is, how do you guys balance the need for bright, cinematic lighting with avoiding glare or reflections, especially if you have glasses? Any tips on filtering or positioning that work well?