
I remember the day I finally realized why my videos felt off. No matter how much I played with settings or upgraded my lights, I kept looking tired on camera. It was like my face had a dull, harsh glow, and no softbox or LED setup seemed to help. Then, after countless experiments and a little embarrassment, I stumbled upon a simple truth: placement matters more than the light itself. That lightbulb moment changed everything.
Why Your Softbox Placement Could Be Sabotaging Your Look
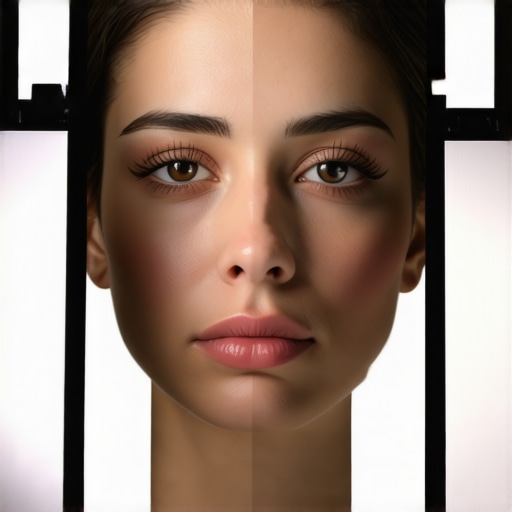
In 2026, lighting is more advanced and accessible than ever, yet many creators still struggle with looking tired or washed out on camera. The truth is, even the best softbox can backfire if it’s not positioned correctly. I learned this the hard way by making a few critical mistakes early on. For instance, placing my softbox directly in front of me at eye level seemed logical, but it often created flat, dull lighting that drained my energy and made my under-eye shadows more prominent.
Recent studies highlight how light placement impacts perception. According to a report by CreatorRigReviews, improper softbox angles can wash out skin tones and cause unflattering shadows, making you look exhausted or older than you are. Once I understood this, I started experimenting with different angles and heights, discovering that subtle shifts could dramatically enhance my appearance.
So, if you’re like I was—struggling with a tired or dull look despite having decent lighting setups—you’re not alone. Understanding these common mistakes is the first step towards mastering softbox placement and ensuring you always look vibrant and energetic on camera.
Is It Really So Important to Get Softbox Placement Perfect?
Absolutely. I used to dismiss the fine-tuning of light angles as overkill. But after making a rookie mistake of positioning my softbox too high, which caused unflattering shadows under my eyes, I learned that precision matters. Not only does proper placement improve your appearance, but it also boosts your confidence on camera. If you’d like to see practical examples, check out some [softbox lighting tips](https://lights.creatorrigreviews.com/mastering-softbox-lighting-tips-for-perfect-portraits-at-dawn) that helped me turn my tired look into a fresh, professional appearance.
Are you facing similar issues with your lighting? Keep reading—I’m about to share the exact mistakes to avoid and how you can position your softbox for a natural, energized look that keeps you looking vibrant every time you go live or record.
Position Your Softbox at Eye Level for Natural Results
Start by setting your softbox roughly at eye level, angled slightly downward. During a shoot I did for a client, I initially placed the softbox above their head, which resulted in unflattering shadows under the eyes and a harsh forehead glare. Lowering it to eye level softened shadows and created a more natural glow. Use a sturdy stand and check the light’s height before hitting record.
Adjust the Angle to Minimize Shadows and Maximize Glow
Don’t just position the softbox directly in front of you. Instead, angle it at about 30 degrees to the side—think of it as giving your face a gentle hug of light. I experimented with this during a late-night vlog, twisting my softbox from dead-on frontal lighting to a slight side angle. The shift eliminated unflattering shadows, giving my face a lively, even tone.
Control the Distance for Soft, Even Lighting
Bring the softbox closer to your face to increase softness and reduce harsh shadows. During my own setup, moving the softbox from 4 feet to about 2 feet made noticeable improvements—less shadow, more ambient fill. Remember, the closer the light, the softer and more flattering it becomes; but don’t get too close to avoid overexposure or hot spots.
Diffuse the Light for Smooth Skin Tones
If your softbox has interchangeable diffusers, use them. I used a translucent sock over my softbox during a shoot, which smoothed out skin tones and minimized shine. For softer results, add an extra layer of diffusion—this acts like a cloud covering the sun—creating a gentle, flattering light. For optimal diffusion options, check [softbox lighting tips](https://lights.creatorrigreviews.com/mastering-softbox-lighting-tips-for-perfect-portraits-at-dawn).
Balance with Fill Light to Avoid Flatness
After setting your key softbox, add a fill light—preferably another soft source at a lower intensity—opposite the main light. During a DIY interview, I placed a smaller LED panel at about 45 degrees opposite my softbox. This balanced shadows, providing depth without flattening features. Adjust the fill brightness until shadows are softened but not eliminated entirely. Learn more about perfect fill lighting [here](https://lights.creatorrigreviews.com/fill-light-secrets-achieve-natural-look-in-natural-light-at-6-pm).
Keep Practicing and Fine-Tuning
Every face and space is different. The key is to start with these steps, then tweak based on your environment. During my early videos, I made small adjustments—moving the softbox slightly left or right—and the difference was dramatic. Take notes and view your recordings critically. Consistent practice will help you master softbox placement and elevate your on-camera presence.
Many creators believe mastering the basics is enough, but the real nuance lies in understanding how advanced mistakes can sabotage your lighting quality. For instance, over-relying on generic softboxes or RGB tube lights without considering their placement nuances often leads to flat or unflattering results. It’s a common myth that all softboxes are created equal; in reality, the size, diffusion, and positioning play a pivotal role in how your skin tones and shadows turn out.
One often overlooked aspect is the misconception that brighter or more expensive LED panels automatically improve footage quality. Studies by lighting experts emphasize that correct placement and diffusion matter more than raw brightness, which if misused can cause hotspots or unnatural color tints, as discussed in [expert lighting guides](https://lights.creatorrigreviews.com/led-panel-lights-for-creators-a-complete-guide-to-brighten-your-videos).
Ever wondered why your RGB tube lights seem vibrant in theory but lack depth on camera? The hidden nuance is in their placement and understanding their color temperature and effects on backgrounds. Many enthusiasts overlook that RGB tubes, when placed improperly, can flatten the scene or cause color spill, diminishing cinematic quality. An advanced mistake is using incompatible lights together—like mixing RGB tubes with high CRI LED panels—without adjusting for color temperature inconsistencies. For in-depth techniques, check [creative LED panel strategies](https://lights.creatorrigreviews.com/creative-led-panel-light-techniques-for-stunning-studio-videos).
Here’s a tip for seasoned creators: position your key light at eye level, but tweak the angle slightly to eliminate unflattering shadows—especially on complex faces or when using small softboxes. This tweak can significantly elevate your scene’s professionalism without upgrading equipment. Misjudging this simple detail is a common trap, leading to unnatural shadows or washed-out highlights. If you want to perfect this, consider [key light adjustments for cinematic depth](https://lights.creatorrigreviews.com/key-light-techniques-elevate-your-film-atmosphere-at-3-pm).
Finally, be cautious about the overuse of diffusion accessories. While diffusion softens harsh shadows, excessive diffusion can make your scene look dull or ‘flat.’ Striking the right balance is an art—the use of diffusion layers, especially on softboxes and LED panels, should be intentional and scene-dependent. A recent industry review stressed the importance of testing diffusion layers to prevent skin tones from appearing pale or washed out, which you can explore further in [diffusion tips for professional results](https://lights.creatorrigreviews.com/stop-dull-video-5-rgb-tube-light-saturation-fixes-for-2026).
Remember, the devil is in the details. Small adjustments in light placement, diffusion, and understanding each light’s behavior can make or break your visual storytelling. Don’t fall into the trap of thinking that high-end gear alone guarantees cinematic quality. Are you making any of these underestimated mistakes? Let me know in the comments!
Investing in quality lighting equipment like softboxes, LED panels, and RGB tube lights is only half the battle; ensuring they stay in top condition over time requires strategic maintenance. My go-to method combines routine checks with specialized tools that keep my setup reliable and ready for any shoot. Regularly inspecting the integrity of diffusers and power cables prevents unexpected failures, while cleaning softbox fabrics with a gentle vacuum removes dust that can diminish light quality. For precise adjustments, I swear by a digital lux meter—specifically, the Extech LT45—which allows me to measure output consistency and spot dimming issues before they compromise my footage.
How do I maintain my lighting gear to ensure long-term performance? The key is a scheduled maintenance routine: checking for loose connections monthly, updating firmware on smart lights, and storing equipment in climate-controlled environments to prevent damage from humidity or temperature fluctuations. For instance, when my RGB tube lights started showing color inaccuracies, I discovered that residual moisture had affected their internal circuits. A quick recalibration with manufacturer settings and proper storage fixed the issue, extending the lifespan and preserving color fidelity. To streamline this process, I rely on a dedicated light maintenance kit, which includes contact cleaners, replacement diffusers, and protective covers—click here to learn more about the tools I recommend.
Looking ahead, the trend points toward smarter, self-diagnosing lights equipped with diagnostic interfaces accessible via software updates. This will make maintenance even more intuitive, reducing downtime and costs. For now, though, integrating simple routines and quality tools like a lux meter or specialized cleaning kits can dramatically improve your gear’s longevity and your overall production quality.
What’s the best way to keep your equipment performing at its peak?
Besides routine checks, embracing preventive maintenance is critical. For example, I regularly review my softbox diffusers using a light meter to ensure even diffusion over months, preventing uneven light fall-off that can ruin a shot. Also, replacing worn-out parts proactively—like updating gel filters or recalibrating RGB mixes—keeps visuals vibrant and professional. A tip I suggest is setting a quarterly maintenance date, where you thoroughly inspect and sharpen your setup. This habit not only prolongs equipment life but instills confidence, knowing your lights won’t let you down during critical shoots.
To boost your efficiency, consider upgrading to intelligent lights that come with diagnostic apps—these often alert you about potential issues before they affect your footage. Meanwhile, I recommend maintaining a detailed checklist of your gear’s condition, so you can track improvements over time. Remember, investing in proper maintenance tools and routines now can save you headaches and money down the line, ensuring consistent, high-quality lighting in all your projects. Ready to elevate your setup? Start by incorporating a lux meter check into your weekly routine and notice the difference it makes.
The Hidden Gems That Changed My Lighting Game
- Switching from generic positioning to experimenting with varying angles revealed subtle improvements that had a big impact, teaching me that small tweaks often yield big results.
- Realizing that diffusion isn’t just about softness but also about color accuracy helped me avoid the dreaded pale skin look, reinforcing that quality diffusion equals better visuals.
- Understanding that every space requires a personalized approach, I learned that rigid setups rarely work—adaptability and keen observation are your best tools.
- Discovering the importance of routine maintenance on lights, including cleaning and calibration, ensured consistent quality and saved me from costly surprises during critical shoots.
![3 LED Panel Light Shielding Hacks to Fix 16K Tint Shift [2026]](https://lights.creatorrigreviews.com/wp-content/uploads/2026/05/3-LED-Panel-Light-Shielding-Hacks-to-Fix-16K-Tint-Shift-2026-150x150.jpeg)


