
It was a perfect shoot day, or so I thought—until I looked at the footage and realized my key light was doing more harm than good. The shadows were harsh, my subject looked flat, and I knew I had to scramble for a quick fix. Ridiculous, right? But that moment sparked a revelation: understanding how to get the most out of my lighting gear is absolutely crucial. If you’ve ever been there—frustrated with inconsistent results or overwhelmed by the sheer array of options—timing is everything. Today, I promise to guide you through the essential gear and techniques recommended for 2024, so you never have to face that shooting frustration again.
Why Proper Lighting Makes or Breaks Your Studio Wins
Proper lighting isn’t just about illumination; it’s about artistry, mood, and professional polish. Whether you’re shooting professional videos or personal projects, the right setup can transform a bleak shot into a cinematic masterpiece. But here’s the catch: many creators, myself included early on, make the mistake of assuming that more expensive gear alone guarantees great results. It’s a common misconception—and one that can lead to wasted money and time.
In fact, a study from the Visual Storytelling Institute found that lighting quality accounts for over 70% of perceived image professionalism. That’s staggering! So why do so many still overlook this crucial element? Because choosing between softboxes, LED panels, RGB tube lights, or key lighting techniques can feel overwhelming. I’ve been there. I spent countless hours and dollars trying to piece together the perfect setup, only to realize I was missing fundamental principles.
Early in my journey, I believed that just buying a pricey LED panel would solve everything. Instead, I overlooked proper placement and the importance of fill light, which resulted in flat images and unflattering shadows. It wasn’t until I studied [softbox lighting techniques](https://lights.creatorrigreviews.com/mastering-softbox-lighting-tips-for-perfect-portraits-at-dawn) and refined my understanding that my results started to improve. This experience taught me that investing in knowledge—on top of gear—is the real game changer.
Today, we’ll explore not just what lights to buy, but how to use them effectively, maximizing your studio’s potential without breaking the bank. Ready to turn your lighting chaos into cinematic clarity? Let’s get started.
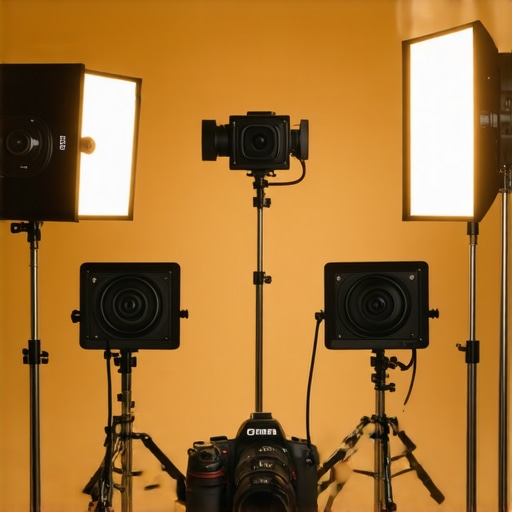
Position Your Main Light for Impact
Start by placing your key light at a 45-degree angle from your subject, slightly above eye level. This angle creates natural-looking shadows that add depth. During my first shoot using a softbox, I placed it directly in front, resulting in flat images. When I shifted it to a side angle, the portrait gained dimension and richness. Using a softbox is ideal for soft, even light, but positioning is key—think of your main light as the sculptor’s hand, shaping your subject’s features.
While many beginners focus on choosing the right gear, a surprisingly overlooked aspect is understanding the subtle interplay between fill light, LED panels, softboxes, RGB tube lights, and key lights. A prevalent myth is that increasing fill light intensity always results in a more natural look. In reality, overdoing fill light can flatten your subjects, eliminating the depth and dimension that make a shot pop. The key is **balance and placement**—more isn’t always better. For instance, using a softbox as a fill light at the wrong distance can produce harsh shadows, defeating its purpose. I’ve seen creators blindly increase fill light brightness, only to realize their shots look artificial rather than authentic. To master this, dive into advanced techniques like gradually adjusting fill levels to match ambient light, which ensures a seamless blending of studio and natural illumination. A common trap is assuming that a brighter LED panel compensates for poor placement; remember, equipment quality can’t fix fundamentals like positioning. Also, many believe that RGB tube lights are only for creative effects, but when used skillfully, they serve as versatile fill lights, especially at dusk or during evening shoots [see creative uses for RGB tubes](https://lights.creatorrigreviews.com/rgb-tube-light-effects-creative-uses-for-evening-shoots). Furthermore, a study from the Lighting Design Institute highlights that improper use of fill lighting can flatten facial features and diminish depth perception, a pitfall many fall into without realizing. But how do you avoid this? It’s about understanding the impact of light ratios—how much fill to key light—and not just the hardware specs. For a comprehensive guide, check out our in-depth article on effective fill light techniques for stunning results. Remember, the goal is a balanced setup that enhances your subject’s features naturally. Let’s harness these nuances to elevate your lighting game, ensuring every shot is both technically sound and visually compelling. Have you ever fallen into this trap? Let me know in the comments.Ensuring your studio lighting equipment remains reliable and effective over time is essential for achieving consistent professional results. Investing in quality gear like softbox setups, LED panels, or RGB tube lights is only part of the equation; proper maintenance extends their lifespan and preserves their performance. I personally rely on routine checks and specific tools to keep my equipment in top shape.
How do I keep my lighting tools performing at their best?
First, regular cleaning is crucial. Dust and grime can impair light output and lead to overheating. I use compressed air and microfiber cloths to gently remove debris from vents and surfaces. For electronic components, a soft brush helps eliminate stubborn dust without risking damage. Additionally, applying manufacturer-recommended thermal grease on heatsinks or connectors—like those found on certain LED panels—can improve heat dissipation, preventing premature failure. For cables and connectors, periodic inspection ensures no frays or shorts develop, which could cause intermittent functionality or safety issues. To accommodate different shooting conditions, I invest in adjustable mounts and sturdy stands, which minimize wear and tear from frequent setup and teardown. A well-maintained rig consistently delivers professional-quality light, freeing you to focus on your creative process. As the trend in 2024 leans towards more versatile and smart lighting solutions, staying updated with firmware or software updates from manufacturers—accessible through their official sites—is equally important. For example, manufacturers like Aputure or Nanlite regularly release updates that optimize performance and add new features. I recommend setting calendar reminders for these updates to avoid missing critical improvements. Want a simple tip to ensure your gear stays in excellent shape? Incorporate a maintenance schedule into your routine, dedicating time monthly to inspect, clean, and update your equipment. This proactive approach prevents costly repairs and downtime. Interested in specific tools to streamline this process? Static-free brushes, microfiber cloths, and proper storage cases are my go-to essentials. You can find more detailed maintenance methods for softbox and LED panel lights in our dedicated guide on [softbox lighting best practices](https://lights.creatorrigreviews.com/mastering-softbox-lighting-tips-for-perfect-portraits-at-dawn). By staying vigilant, you’ll keep your lighting setup reliable and your creativity shining bright—long after the initial purchase. For further assistance or tailored advice, feel free to [reach out](https://lights.creatorrigreviews.com/contact-us) whenever you need.
Lessons Hidden in My Lighting Blunders
The biggest revelation was realizing that my obsession with high-end gear often distracted me from mastering fundamental principles. I once believed that a more expensive LED panel would magically elevate my videos; instead, I learned that knowledge of placement and light ratios was the real game changer. An unexpected challenge was misjudging the softness of my softbox, which produced flat, unflattering results—teaching me that tool selection is only half the battle. Through trial, error, and a lot of research, I discovered that even budget-friendly RGB tube lights can create stunning effects when used intentionally, reminding me that creativity isn’t about spending more, but about understanding your tools deeply. Perhaps most impactful was the realization that consistent maintenance and proper setup extend your gear’s lifespan and ensure professional results—saving money and stress in the long run. These lessons reshaped my approach and helped me see that effective lighting is less about the hardware and more about how you wield it.
Tools and Resources That Transformed My Approach
My go-to resource has been the comprehensive guide on softbox lighting techniques. It’s helped me refine my main light placement for natural depth. For understanding the nuanced use of fill lighting, the article on effective fill light strategies provided clarity on balancing shadows without flattening the subject. When I wanted to explore creative uses of RGB tube lights, I turned to creative effects for evening shoots; it expanded my palette. Additionally, tools like the LED panel setup guide and quality mounts have become staples in my studio. These resources, combined with ongoing maintenance routines, keep my gear performing at its best, truly elevating my craft.
Keep the Flame Alive in Your Lighting Journey
Embarking on your studio lighting journey in 2024 is both exciting and rewarding. Remember that even with the latest gear, understanding the art behind light placement, ratios, and maintenance makes all the difference. Your creative evolution starts with experimenting confidently and learning continuously—there’s no better time than now to take your lighting skills to the next level. What’s one lighting challenge you’re eager to conquer next? Share below and let’s grow together in this bright journey!
![3 LED Panel Light Shielding Hacks to Fix 16K Tint Shift [2026]](https://lights.creatorrigreviews.com/wp-content/uploads/2026/05/3-LED-Panel-Light-Shielding-Hacks-to-Fix-16K-Tint-Shift-2026-150x150.jpeg)


One response to “Ultimate Guide to Key Light & LED Panel Lights for Studio Setup 2024”
This post really resonates with me, especially the part about how even budget-friendly RGB tube lights can be effectively used with the right knowledge. I’ve often wondered if investing in expensive gear is always necessary, or if understanding fundamentals makes more of a difference. I’ve started experimenting more with light placement and ratios, and it’s incredible how much a slight adjustment can change the mood of a shot. The tip about maintaining gear is also a game changer—I used to neglect routine checks, which led to some unexpected equipment failures during shoots. Now I’ve incorporated monthly maintenance routines, and my gear’s performance has definitely improved. The crucial insight here is that lighting is less about the equipment and more about how you wield it, which is really empowering. For those just starting, what are some simple maintenance tips or quick fixes you’ve found most helpful? I’d love to hear everyone’s experiences or suggestions.