
I remember the frustration of spending hours fiddling with my lighting setup, only to realize I had no idea how to get that perfect, natural look on camera. One evening, after a string of failed shoots, it hit me — lighting isn’t just about having fancy gear; it’s about knowing how to wield it effectively. That lightbulb moment changed everything for me, and now I want to help you avoid the same pitfalls.
Why Lighting Setup Can Make or Break Your Content
When I first started creating videos, I naively believed that good content would shine through regardless of my lighting. Turns out, poor lighting can turn a simple shot into a confusing mess. It’s the difference between looking professional and amateurish. Properly set up softboxes and LED panels can dramatically elevate your visuals, making your content more engaging and trustworthy. According to a recent study, 93% of viewers consider lighting quality a key factor in judging a creator’s professionalism. So, if you’ve ever felt like your videos aren’t quite hitting the mark, the problem might be your setup.
Is Spending Big on Lights Actually Worth It?
Early on, I made a mistake many beginners do — I bought cheap, low-quality lights because I thought they’d do the job. Spoiler: they didn’t. Instead, I wasted time and money on gear that didn’t deliver consistent results. The truth is, investing in quality softboxes and LED panels, like those discussed in our Ultimate Guide, is worth every penny. They’re reliable, versatile, and can be fine-tuned for any shoot. Want to see how the right equipment can change your game? Check out this article on best softbox and RGB tube lights for creators in 2024.
But here’s the thing — even the most expensive lights won’t save you if you don’t know how to set them up properly. That’s why I’ve put together this comprehensive guide. We’ll cover everything from choosing the right softbox to positioning LED panels for maximum effect. Ready to transform your studio? Let’s dive in!
Getting Started with Your Lighting Arsenal
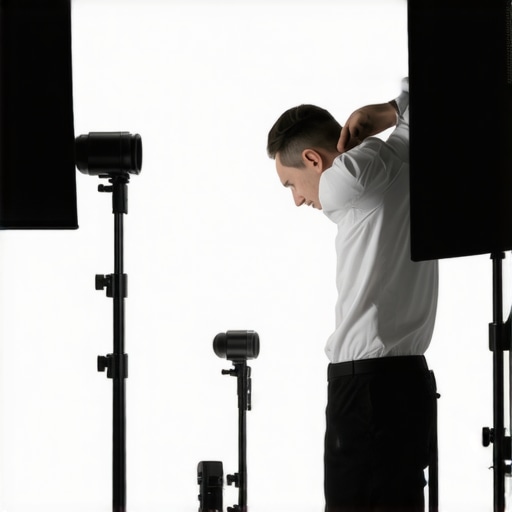
Position Your Lights Strategically
During my first attempt at setting up a softbox, I placed it directly in front of me, thinking more light equals better quality. The result was a harsh, flat look that washed out my face. I learned quickly that angling your softbox slightly above eye level and pointing it downward creates a natural, flattering light. Think of it as mimicking sunlight filtering through a window — soft, directional, and pleasing. Use a light stand with adjustable height to fine-tune this angle until your subject’s face is evenly illuminated without harsh shadows.
Balancing Key and Fill Lights
Once I introduced a fill light, I realized how vital it is to balance the intensity. I started with a key light that provides the main illumination and a softer fill light to reduce shadows. For example, I set my softbox at 100% power and my LED panel as a fill at around 30-40%. This contrast keeps the face dynamic without losing detail in the shadows. For more nuanced control, consider using dimmers or adjusting the distance of your lights, akin to adjusting the volume and tone of a musical instrument to achieve harmony.
Experiment with Light Distance and Intensity
One day, I placed my softbox too close, resulting in overexposure and washed-out skin textures. I moved it back about 3 feet, which softened the light and added depth. Think of light like water from a garden hose — the closer it is, the more intense and harsh it feels; farther away, the softer and more diffuse. Use a light meter or your camera’s histogram to check exposure levels, ensuring your subject is well-lit without blowing out details. For LED panels, many models allow you to dial in brightness precisely, much like tuning a radio for clear reception.
Utilize Practical and Background Lights
Adding practical lights, such as small lamps or accent LEDs, can elevate the scene’s depth. I once used a RGB tube light behind my setup to create a subtle color accent that made the shot more vibrant. Explore creative effects by adjusting the color temperature or using effects like flicker or pulse, as shown in our RGB tube light effects guide. This adds personality and cinematic quality to your videos, making your background pop without overwhelming the main subject.
Refine with Consistent Testing
My breakthrough came when I started testing each element systematically. I would adjust my softbox height, change the intensity of my LED panels, and review the footage immediately. This iterative process resembles tuning a guitar — small tweaks lead to perfect harmony. Use your camera’s viewfinder or monitor to observe how each change affects the shot. Remember, lighting is an art of balance, not just brightness. For advanced techniques, check out our ultimate softbox and RGB tube lighting guide for detailed insights.
Many creators operate under assumptions that, while seemingly logical, often lead to suboptimal results or even mistakes that can hinder the professional look of your videos. Let’s dig deeper into some of these misconceptions and clarify what truly matters in advanced lighting setup.
Why Most People Overlook Light Quality Over Placement
It’s a widespread belief that positioning lights correctly is enough, but in my experience, the quality of your light source plays a more critical role. Cheap LEDs or fluorescent bulbs may be bright enough, but they often produce color casts, flicker, or uneven diffusion that can ruin an otherwise perfect shot. Investing in high-quality softboxes or LED panels with consistent color temperature and flicker-free operation can make a significant difference. For instance, recent innovations in LED panel technology ensure your lighting remains stable, even during long shoots. Remember, a well-placed, low-quality light can look worse than a poorly placed but high-quality source.
Beware of the Myth That More Lights Equal Better Results
This is a trap many fall into — thinking more is better. In reality, over-lighting can create unwanted shadows, reduce contrast, and flatten your image, making it look unnatural. Effective lighting isn’t about saturation but about strategic placement and balance. Using fewer, well-placed lights, such as a key light combined with a subtle fill, often yields more natural and professional results. For advanced techniques on achieving this, check out our key light strategies.
When to Use Fill Lights and When to Skip Them
Many creators assume fill lights are always necessary, but this isn’t true. Overuse of fill lights can eliminate shadows that add depth and dimension, resulting in a flat look. The secret is in understanding your scene and choosing whether to embrace shadows for drama or soften them for clarity. For example, during a cinematic interview, a subtle fill can add realism without washing out details. Want to master this? Our fill light techniques offer detailed guidance.
How to Avoid the Mistake of Ignoring Light Temperature
Many newcomers focus solely on brightness, neglecting the importance of color temperature, which can make or break your scene’s mood. Mixing lights with different temperatures creates unnatural color casts that are hard to correct in post-production. Consistency is key — using lights with the same Kelvin rating, such as 5600K for daylight, ensures a harmonious look. For advanced control, consider using RGB tubes or adjustable LED panels that let you fine-tune the hue in real-time. This approach prevents the common mistake of mismatched lighting, which can distract viewers and diminish your content’s professionalism.
Understanding these nuances is crucial for elevating your lighting game. Have you ever fallen into this trap? Let me know in the comments. For more expert insights, explore our ultimate lighting guide.
Maintaining your lighting equipment is essential to ensure consistent, professional results and extend the lifespan of your investment. Over time, even high-quality lights can suffer from wear and tear, dust accumulation, or technical issues that can compromise your shoot quality. A proactive maintenance routine not only saves you money but also keeps your setup reliable for those critical shoots when you can’t afford disruptions.
How do I maintain my lighting setup over time?
First, regularly clean your lights and accessories. Dust, dirt, and fingerprints can affect diffusion and color temperature. Use a soft, lint-free cloth and gentle cleaning solutions suitable for plastic and metal surfaces. For softboxes and diffusers, remove the fabric parts and wash them according to manufacturer instructions—typically hand-washing with mild soap helps preserve their lifespan.
Second, check your cables and connectors periodically. Frayed wires or loose connections can cause flickering or unpredictable color shifts. Replace damaged cables immediately and store them properly to prevent bending or breaking. This simple step ensures your LED panels or RGB tubes continue to deliver stable, flicker-free illumination, as emphasized in the LED panel innovations article.
Third, update the firmware of your smart lighting gear if applicable. Manufacturers often release updates that fix bugs or improve performance. Check the manufacturer’s website regularly or subscribe to their newsletter to stay informed. Keeping your software current helps prevent glitches and ensures compatibility with your control apps or camera systems.
What tools do I recommend to keep my lights working?
I personally rely on a few specialized tools to keep my studio lights in prime condition. A high-quality compressor air can is invaluable for removing dust from vents and delicate components without risking damage. I also use a flicker tester to ensure my LED panels are operating flicker-free, which is critical for smooth video footage and avoiding headaches for viewers. Additionally, a multimeter helps diagnose electrical issues quickly, saving time and preventing larger problems from developing.
Investing in these tools is a small price compared to the cost of downtime or replacing entire units. For comprehensive maintenance, I follow a routine check every few months, inspecting each piece of equipment thoroughly. This proactive approach predicts potential issues before they become costly repairs.
Future trends in lighting maintenance
Looking ahead, I believe smart diagnostics and AI-powered maintenance solutions will become standard. Imagine a system that not only alerts you to issues but also predicts component failures based on usage patterns and sensor data. This predictive maintenance will minimize downtime and keep your studio running smoothly without constant manual checks.
To start applying these principles today, try integrating a flicker tester into your regular routine. It’s a simple, effective way to catch flickering issues early and maintain video quality at its best. Keeping your gear in top shape isn’t just about repairs; it’s about ensuring your creative flow remains uninterrupted for long-term success.
The Hardest Lesson I Learned About Lighting Setup
One of my most valuable realizations was that investing in high-quality lighting gear is just the beginning. Without proper setup and understanding, even the most expensive lights can fall flat. I once spent hours troubleshooting flickering LED panels, only to discover that simple cable connections or incorrect angles were the culprits.
3 Myths About Lighting That Held Me Back
For a long time, I believed more lights meant better results. Turns out, strategic placement and quality matter far more than quantity. I also thought that softboxes were only for professional studios, but with the right techniques, they can transform any setup. Lastly, I assumed that color temperature was a minor detail; however, mismatched temperatures can ruin the consistency of your scene’s look.
What Experts Won’t Tell You About Maintaining Your Lights
Many creators overlook regular maintenance, which is vital for reliable performance. Simple steps like dusting your diffusers, inspecting cables, and updating firmware can extend your gear’s lifespan and ensure flicker-free footage. I’ve learned that proactive care saves time and money in the long run, keeping your studio ready for every shoot.
My Essential Toolkit for Lighting Success
These tools have been game-changers for me: a high-quality flicker tester to ensure stable operation, a reliable LED panel with adjustable Kelvin temperature, a soft brush for cleaning diffusers, and a multimeter for electrical troubleshooting. These investments keep my setup consistent and professional.
Don’t Be Afraid to Start Creating with Better Lighting
Improving your lighting setup isn’t about having the latest gear; it’s about learning to use what you have effectively. Start experimenting with angles, distances, and color temperatures today. Your content will look more polished, engaging, and trustworthy. Remember, every creator begins somewhere, and mastery comes with practice and patience.
What’s been your biggest challenge in setting up your lighting? Share your experiences below and let’s grow together!
,
![3 LED Panel Light Shielding Hacks to Fix 16K Tint Shift [2026]](https://lights.creatorrigreviews.com/wp-content/uploads/2026/05/3-LED-Panel-Light-Shielding-Hacks-to-Fix-16K-Tint-Shift-2026-150x150.jpeg)


2 responses to “Ultimate Guide to Softbox & LED Panel Light Setup for Creators in 2024”