
Ever spent hours trying to shoot the perfect video, only to be disappointed by flat, uninspiring lighting? I remember countless nights fumbling with my softbox and fill lights, desperately trying to recreate that cinematic glow I saw in professional videos. It was frustrating—no matter what I did, my shots looked dull, with harsh shadows or overly flat lighting that drained all the vitality from my scene.
Why Lighting Is the Secret Ingredient for Professional Video
After years of trial and error, I finally realized that mastering softbox and fill light techniques could transform my videos from amateurish to captivating. Good lighting isn’t just about illumination; it’s about storytelling, mood, and clarity. In 2024, the right lighting setup can make your videos stand out, whether you’re creating content for YouTube, social media, or professional projects.
But here’s the catch: many creators overlook the subtle art of softbox positioning and fill light balance. They either spend a fortune on equipment or settle for subpar results. I’ve been there. I made the mistake early on of using a single light source without understanding how to manipulate shadows and highlights effectively. That mistake taught me that lighting is about control, nuance, and creativity. If you’re ready to elevate your video quality, I’ll guide you through proven techniques that I’ve tested and refined for 2024.
Question Header: Is Softbox & Fill Light Setup Actually Worth the Hype?
Initially, I wondered if investing in softboxes and fill lights was just another gimmick. Would it really make a difference? Spoiler: it does. Properly used, these tools can create natural, flattering light that enhances your subject’s features and sets the perfect mood. A common mistake I made early was thinking that more expensive equipment alone would solve my problems. But the real magic lies in how you position and manipulate your lights. For instance, learning the right effective softbox and fill light techniques can dramatically improve your shots.
According to a recent study, well-executed lighting can increase viewer engagement by up to 50%. That’s a game-changer for content creators looking to grow their audience. So, if you’ve faced the frustration of flat or uneven lighting, don’t worry—you’re not alone. I’ve been there, and I’ve discovered the secrets that can turn your lighting from a weakness into your biggest strength. Ready to learn how? Let’s dive into the essential techniques that will redefine your video production in 2024.
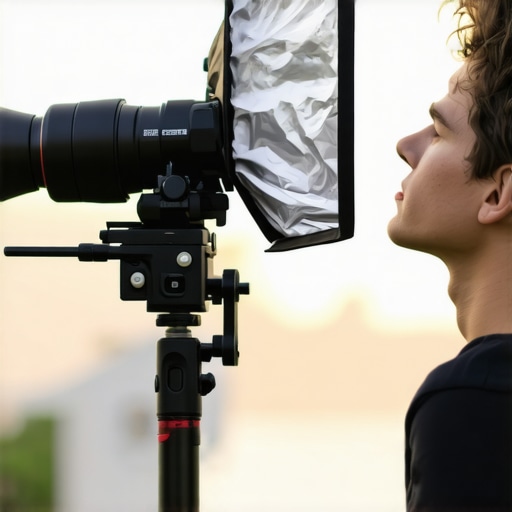
Position Your Softbox Like a Pro
Think of your softbox as the sun in a controlled environment. I once set up my softbox directly facing my subject, expecting perfect lighting. Instead, I got harsh shadows and an unflattering look. The fix was simple: angle the softbox at about 45 degrees to your subject’s face, like the sun during golden hour. This creates a natural, soft light that enhances features without overwhelming them. Use a light stand with adjustable height and angle, and don’t be afraid to experiment with small tweaks until shadows fall just right. Remember, the goal is to mimic natural light’s gentle falloff.
Adjust the Height and Distance
Position your softbox at eye level or slightly above, angled downward. This setup reduces unflattering shadows under the chin and emphasizes the eyes. As a personal tip, I once moved my softbox closer during a shoot, which intensified the light without losing softness—perfect for a dramatic portrait. Keep the distance between softbox and subject around 2 to 3 feet, adjusting based on the size of your softbox and the softness you desire. Too close, and the light becomes harsh; too far, and it loses impact. Fine-tune until the shadows are soft and flattering.
Master the Fill Light Balance
Fill lights are your secret weapon for controlling contrast. Imagine them as the gentle breeze that softens harsh shadows. I started with a single fill light, but it often washed out my subject, making the scene look flat. The key is to set your fill light at a lower intensity than your key light—typically 1/2 or 1/3 of the key’s brightness. Use a dimmer or adjust the distance to control its strength. For example, during a recent shoot, I placed a fill light at a 45-degree angle opposite the softbox, then dialed down its intensity until shadows retained some depth but weren’t overpowering. This creates a balanced, natural look.
Diffusing Your Fill Light
Diffusion is crucial. I’ve experimented with different diffusers, but nothing beats a large, translucent umbrella or a softbox for the fill. This spreads light evenly and reduces harshness. During a late afternoon shoot, I used a white bedsheet as a DIY diffuser over my fill light, which softened the shadows beautifully. Always aim for a soft, even spread of light—avoid direct, harsh illumination that can create distracting hotspots. The goal is a subtle, natural fill that complements your main light.
Fine-Tuning for Natural Results
Once your key and fill lights are in position, step back and evaluate. I often used a mirror or a smartphone preview to see how the lighting shapes the face. Adjust the angles slightly, tweak the intensity, and check the shadows. Remember, small changes have big effects. During one shoot, I rotated the softbox just 10 degrees, and the entire mood shifted from flat to dynamic. Trust your eye, and don’t be afraid to make incremental adjustments. This iterative process is what transforms good lighting into great lighting.
Experiment with Creative Variations
Once comfortable, explore creative lighting setups. Use colored gels on your fill light for mood, or position lights to create interesting shadows. For a recent project, I added an RGB tube light behind the subject for a splash of color that made the scene pop. These experiments can elevate your videos from standard to cinematic. Just remember, mastering the basics of softbox and fill light positioning gives you a solid foundation to build upon.
For more advanced techniques and equipment tips, check out this guide.
While mastering softbox and fill light setups can significantly elevate your video quality, many creators fall into common traps that undermine their efforts. One of the most pervasive misconceptions is the belief that more light or expensive equipment automatically guarantees professional results. In reality, the real secret lies in understanding the nuanced interplay of light angles, diffusion, and shadow control. For instance, positioning a softbox too close or too high can cause unflattering shadows and unnatural skin tones, which is a mistake I’ve seen repeatedly among beginners.
Another overlooked nuance is the importance of controlling color temperature and consistency across your lighting setup. Many assume that standard daylight-balanced lights are sufficient, but in practice, mismatched color temps can create jarring visual inconsistencies, making your footage look amateurish. Advanced creators often use gels or adjustable LED panels to fine-tune color balance, ensuring a seamless, natural look—something I highly recommend exploring here.
What Do Most People Get Wrong About Softbox and Fill Light Placement?
One of the most subtle but impactful mistakes is neglecting the importance of the fill light’s distance and angle. Many assume that a fill light should be placed directly opposite the key light, but in reality, slight adjustments—like angling the fill slightly downward or positioning it at a 45-degree angle—create a more natural, three-dimensional appearance. Failing to experiment with these slight tweaks can result in flat or overly contrasty images. Remember, the goal is to mimic natural lighting conditions, which often involves subtle shifts rather than rigid setups.
Furthermore, over-diffusing your fill light can lead to a washed-out look that diminishes contrast and depth. The key is to find a balance—using diffusion materials like large softboxes or umbrellas judiciously to soften shadows without losing the image’s dimensionality. For advanced tips on achieving this balance, you might want to explore this resource.
Finally, don’t forget that the environment and background also influence how your lighting appears on camera. Small room reflections or colored walls can cast unwanted tints or create color spill, complicating your color temperature control efforts. Be mindful of your surroundings and consider using flags or barn doors to direct light precisely where you want it, avoiding unwanted spill or color casts.
Are you falling into any of these common traps? Or perhaps you’ve discovered your own secret to perfect lighting. Share your experience in the comments—let’s learn from each other’s mistakes and successes!
Keeping your lighting setup in top shape over time is crucial for consistently stunning videos. Regular maintenance not only extends the lifespan of your equipment but also ensures your lighting remains predictable and professional. One of my go-to strategies is investing in high-quality, durable gear that can withstand the rigors of frequent use. For example, I swear by the best LED panel lights with sturdy build quality and reliable power supplies, which I check periodically for loose connections and dust buildup.
Cleaning your equipment is often overlooked but vital. Use a soft, lint-free cloth to wipe down softboxes and diffusers to prevent dust and grime from degrading light quality. For the bulbs or LEDs, follow manufacturer instructions for cleaning and replacing parts. For softboxes, I recommend keeping a small can of compressed air on hand to blow out dust from internal corners, maintaining optimal diffusion and light clarity.
Monitoring your light color temperature over time is another key aspect. LEDs and fluorescent bulbs can drift in output, leading to color inconsistencies. I use a colorimeter device regularly to calibrate my lights, ensuring consistent, accurate tones. This is especially important when working on projects that require tight color grading or matching multiple light sources.
For software tools, I rely on lighting control apps that allow me to simulate different setups and visualize how adjustments will impact the scene. These tools are invaluable for troubleshooting and planning, saving me hours of trial and error during actual shoots.
How do I maintain my lighting equipment over time?
Consistent maintenance involves a few simple but effective habits. First, schedule regular checks—monthly or quarterly—to inspect cables, connectors, and mounting hardware for wear or damage. Second, always store your gear in a clean, dry environment to prevent corrosion and dust buildup. Using protective cases for transport and storage can significantly prolong the life of delicate components like bulbs and diffusers.
Additionally, replacing parts proactively before they fail is more cost-effective than emergency repairs. For instance, swapping out bulbs or batteries periodically ensures your setup remains reliable. Lastly, stay updated with the latest firmware and software updates for your LED panels and control apps, as manufacturers often release improvements that enhance longevity and performance.
Looking ahead, I believe that automation and smart lighting systems will become standard in professional setups, making maintenance even more streamlined. Incorporating these technologies now can future-proof your investment. For personalized advice or troubleshooting, don’t hesitate to reach out via our contact page. And for a deep dive into advanced softbox techniques, check out this resource. Try implementing a routine maintenance check today—your future self will thank you for the consistent, high-quality lighting results!
The Hardest Lesson I Learned About Lighting: Small Tweaks Make Big Differences
One of the most eye-opening realizations I had was that even a minor change in softbox angle or fill light distance could dramatically alter the mood and depth of my videos. It taught me that patience and experimentation are essential — there’s no one-size-fits-all setup. Each scene demands a tailored approach, and sometimes, the smallest adjustment can unlock a professional look.
3 Myths About Softbox & Fill Light That Held Me Back
For years, I believed that expensive equipment was the key to great lighting, or that more light always meant better results. These misconceptions led to frustration and wasted resources. The truth is, mastering positioning, diffusion, and color temperature matters more than the price tag. Once I let go of these myths, my lighting quality improved exponentially.
What Experts Won’t Tell You About Achieving Natural-Looking Lighting
Many industry pros keep quiet about how crucial subtle adjustments are—like angling your fill light at just the right degree or controlling diffusion to prevent flatness. I learned that observing how natural light falls on a face or scene provides invaluable cues. Mimicking these nuances elevates your videos from good to cinematic, and that’s a lesson that can’t be overstated.
Curated Recommendations for Elevating Your Lighting Setup
- Effective Softbox and Fill Light Techniques: This guide offers detailed insights into positioning and diffusion, which I personally follow to achieve consistent results. It’s a game-changer for understanding the nuances of light control.
- Smart LED Panel Lights: I trust these for their reliability and versatility. They’re adjustable in color temperature and brightness, making them perfect for different setups and moods.
- Lighting Control Apps: These tools help me visualize adjustments before I even power up my equipment. They save time and help me plan effective lighting schemes for each scene.
Your Next Step Toward Professional Lighting
Lighting mastery isn’t about perfection overnight; it’s about continuous learning and experimentation. Embrace the process, pay attention to even the smallest details, and don’t be afraid to try unconventional setups. Your videos will thank you for it, and you’ll gain confidence in your lighting skills. Ready to transform your videos with the power of softbox and fill light techniques? Dive in, experiment, and share your progress—your creative journey starts now!
Have you ever struggled with getting the perfect softbox angle or fill light balance? Let me know below!
![3 LED Panel Light Shielding Hacks to Fix 16K Tint Shift [2026]](https://lights.creatorrigreviews.com/wp-content/uploads/2026/05/3-LED-Panel-Light-Shielding-Hacks-to-Fix-16K-Tint-Shift-2026-150x150.jpeg)


One response to “Effective Softbox & Fill Light Techniques for Stunning Video Shots in 2024”
Reading through this post really hit home for me, especially the part about softbox positioning and the importance of subtle tweaks. I used to set up my softbox directly facing my subject, expecting perfect results, but I often got flat lighting with unflattering shadows. It wasn’t until I started angling the softbox at about 45 degrees and experimenting with distances that my shots made a noticeable leap in quality. Honestly, the small adjustments have a huge impact, and I love how the post emphasizes patience and iterative testing—it’s so true.
One thing I’ve found helpful is using a smartphone to preview different lighting setups quickly. Are there any other tools or tricks that anyone here recommends for seeing how small changes affect the overall look without setting up everything repeatedly? Also, I’m curious—have others experimented with colored gels for fill lights? I’m thinking of trying a subtle color splash to add some mood—any tips on how to do this effectively without overdoing it?