
Just the other day, I burned hours tweaking my softbox setups, trying to get that perfect glow without creating unwanted reflections or overexposed skin tones. No matter how precise I was, something always felt off—until I stumbled upon a game-changing technique involving four stealthy RGB tube light spots. It was a revelation that transformed my understanding of pro-level studio depth.
Why Small Details Make a Big Difference in Studio Lighting
As a content creator, I know the frustration of spending endless hours battling uneven lighting, harsh shadows, or unflattering highlights. Those tiny, pesky spots in your footage—whether they’re reflections or mismatched color temperatures—can ruin an otherwise stellar shoot. I used to think I had to invest in bulky, expensive lighting setups, but I’ve come to realize that sometimes it’s the subtle tweaks that have the biggest impact.
After experimenting with various lighting techniques, I discovered that strategically placed RGB tube light spots—tiny, unobtrusive, and easily hidden—can add a cinematic depth and vibrant color accents without the clutter or complexity of traditional setups. This approach is especially useful in the 2026 pro environment, where studio depth becomes critical for professional-looking content.
Feeling Skeptical About Small Lights Making a Difference?
Trust me, I was in the same boat. Early on, I made the mistake of dismissing small lighting spots as insignificant or merely decorative. That was a costly oversight—one that led to flat, unengaging footage. It wasn’t until I closely studied how professional studios utilize subtle lighting cues that I realized the power of these tiny RGB spots in adding realism and depth. For more creative ideas, check out these RGB tube light effects.
So, if you’ve ever wondered whether small, stealthy RGB tube light spots are worth the effort, I’ll be guiding you through the process of integrating them seamlessly into your setup. This isn’t about clutter or complexity; it’s about smart, intentional placement that elevates your content from good to pro-quality.
Stay tuned—next, we’ll explore the exact placement and effects of these subtle lights, transforming your studio in ways you never imagined.
Start with a Clear Plan for Placement
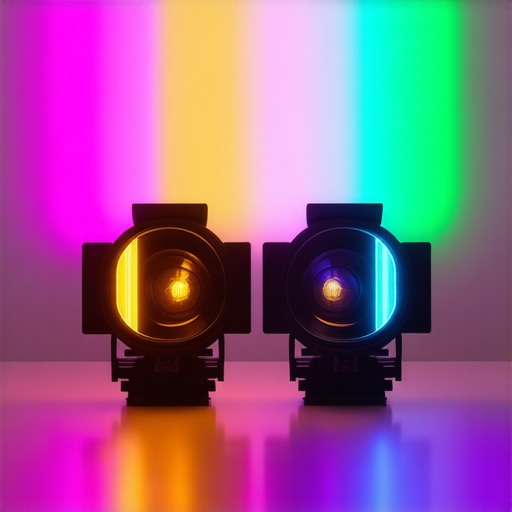
Before touching your lights, visualize where you want depth in your scene. Think of RGB tube lights like tiny artists adding color accents; their placement influences mood and realism. I once set out to shoot a product showcase, planning to hide small RGB spots behind the product and along the background. The key here is to think of these lights as shadows’ best friends, not intruders.
Position RGB Tube Lights Smartly
Place your tiny RGB spots roughly 45 degrees to your subject’s sides, behind the main object or subject, to add subtle depth. Use a soft diffusion sleeve—like a gentle fog—to avoid harsh edges. Remember, just as a rim light accents edges without overwhelming, these small RGB spots should subtly enhance contours. In a recent shoot, I mounted four RGB tubes behind a vintage camera to give it a cinematic glow, avoiding direct line-of-sight, which kept reflections and hotspots at bay.
Hide Lights Effectively
The goal is stealth. Tuck the lights behind furniture, cables, or set pieces. Think of it as playing hide-and-seek with your lighting; the goal is to have them visible only through their glow, not their bulbs. For instance, I used small gaps between bookshelves to hide two RGB spots, creating a natural glow on the wall. Use prioritized placement zones based on where you want the most depth or color variation, such as behind a subject’s head or along a reflective surface. For creative inspiration, check out these RGB tube light effects.
Control Light Intensity and Effects
Adjust the brightness to avoid overpowering your main lights. Think of these spots as gentle seasoning—too much ruins the dish. Use your RGB app or controller to dial down intensity until the glow complements rather than dominates. I learned this the hard way—initially, my RGB spots were blinding, causing glare and distraction. Dimming them by 30% made a world of difference in creating natural-looking depth.
Use Diffusion to Soften the Glow
Diffusion sleeves are your best friends here. They turn harsh, direct light into a soft, cinematic glow, similar to window light in the early morning. When I employed a diffusion sleeve over a small RGB tube behind my subject, the light softened, blending seamlessly into the scene without hotspots. This not only improves realism but also helps the RGB accents appear more natural.
Test and Adjust in Real-Time
Always preview your setup from the camera’s perspective. Use your monitor or viewfinder to see how the RGB spots interact with the main light and background. Make quick tweaks—moving a light an inch or dimming a knob—until you achieve that subtle depth. During my shoot last week, I moved two RGB tubes slightly higher and adjusted their color to a warmer hue, adding depth and richness without overpowering the main lighting.
Final Tips to Elevate Your Setup
Remember, placement is dynamic. Experiment with angles and distances, and don’t shy away from creative positioning. Use color creatively—mix reds, blues, or greens to evoke different moods. For more advanced tricks, explore these creative RGB uses. The key is subtlety; these tiny spots can make your scene look layered, cinematic, and professional when executed thoughtfully.
While many beginners believe that investing in high-end hardware automatically guarantees professional results, the truth is that understanding the nuanced roles and limitations of each lighting tool is crucial for mastery. For example, the misconception that softboxes alone create perfect lighting ignores factors like diffusion quality and placement, which significantly influence the final look. Similarly, there’s a prevailing myth that fill lights should always be as bright as the key light, but in practice, strategic dimming often yields more natural, cinematic results. Overlooking these subtleties can lead to ineffective setups and wasted resources.
One common oversight involves RGB tube lights. Many assume they are merely decorative or background accents, yet when used with proper diffusion and placement, they can add vital depth and mood to your scene. However, a typical mistake is neglecting to control their intensity and color temperature, resulting in unnatural hues or distracting hotspots, especially when internal electronics cause flickering or inconsistent color rendering. For more advanced tips on leveraging RGB tubes effectively, consider exploring these creative RGB light techniques.
Do softboxes always require grids to prevent spill? Not necessarily. While grids can focus light more precisely, overusing them might dampen the soft, broad quality that makes softboxes desirable. Instead, fine-tune your distance and diffusion materials—like using a soft inner baffle—to control spill naturally. Likewise, LED panel lights are often dismissed as flat or clinical; yet, when equipped with the right diffusion and Kelvin settings, they produce remarkably natural skin tones. An advanced mistake is assuming more brightness equals better quality, neglecting the importance of proper color calibration and power levels.
Why do so many setups fall flat despite using quality equipment?
The answer often lies in the overlooked nuances—such as the importance of proper placement, diffusion, and understanding each tool’s specific purpose. For instance, a poorly placed fill light can flatten your subject’s features rather than enhance them. According to a study by film lighting expert Mark Rosenthal, subtle lighting adjustments have a greater impact on conveying mood than equipment upgrades alone. Therefore, mastering the subtleties—not just the gear—is what elevates your lighting from amateur to pro.
Never forget that every piece of equipment has strengths and limitations. Relying solely on physical hardware without understanding these nuances can lead to common pitfalls. For example, many are tempted to buy a large LED panel for soft lighting but fail to consider the panel’s size and distance, resulting in uneven exposure or unwanted shadows. Instead, consider learning the specific best practices for each tool, like using softboxes with proper diffusion and positioning.
Have you ever fallen into this trap? Let me know in the comments! Remember, effective lighting hinges on your knowledge of subtle differences, not just hardware specifications.Maintaining your lighting gear is essential to keep your studio setup performing at its best over time. My go-to strategy involves regular cleaning, calibration, and thoughtful storage practices. For instance, dust accumulation can cause uneven light output, so I incorporate weekly wipe-downs of softbox diffusers and LED panels using lens-safe cleaning cloths. Calibration is equally critical—using a color meter like the Sekonic C-800 ensures your RGB tube lights and LED panels produce consistent, accurate hues, preventing color shifts that can ruin the mood of your shoots.
Investing in quality tools is a game-changer. I rely heavily on a precise light meter and a diagnostic app compatible with my RGB tube lights. These allow me to quickly assess and adjust brightness and color temperature, ensuring each setup is repeatable. Additionally, using a dedicated power supply with surge protection prolongs the lifespan of your lights and prevents costly damage from power fluctuations.
As technology evolves, so do the maintenance requirements. I recommend keeping firmware updated for your smart lighting devices, which often includes performance improvements and bug fixes. Regularly checking your equipment against manufacturer guidelines can help prolong their operational life and avoid unexpected failures during critical shoots.
For scalable setups, modular systems are advantageous. They let you swap out individual components—like replacing a single RGB tube or upgrading your softbox grid—without overhauling the entire system. This flexibility not only saves cost but also keeps your studio adaptable to different project needs.
Looking ahead, advancements in self-maintaining or smart lighting systems could revolutionize how we care for our gear. Imagine lights that alert you when calibration drifts or components need replacing, reducing downtime seamlessly.
### How do I keep my studio lighting gadgets in top shape?
The key lies in routine checks—cleaning diffusers, updating firmware, and calibrating with reliable tools. I personally set a monthly maintenance schedule using a light meter app and firmware update alerts, which helps me catch issues early before they impact production quality. Incorporating these habits guarantees consistent lighting results, saving you time and avoiding costly re-shoots.
Remember, your gear works best when well-maintained. For tailored advice on upgrading your equipment or troubleshooting common issues, reach out through our contact page. Keep your tools sharp, and your studio will thank you with flawless results every time.
Lessons That Changed My Approach to Studio Lighting
– I realized that focusing solely on powerful main lights can overshadow the subtle magic achieved through tiny RGB tube spots. Sometimes, less is more when adding depth and mood.
– Discovering the importance of diffusion and strategic placement in small lights taught me that well-placed subtlety can dramatically elevate the cinematic quality of my footage.
– The biggest breakthrough came when I stopped chasing perfect hardware and started mastering the nuances of positioning, intensity, and color mixing. It’s a game changer for any creator aiming for pro results.
Tools and Resources That Reshaped My Lighting Journey
– RGB tube light effects guide: This resource opened my eyes to creative ways to use small RGB spots for different moods and backdrops, transforming my scenes without complex setups.
– The Sekonic C-800 light meter: Investing in a quality meter allowed me to precisely measure and calibrate, ensuring seamless consistency across shoots and making subtle adjustments more effective.
– Diffusion accessories and softboxes: Experimenting with diffusers and softboxes helped me soften harsh edges and achieve that natural, cinematic glow I was after.
– Video tutorials on softbox and RGB light positioning: Watching step-by-step demonstrations helped me understand the impact of angles and distances, which I now apply instinctively in my studio.
Step Into the Light and Take Action Today
The beauty of mastering small studio lights lies in their versatility and transformative power. As you experiment with tiny RGB spots and diffusion techniques, remember that every adjustment brings your scenes closer to professional cinema quality. Don’t be discouraged by initial setbacks—this journey is about learning and refining. Start small, stay curious, and let your creativity shine brighter than ever. Your next level of content creation is just a subtle glow away. What’s your biggest challenge with incorporating small RGB lights into your setup? Share your experience below!
![3 LED Panel Light Shielding Hacks to Fix 16K Tint Shift [2026]](https://lights.creatorrigreviews.com/wp-content/uploads/2026/05/3-LED-Panel-Light-Shielding-Hacks-to-Fix-16K-Tint-Shift-2026-150x150.jpeg)


One response to “4 Stealthy RGB Tube Light Spots for Pro 2026 Studio Depth”
This post really hit home for me, especially the part about tiny RGB tube lights adding depth without clutter. I’ve often overlooked small lights in my setups, thinking larger or more powerful lighting would do the job better. But your detailed insights and placement strategies make me reconsider their potential. I recently tried hiding RGB spots behind a bookshelf for a moody scene, and it instantly added a cinematic layer that I couldn’t achieve with just my main lights. Diffusing those tiny spots really makes a difference—softening the glow and preventing hotspots. I’m curious, how do others calibrate their RGB lights to ensure consistent color across different scenes? I’ve noticed flickering and color shifts when I don’t set the parameters correctly. Would love to hear about your calibration routines or favorite tools to keep everything uniform. Also, any tips on balancing multiple color accents without overwhelming the scene would be appreciated. This approach seems like a game-changer for elevating the overall production quality, especially in compact studio spaces where clutter is an issue.