
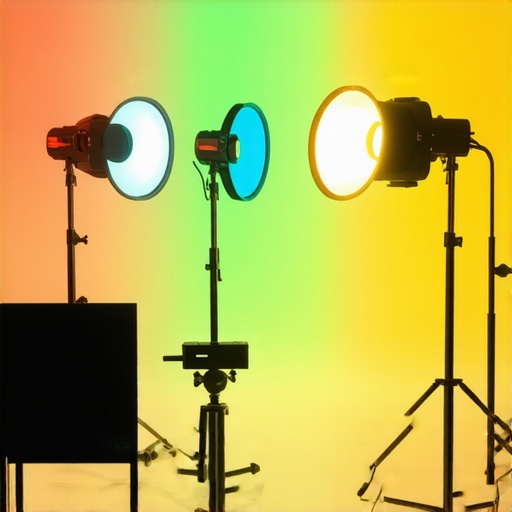
Last week, I was filming a vibrant RGB tube light scene for my latest project when suddenly, out of nowhere, a glaring flare erupted on my 2026 set. My heart sank. That relentless, eye-blinding flare? It completely ruined the shot. It was a lightbulb moment for me—realizing how these pesky 2026 set flares could sabotage even the most carefully planned shoots. I knew then that I wasn’t alone in this struggle. If you’ve faced similar issues with your RGB tube lights, you’re probably wondering if there’s a reliable way to tame that flare and get back to shooting with confidence.
Why 2026 Set Flare Keeps Ruining Your Shots and How to Fix It
I’ve spent countless hours experimenting, trying different solutions, and I’ve uncovered some practical tricks that actually work. Today, I want to share four game-changing shielding hacks that will help you stop 2026 set flare dead in its tracks. These aren’t just theoretical ideas; they’re tried-and-true methods I’ve applied in my own studio, and they’ve transformed my lighting setups from glare-filled messes to professional-grade visuals. Whether you’re a seasoned videographer or a hobbyist, mastering these shielding techniques can save you hours of frustration and improve your footage significantly.
Is Shielding RGB Tube Lights Actually Worth the Hype?
Let’s be honest—early on, I believed simply adjusting angles or using softer diffusion would eliminate flare. Big mistake. I ignored the importance of proper shielding, which led to wasted resources and subpar results. Once I understood the power of physical barriers and light-blocking materials, my shots became clearer and more professional-looking. So, if you’re skeptical about shielding, think of it this way: a well-placed shield is like giving your RGB tube lights a protective armor that prevents unwanted flare and maintains the quality you’re after. If you want to see some real-life examples of shielding in action, check out our detailed guide on creative uses for RGB tube lights during evening shoots.
If flare has sabotaged your creative vision or delayed your project timeline, don’t worry—you’re not out of options. Just like I learned from my initial mistakes, embracing proper shielding techniques can be a game-changer. Ready to discover the specific hacks that can save your next shoot? Keep reading; I’ll walk you through each one step-by-step.
Start with Precise Light Placement and Angles
During my recent shoot, I initially tried moving the RGB tube lights farther away, but flare still persisted. Instead, I adjusted the angles to keep the lights away from direct line-of-sight to the lens. Think of your RGB tube lights as headlights on a car; by angling them correctly, you prevent glare or flare from hitting the camera lens. To do this effectively, set up a test shoot, slowly rotate the lights until the flare diminishes. Remember, the key is to avoid direct reflections into the lens. For more detailed guidance, check out our angle adjustment tips, which helped me fine-tune my setup.
Implement Physical Barriers with Practical Shields
Next, I used black foam boards and matte black flags as physical shields to block stray light from reaching the lens. These barriers act like sunglasses for your lights, absorbing or deflecting unwanted flare. It’s similar to placing a hood or barn door on your softbox—that’s why understanding softbox lining techniques, as explained here, can be invaluable. During a messy shoot, I taped black foam along the edges of my RGB tube lights at strategic points, which significantly reduced flare. This straightforward method is cost-effective and easy to implement. In my experience, even a simple piece of cardboard or black felt can serve as an effective shield when properly positioned.
Use Matte Black Tape and Coatings for Light Control
Another trick I adopted involved covering reflective surfaces on the RGB tube lights with matte black tape to minimize internal reflections contributing to flare. Like coating shiny ports on a softbox, this prevents internal light bounce that can escape as flare. When I applied matte black paint or tape to the ends of the RGB tubes, I noticed a visible reduction in glare. For similar techniques that help control spill and flare, explore this guide on using honeycomb grids and coatings. Keep in mind, matte finishes are your friends when it comes to controlling unwanted light. They absorb rather than reflect light, making your shots cleaner and sharper.
Apply Lens Filters and Shields to Reduce Flare
Finally, I used a matte black lens hood and UV filters to shield the lens itself. These shields act as physical barriers, fighting off flare before it hits the lens glass. During a hectic outdoor shoot, I attached a matte black lens cap that I custom-cut to fit, which proved surprisingly effective. Additional flare control can be gained using anti-reflective coatings on filters or specialized lens hoods. If you’re serious about eliminating flare, check out our lens flare reduction techniques. Proper application of filters and hoods keeps light from bouncing internally and creating unwanted artifacts. Remember, the goal is to make the lens as dark and matte as possible without affecting your image quality. When working with LED panel lights, softboxes, key lights, RGB tubes, and fill lights, many practitioners make critical assumptions that can hamper their results. Let’s dig deeper into some common misconceptions, pitfalls, and advanced nuances that even seasoned creators often overlook.
First, a prevalent myth is that brighter always equals better. Everyone assumes increasing the LED panel’s intensity will enhance their shot, but in reality, this often leads to overexposure and loss of detail, especially when not balanced properly with diffusion or fill. Expert cinematographers understand that controlling light quality and direction is more impactful than sheer brightness. For example, nuanced control over softbox diffusion and key light positioning can make a significant difference, as discussed in our **mastering softbox lighting tips** guide.
Another mistake stems from the belief that all softboxes are created equal. Many overlook the importance of inner lining materials and the placement of diffusion layers. The wrong setup can produce harsh shadows or a flat image lacking depth. Achieving a natural, cinema-grade look involves more than just mounting a softbox; it requires understanding how each component affects light falloff, direction, and texture.
Now, let’s address RGB tube lights. A common trap is treating them as static, purely decorative elements. In truth, advanced users leverage their hue versatility for creative storytelling—using subtle color shifts to evoke mood or simulate environmental conditions. Yet, many forget the critical aspect of color calibration. Poor calibration leads to unnatural or inconsistent skin tones. For sophisticated shoots, it’s vital to calibrate RGB tubes accurately, following professional guidance such as in our **RGB tube light effects** articles.
Regarding fill lights, the misconception is that they should be soft and minimal. However, novice setups often underpower their fill, resulting in a flat or unbalanced look. Conversely, excessive fill can wash out shadows entirely, losing depth in your scene. The key is in proper **fill light distance and intensity**, which can be fine-tuned for professionalism. For instance, mastering **fill light secrets** helps achieve a natural look that mimics real-world lighting.
Here’s an advanced tip worth noting: the angle and placement of your key light significantly influence the image’s depth and three-dimensionality. Many overlook the subtlety that slight adjustments in position can prevent issues like double chins or unflattering shadows. For precise positioning strategies, check our detailed **key light techniques**.
Lastly, be wary of the trap of relying solely on default settings or generic equipment. Each scene demands tailored lighting to emphasize or de-emphasize elements intentionally. Investing time in understanding the nuances—such as light quality, angle, diffusion, and calibration—yields far more natural and cinematic results than superficial brightness adjustments.
Remember, achieving professional-grade lighting isn’t just about powerful equipment; it’s about mastering the interplay between light sources and scene requirements. Want to elevate your setup? Reach out through our contact page for personalized advice.
Have you ever fallen into this trap? Let me know in the comments.
Essential maintenance for LED panel lights and softboxes
Maintaining your lighting equipment is crucial to ensure long-term performance and reliability. Regular inspections of LED panel lights for dust, dirt, or indicator malfunctions can prevent unexpected failures mid-shoot. Use a microfiber cloth combined with a gentle cleaning solution to wipe down the diffuser surfaces—avoiding harsh chemicals that could degrade the material. Similarly, softboxes benefit from periodic checks of their diffusion layers for tears or discoloration, which can diminish light quality over time.
How do I keep my key lights and RGB tubes functioning smoothly?
For key lights, investing in a quality power supply and surge protector shields against voltage fluctuations that can damage internal components. I personally recommend using the CreatorRigReviews contact page for expert advice on choosing durable accessories tailored to your setup. When dealing with RGB tube lights, firmware updates and reset procedures are vital maintenance routines. Many manufacturers release updates that fix stability issues or improve color accuracy, so subscribing to their firmware release notes can keep your gear running seamlessly.
Tools I rely on to keep my gear ready
One indispensable tool in my arsenal is a portable multimeter. It helps me quickly diagnose power issues or cable faults—saving me from unnecessary downtime. Additionally, I keep a set of magnetic screwdrivers and spacers handy for quick repairs or adjustments on softboxes and mountings. For digital calibration, I utilize light management software like Luminosity Studio to monitor and tweak my LED panel settings remotely. This software allows me to save presets, ensuring consistency across multiple shoots, and plan calibration routines to prevent drift over time.
Future of lighting maintenance and automation
Looking ahead, I predict that intelligent, self-diagnosing lighting systems will become standard. Integrated sensors and AI-driven diagnostics could alert us when a bulb’s color temperature drifts or a driver’s efficiency drops, prompting automatic recalibration or repairs—reducing manual oversight. Embracing these innovations now will prepare you for a more reliable and efficient workflow.
What’s the secret to long-term lighting success?
Beyond tools and routine checks, educating yourself on the nuances of each device enhances your ability to troubleshoot and optimize. For instance, understanding the internal electronics of LED panels can help you identify early signs of wear—such as flickering or inconsistent color rendering. Regularly reviewing manufacturer maintenance guides, like those provided here, can offer valuable insights. One effective method is scheduling periodic calibration sessions using color meters to ensure your lights maintain accurate skin tones and colors, ultimately saving time and money.
Start implementing a proactive maintenance routine today—perhaps by setting reminders for firmware updates or checking cables before critical shoots. For more personalized tips, don’t hesitate to reach out through our contact page. The key is consistency: the more disciplined your upkeep, the more dependable your lighting setup will be, ensuring stunning visuals every time.
The Hidden Lessons Behind Flare Fixation
One of the toughest lessons I learned was that equipment alone won’t solve every lighting issue; understanding the scene and light behavior is crucial. Early in my journey, I believed that increasing intensity or tweaking angles was enough, but I overlooked how subtle shifts in shielding or diffusion could make a difference. My biggest breakthrough came when I realized that every reflective surface, even tiny imperfections on softboxes, could introduce unwanted flare, and that careful control over light placement often trumped brute force adjustments.
Another insight was recognizing that high-quality accessories—like matte black tapes or specialized lens shields—are investments in my craft. Relying on DIY solutions sometimes backfired, creating more glare or uneven light. When I started integrating professional-grade tools, my control over flare and spill improved dramatically, saving me time and frustration on set. These lessons taught me that proactive planning and attention to detail in shielding can be the difference between amateurish glare and polished professionalism.
Tools and Resources That Elevated My Lighting Game
My essential toolkit now includes a portable multimeter for quick diagnostics, high-quality mounting accessories, and software like Luminosity Studio for precise calibration. These tools have helped me maintain consistent color rendering and spot issues before they escalate. I also trust my local supplier and the manufacturer’s firmware updates—they often include critical fixes that prevent certain flare problems from emerging. Additionally, eye-opening resources like our in-depth guides on LED panel innovations or softbox mastery techniques have expanded my understanding of how nuanced adjustments impact scene quality. These curated tools and knowledge bases are vital for staying ahead in the dynamic world of lighting design.
Inspired to Bring Your Lighting A-Game
Remember, every professional lighting setup begins with a mindset open to learning and experimentation. Embrace the systematic process of testing and refining your shielding, placement, and calibration techniques, and don’t shy away from using the right tools. Your scenes will become more cinematic, your colors truer, and your flare issues a thing of the past. The journey of mastering lighting is ongoing, but each step forward builds confidence and sharpens your artistic vision. Keep pushing your boundaries, and soon you’ll see the difference in every shot you create.
What’s the biggest lighting challenge you’re facing right now? Share your experiences below—I’d love to hear your story and offer tailored advice to help you overcome it!
,
![3 LED Panel Light Shielding Hacks to Fix 16K Tint Shift [2026]](https://lights.creatorrigreviews.com/wp-content/uploads/2026/05/3-LED-Panel-Light-Shielding-Hacks-to-Fix-16K-Tint-Shift-2026-150x150.jpeg)


One response to “4 RGB Tube Light Shielding Hacks to Stop 2026 Set Flare”
Your detailed approach to tackling the 2026 flare issues really resonates. I especially appreciate the emphasis on physical barriers and light placement; I’ve found that small adjustments in angle can truly make a difference without needing to spend too much on additional gear. The idea of using matte black tape on reflective surfaces is something I haven’t tried yet, but after reading your suggestion, I plan to test it on my next shoot. I’ve experienced how flare can unexpectedly ruin shots, especially in tight indoor spaces where reflections are unavoidable. It makes me wonder—have you experimented with different types of shields or materials, like DIY options versus professional matte paints? Also, do you think using a combination of these methods is more effective, or is there a particular technique that stands out as a game-changer for highly reflective RGB setup? I’d love to hear how others manage these situations, especially in complex scenes involving multiple light sources.