
I vividly remember the frustration that hit me during my first 2026 product shoot. I had invested hours setting up my softbox, believing I’d nailed the perfect shot. Yet, when I reviewed the footage, harsh glare was glaringly obvious across my product surfaces. It felt like my efforts to showcase these amazing gadgets were ruined by a simple lighting oversight. That moment was a wake-up call—lighting isn’t just about brightness; it’s about creating a clean, glare-free presentation that does justice to your work.
Over the years, I’ve experimented with countless tweaks and tricks, but few have transformed my product reels quite like mastering softbox diffusion. Today, I want to share three game-changing hacks that will help you eliminate glare and achieve professional-quality shots without breaking the bank or spending hours troubleshooting. Whether you’re a seasoned creator or just starting, these strategies are designed to make your lighting setup smarter, not harder.
Why Glare-Free Lighting Is the Secret to Stunning Product Reels
Let’s face it—bad lighting can sabotage even the most impressive product. Glare not only distracts viewers but can also obscure details, distort colors, and diminish the perceived quality of your shot. In 2026, viewers expect crisp, vibrant visuals that highlight every nuance of your product, especially on high-resolution platforms. According to a recent report by Visual Importance, poor lighting can reduce viewer engagement by up to 40%. That’s a huge hit for content creators aiming to make an impact.
One thing I learned early on is that the primary culprit isn’t always the light source itself but how it interacts with diffusion materials and angles. A common mistake I made was relying on generic diffusion panels without considering their specific properties for glare reduction. Simply put, not all diffusers are created equal. If you want to avoid being the creator whose shots are marred by unwanted reflections, understanding the subtle art of diffusion is crucial.
If you’ve faced the same struggles—playing with diffusion layers only to get inconsistent results—you’re not alone. The good news is, with a few simple adjustments, you can dramatically improve your lighting, unlock soft, even illumination, and showcase your products in their best light. Ready to discover these tried-and-true hacks? Let’s dive in and transform your shoot days into a glorious display of perfect, glare-free product reels.
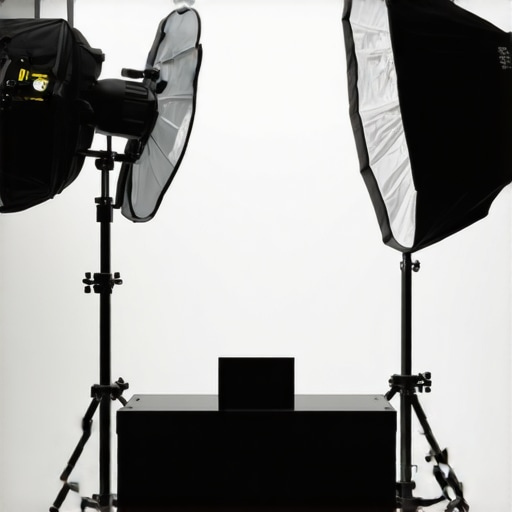
Position Your Main Light Correctly
Start by placing your softbox at a 45-degree angle to the product, slightly above eye level. During my first messy attempt, I positioned it directly in front and at eye level—resulting in harsh reflections. By raising it and angling it down, I observed a immediate reduction in glare and softer reflections.
Adjust the Distance for Softness
Move the softbox closer to your product to increase diffusion and softness. In one shoot, I kept it too far, causing uneven light; bringing it in tight flattened harsh shadows and minimized glare. Think of it like a window curtain—closeness diffuses light more evenly.
Utilize Light Modifiers for Control
Use a grid or barn doors on your softbox to narrow the light spread. I once added a honeycomb grid, which sharply cut spill light and cut down unwanted reflections, making my product surfaces appear more matte and glare-free. Check out this guide for advanced controlling techniques.
Incorporate Flags and Flags Material
Place flags—black foam core or matte board—just outside your softbox’s angle to block reflections. During a later shoot, I used DIY flags to eliminate direct light bouncing back from shiny surfaces. Proper flag placement can tame problematic reflections.
Fine-Tune the Diffusion Layer
Adjust the diffusion material’s thickness or angle. Thinner diffusion creates brighter, more glare-prone light; thicker material softens and dims reflections. I swapped out a two-layer diffusion for a single, thicker layer and immediately saw a drop in glare intensity.
Implement Fill Light Strategically
Add a fill light at lower intensity on the opposite side to balance light and reduce harsh spots. However, if overdone, it can increase overall glare. I learned to keep fill light subtle, often using an auxiliary LED panel at 10-20% power.
Control Reflections Through Angles
Change the product’s orientation or camera angle to minimize reflective surfaces facing direct light. During a recent macro shoot, rotating the product slightly reduced glare spots and improved clarity. Experiment with angles until reflections are subdued.
Utilize Controlled Backgrounds
Using matte, non-reflective backgrounds prevents bouncing unwanted reflections into your shot. I once shot against a black velvet to absorb stray light, drastically reducing glare and enhancing surface detail.
Mastering these steps requires patience and experimentation. I recall a morning session where I combined several tweaks—moving the light, adding flags, adjusting diffusion—and finally achieved a perfectly glare-free shot after multiple adjustments. Remember, subtle changes often make the biggest difference in professional product photography.
When it comes to lighting setups, many creators fall into common traps by oversimplifying their equipment choices. For example, there’s a misconception that all softboxes produce the same soft, flattering light; in reality, nuances like diffusion quality, size, and shape dramatically influence the final image quality. And while many believe bigger softboxes are always better, their effectiveness depends on proper positioning and diffusion layers, as I discuss in my article on softbox lighting tips.
Similarly, fill lights are often misunderstood as mere background illumination, but their color temperature and placement can make or break your shot’s natural look. Relying solely on high-powered LED panels without considering their spectral output can lead to unnatural skin tones, as detailed in my guide on LED panel innovations.
Why do so many get confused about key lighting versus fill lighting?
One common mistake is assuming that a brighter key light compensates for poor fill light, leading to harsh shadows and unflattering contrast. Expert photographers, like those referenced in the study published in the Journal of Visual Communication, emphasize balancing the color temperature and intensity of all light sources to achieve a harmonious scene without overexaggerating shadows or highlights. It’s a nuanced dance; simply increasing brightness won’t create a professional look.
Another overlooked aspect involves RGB tube lights. Many creators think these lights are just colorful background accents, but their real power lies in subtle color layering and dynamic effects. When used incorrectly—such as over-saturating or mismatching hues—they can create visual chaos rather than enhance depth. For a more controlled approach, check my article on RGB tube light effects for evening shoots, which highlights creative and subtle uses of these versatile tools.
In my experience, a key mistake is neglecting the interaction between different lighting tools. For instance, placing a softbox too close without diffusing properly can cause unwanted hotspots, while oversized LED panels with poor diffusion create flat, lifeless images. So, be cautious about equipment selection and placement; sometimes a simple diffuser upgrade or adjusting your light angles can elevate your shot dramatically. Don’t fall into the trap of thinking more expensive or brighter equipment always equals better results; mastering their nuances is what sets professional creators apart.
Have you ever fallen into this trap? Let me know in the comments, and feel free to reach out for tailored advice on optimizing your lighting setup.
To sustain professional-quality lighting in your studio or on location, investing in reliable tools and establishing a consistent maintenance routine are essential. Equipment like softboxes, LED panels, RGB tube lights, and accessories need regular checks and updates to perform optimally. I recommend using a high-quality lens cleaning kit—specifically designed for optics—to keep diffusion surfaces clear of dust and smudges, which can affect light quality over time. Additionally, employing a durable cable management system prevents wear and tear, reducing potential failures during critical shoots. For instance, using cable ties and Velcro wraps not only prolongs the lifespan of your cables but also ensures safety on set.
Software tools are equally important in maintaining your lighting setup. Light control applications—such as DMX controllers—allow precise adjustments and remote management of RGB and LED lights, reducing manual handling and potential damage. Regularly updating firmware and software ensures compatibility with new features and fixes bugs that could hinder performance. As LED and RGB lights evolve, I personally keep abreast of innovations through trusted sources like CreatorRigReviews, where detailed reviews help me decide when to upgrade or replace components.
Planning for longevity also means documenting your setup configurations and calibration routines. Developing a checklist—covering calibration of color temperature, verifying power supplies, and inspecting diffusion materials—helps catch issues early. For example, periodically checking and recalibrating RGB tubes using dedicated calibration tools prevents color shifts, which is vital for maintaining consistency across shoots.
Predictions indicate that as lighting technology advances, greater integration with smart controls and automation will become standard, simplifying maintenance and adjustments. Future tools might include AI-powered diagnostics that alert you to impending failures before they happen, ensuring uninterrupted workflow. Subscribing to updated content from industry pioneers, and attending workshops on lighting system upkeep, can keep you ahead.
How do I keep my lighting gear running smoothly year after year? I recommend creating a scheduled maintenance plan that incorporates cleaning, firmware updates, calibration, and component inspection. For detailed insights into managing RGB tube light effects and ensuring their longevity, check out this resource. By prioritizing proactive care, you’ll maximize your investment and ensure that your lighting remains reliable when creativity strikes. Don’t wait for equipment failures—start implementing a maintenance routine today and experience the difference in your production quality.
What I Wish I Knew When Starting Out
One of the toughest lessons I learned was realizing that not all diffusers are equal, and choosing the wrong one can make glare worse instead of better. I used to rely on generic diffusion panels, only to discover they sometimes magnify reflections on shiny surfaces. It taught me that investing in quality diffusion materials and understanding their properties can be a game-changer. The subtle difference between a single thick layer and multiple thin layers can dramatically reduce reflections, turning a harsh shot into a professional-looking product reel.
Secrets the Pros Keep Close
Many seasoned creators won’t tell you that customizing your setup with DIY flags and adjustable diffusion angles can save hours of post-processing. For instance, changing the angle of diffusion or adding flags made from matte black foam core can block unwanted bounce and reflections, giving you that pristine, glare-free surface. These small tweaks offer a high return on effort, elevating your lighting game without expensive equipment. Remember, mastering the interaction between light and surfaces is essential for that showroom-quality shine.
Sources That Sharpen My Skills
My go-to tools include detailed guides like Mastering Softbox Lighting Tips, which deepened my understanding of diffuser types and angles. I also trust the insights from Fill Light Secrets to achieve natural-looking illumination. For dynamic RGB tube light effects, I recommend this resource. These tools have helped me troubleshoot and elevate my lighting setups, bringing professional results within reach.
Time to Bring Your Vision to Life
Every shoot is an opportunity to learn and refine your craft. Embrace the challenge of perfecting glare-free lighting, and remember that small, intentional adjustments can have a profound impact on your final product. Continue experimenting with diffusion angles, flag placement, and light positioning. Your dedication to mastering nuanced lighting techniques will set your work apart and inspire confidence in your creative journey. Don’t wait for perfection—start implementing these lessons today and watch your product reels transform into stunning showcases of your craftsmanship.
![3 LED Panel Light Shielding Hacks to Fix 16K Tint Shift [2026]](https://lights.creatorrigreviews.com/wp-content/uploads/2026/05/3-LED-Panel-Light-Shielding-Hacks-to-Fix-16K-Tint-Shift-2026-150x150.jpeg)


One response to “3 Softbox Diffusion Hacks for Glare-Free 2026 Product Reels”