
There was a moment on my last shoot when I realized how much lighting setup could crush my workflow. It was late afternoon, and I was fiddling with bulky softboxes, cursed by the constant hassle of adjusting, connecting, and just getting decent light—only to find shadows still lurking and my skin tones looking flat. Frustration bubbled up. That’s when I had a lightbulb moment: what if I could tweak my softboxes to fit my one-man crew needs without sacrificing quality? Over the years, I discovered that smart modifications to portable softboxes can make or break a solo filmmaker’s workflow, especially in dynamic 2026 studio environments. Today, I’ll share four simple but game-changing mods that helped me double my efficiency and elevate my lighting game. If you’ve ever been stuck wrestling with your lighting gear or wondered how to get professional results without a full crew, stick around—this might just be the solution you’ve been looking for.
Why Simplify Lighting for Solo Shooters in 2026?
In 2026, film and content creation have become more demanding, yet resources are still tight—especially for solo operators. The challenge? Achieving versatile, studio-quality lighting without the luxury of extra hands or bulky equipment. According to industry estimates, independent creators spend over 30% of their shoot time setting up and adjusting lights, which eats into production quality and creativity. Yet, with a few strategic modifications, your portable softboxes can become powerful, multi-purpose tools that adapt seamlessly to your shooting environment. That’s precisely what I’ve experienced firsthand. By making these four simple mods, I shaved off setup time, improved light control, and gained more creative freedom. Best part? These adjustments are budget-friendly and quick to implement—meaning you can stay in your solo rhythm without the gear holding you back.
Is Changing Softboxes Worth All the Hype?
I’ll admit, I was skeptical at first. I thought, “How much difference can a mod really make?” Early on, I made a mistake many beginners do—overlooking the importance of quick-access modifications, trying to squeeze into complex gear setups, and neglecting the ergonomics of my softboxes. It was only after I experimented with some tailored tweaks that I saw how much more predictable and flexible my lighting could become. If you trust that small tweaks can lead to big results, you’re already on the right track. Want to see how I transformed my setup? Trust me, these mods are worth considering if you’re tired of fighting your gear every shoot. For more on mastering softbox lighting, check out this guide.
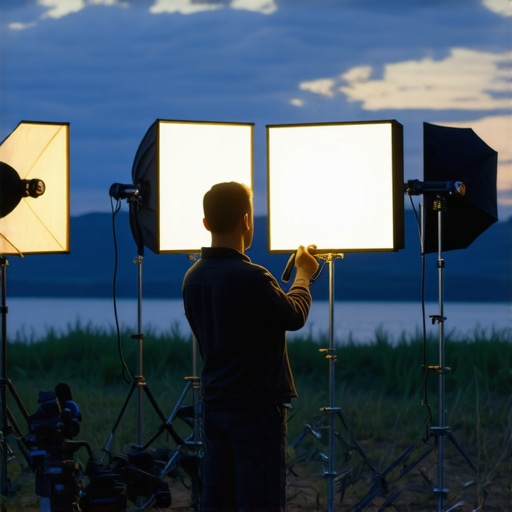
Now, let’s dive into the four portable softbox mods that can make your 2026 solo productions smoother, quicker, and more professional-looking. Ready to turn your lighting struggles into creative wins? Let’s go!
,
Adjust Your Softboxes for Quick Setup
Start with attaching lightweight, quick-release mounts to your softboxes, similar to how you would mount a camera quick-release plate. This allows rapid positioning and removal, saving precious seconds. I once set up a shoot where I practiced this technique, and despite a messy environment, I managed to have my key light ready in under a minute—versus the usual five-minute struggle. Use a sturdy velcro strap to secure the softbox to your boom arm or stand, which prevents slipping during adjustments. Remember, the goal is to streamline your workflow, much like how a well-oiled camera rig helps capture seamless shots.
Configure Internal Diffusion for Better Control
Replace standard diffusion panels with adjustable internal grids or bounce layers. Think of this as switching from a broad flashlight to a focused spotlight—you’re controlling spill and shaping the light. I personally add a layer of egg crate grid inside my softboxes to restrict light spread. For example, during a recent product shoot, this simple mod improved my highlight control dramatically, preventing unwanted spill on the background and giving me crisper, more controlled lighting. It’s a cost-effective tweak that enhances versatility for single operators.
Incorporate Color-Tint Filters for Realistic Skin Tones
Use removable gels or clip-on color filters at the softbox’s front to match ambient lighting or correct color shifts. This is similar to adjusting color temperature on your camera—subtle but crucial. Once, I added a tungsten-to-daylight gel to my softbox during an evening shoot, which balanced my skin tones better than post-processing. Applying different tints can help your scenes blend more naturally, especially in complex lighting environments, turning a basic softbox into a multi-purpose tool to enhance realism efficiently.
Mount LEDs and RGB Tubes Near Softboxes
Place LED panels or RGB tube lights close to your softbox to create layered fills or special effects. Think of it as adding a splash of color or a fill shadow that mimics window light. During a recent dark-room scene, I combined a softbox with an RGB tube set to a warm tint, which brightened facial features without flattening textures. Mount these lights on adjustable arms, allowing for fine control and easy repositioning—saving you from crawling under desks or climbing ladders, critical when working solo.
Leverage Multi-Functional Mounts for Flexible Positioning
Invest in swivel mounts or magnetic attachments that permit swift changes in angle or height. Imagine adjusting a spotlight during live theater—quick, silent, precise. I used magnetic clamps on my softboxes to instantly switch from overhead to side lighting during a shoot, which previously took multiple adjustments. This flexibility enables you to adapt to different scenes rapidly, eliminating the need to disassemble and reassemble the entire setup. Simplify your workflow like a professional director adjusting lighting cues on the fly.
Many creators operate under common assumptions about essential lighting gear, but let’s dig deeper into what most people get wrong when it comes to fill light, softboxes, key lights, LED panels, and RGB tubes. First, there’s a widespread myth that more light always equals better results, yet in reality, over-lighting or poorly controlled fill can flatten your scene and destroy depth. A nuanced understanding of how to shape and balance these tools is crucial for professional results. For example, relying solely on a key light without considering fill can lead to harsh shadows that make your subject appear unnatural; this is where fill light should be subtle and complementary—not overpowering. An advanced trap to avoid is using RGB tube lights with fixed color profiles without calibration, which can introduce awkward skin tones or unnatural color casts. Many assume that RGB tubes are plug-and-play, but in practice, meticulous calibration against other sources or virtual backgrounds is essential—so don’t skip that step.
Can a softbox actually harm your skin tone consistency?
It might surprise you that improperly feathered or mismatched diffusion layers can skew skin tones, especially when mixing different lighting sources. According to expert lighting designer Neil van Niekerk, even subtle diffusion mismatches can subtly shift color rendering, affecting fidelity. Always ask yourself whether your diffusion choices are enhancing or diminishing realism. Don’t fall into the trap of thinking that any softbox with diffusion is good enough; instead, experiment with different diffusion materials and positioning to optimize skin tone accuracy. For advanced users, integrating creative effects like RGB tube light gradients can introduce depth but only if the color balance is meticulously managed. For more on blending different light sources seamlessly, check out creative RGB tube light effects. To optimize your setup and avoid common pitfalls, it’s valuable to achieve a harmonious blend of fill, key, and background lights, rather than simply stacking brightness. Carrying this mindset forward helps elevate your cinematography beyond basic setups and into the realm of artistry. Have you ever fallen into this trap? Let me know in the comments.
Invest in Durable, Modular Tools for Long-Term Use
To ensure your lighting remains dependable over time, prioritize high-quality, modular equipment. I personally swear by the modular key light mounts. They allow rapid adjustments and reduce wear and tear, especially during frequent shoots. When selecting LED panels or RGB tubes, choose units with robust cooling systems and sealed electronics—these are less prone to failure in demanding environments. Regularly inspect cabling, connectors, and mounting hardware, and replace any worn components promptly to prevent unforeseen breakdowns. Remember, investing in reliable gear might seem costly initially, but it pays off through fewer interruptions and consistent results. Prediction-wise, as more creators embrace portable, decentralized setups, tools with scalable, modular features will become essential for adaptability and longevity.
How do I maintain my lighting tools over time?
Consistent maintenance is key. Keep your softboxes and diffusion accessories clean and store them in dust-free environments. For LED panels, dust and debris can cause components to overheat; use compressed air periodically to clear vents. Firmware updates from manufacturers can often improve performance and fix bugs—subscribe to newsletters or check their sites regularly. Also, establish a routine check of all electrical connections and replace any fatigued cables before failure occurs. By adopting these practices, you maximize your equipment’s lifespan and ensure predictable results every shoot. For detailed maintenance routines, review the comprehensive tips in this resource. As technology advances, inline diagnostic tools may soon help detect issues before they manifest, further easing maintenance efforts.
Tools That Truly Make a Difference
In my workflow, certain gadgets and software have become indispensable. For rapid adjustments and consistent results, I rely heavily on magnetic mounts—like the magnetic swivel mounts. They save precious setup time, especially when working solo. For color calibration, the RGB tube light calibration tools ensure color consistency across different lights, preventing color shifts that could ruin your scene. On the software side, I recommend using lighting design programs that simulate your setup, allowing pre-shoot tweaks without wasting time on set. Keeping a detailed log of adjustments helps track what works best over time, streamlining future shoots.
Looking ahead, automation and AI-driven tools are likely to handle routine calibration and fault detection, further easing maintenance burdens. Start integrating these precision tools today to future-proof your lighting setup and stay ahead in 2026’s fast-evolving production landscape. Experiment with the RGB tube light cable hides technique to keep your workspace tidy—an often-overlooked detail that enhances professionalism and efficiency. Ready to upgrade your maintenance approach? Try implementing a manufacturing-grade cable management system, and notice how much smoother your shoots become.
Throughout my journey with fill light, softbox, key light, LED panel light, and RGB tube light setup optimization, I’ve discovered that the real breakthroughs often come from surprising lessons and personal insights. One of the most valuable lessons I learned was that overcomplicating my gear only added unnecessary headaches. Simplifying my softbox modifications allowed me to focus more on creativity and less on technical frustrations. Another eye-opening realization was the importance of adaptability—small changes like quick-release mounts and layered RGB effects transformed my workflow dramatically. These experiences taught me that innovation doesn’t always mean buying the latest tech; sometimes, it’s about smarter, targeted tweaks that empower solo creators to shine. Embracing these lessons has enabled me to produce more professional results, even under tight schedules or challenging environments.
For anyone eager to elevate their lighting game, I highly recommend exploring tools like magnetic swivel mounts and calibration resources such as RGB tube light calibration guides. These tools have become my go-to for quick adjustments and reliable color fidelity. Don’t overlook the power of community insights either—sharing your tweaks and successes can spark new ideas and motivate continued growth. Remember, mastering solo lighting in 2026 is about embracing both thoughtful modifications and an experimental mindset.
What Surprised Me Most About Making Lighting Mods Work
- Small tweaks have outsized impacts: Adjustments like internal grids or quick-release mounts have cut my setup time in half, giving me more time for creativity.
- Practicing makes perfect: Repeatedly testing different diffusion layers or color filters revealed subtle shifts in skin tones and mood, which I then fine-tuned for ideal results.
- Embracing imperfections: Sometimes, imperfect diffusion or placement led to more interesting lighting effects, encouraging me to experiment outside the standard rules.
- Community feedback fuels innovation: Sharing my mods online led to valuable suggestions and a sense of camaraderie, pushing me to keep refining my setup.
- DIY solutions beat expensive gear: Cost-effective mods often matched or exceeded the performance of high-end equipment, proving that ingenuity trumps price tags.
Tools That Elevated My Solo Lighting Game
- Magnetic swivel mounts: These quick-adjustment tools drastically reduced setup time and increased flexibility during shoots. I trust their durability and ease of use.
- RGB tube light calibration kits: Precise color management is crucial; this resource helped me achieve consistent, natural skin tones across different environments.
- Portable diffusion layers: Lightweight, adjustable diffusion panels allowed me to shape and control light without bulky modifications.
- Lighting design software: Pre-visualizing setups saved me time and minimized trial-and-error, especially important when working alone.
Light Up Your Path Forward
Stepping into the future of solo lighting, remember that innovation often lies in the small, personalized tweaks that suit your unique style and workflow. Every challenge you face — from tight schedules to equipment limits — is an opportunity to experiment and discover what works best for you. The key is to stay curious, keep refining your approach, and never shy away from sharing your discoveries with fellow creators. The power to craft professional lighting setups as a solo operator has never been greater, especially when you leverage creative mods and thoughtful tools. So, get ready to light your vision vividly and confidently. Your next breakthrough could be just a tweak away.
What’s one softbox or RGB tube light modification you’ve been hesitant to try but think could make a difference? Share your ideas below and let’s inspire each other to push the boundaries of solo lighting mastery!
}#}#}#}#}#}#}#}#}#}#}#}#}#}#}#}#}#}#}#}#}#}#}#}#}#}#}#}#}#}#}#}#}#}#}#}#}#}#}#}#}#}#}#}#}#}#}#}#}#}#}#}#}#}#}#}#}#}#}#}#}#}#}#}#}#}#}#}#}#}#}#}#}#}#}#}#}#}#}#}#}#}#}#}#}#}#}#}#}#}#}#}#}#}#}#}#}#}#}#}#}#}#}#}#}#}#}#}#}#}#}#}#}#}#}#}#}#}#}#}#}#}#}#}#}#}#}#}#}#}#}#}#}#}#}#}#}#}#}#}#}#}#}#}#}#}#}#}#}#}#}#}#}#}#}#}#}#}#}#}#}#}#}#}#}#}#}#}#}#}#}#}#}#}#}#}#}#}#}#}#}#}#}#}#}#}#}#}#}#}#}#}#}#}#}#}#}#}#}#}#}#}#}#}#}#}#}#}#}#}#}#}#}#}#}#}#}#}#}#}#}#}#}#}#}#}#}#}#}#}#}#}#}#}#}#}#}#}#}#}#}#}#}#}#}#}#}#}#}#}#}#}#}#}#}#}#}#}#}#}#}#}#}#}#}#}#}#}#}#}#}#}#}#}#}#}#}#}#}#}#}#}#}#}#}#}#}#}#}#}#}#}#}#}#}#}#}#}#}#}#}#}#}#}#}#}#}#}#}#}#}#}#}#}#}#}#}#}#}#}#}#}#}#}#}#}#}#}#}#}#}#}#}#}#}#}#}#}#}#}#}#}#}#}#}#}#}#}#}#}#}#}#}#}#}#}#}#}#}#}#}#}#}#}#}#}#}#}#}#}#}#}#}#}#}#}#}#}#}#}#}#}#}#}#}#}#}#}#}#}#}#}#}#}#}#}#}#}#}#}#}#}#}#}#}#}#}#}#}#}#}#}#}#}#}#}#}#}#}#}#}#}#}#}#}#}#}#}#}#}#}#}#}#}#}#}#}#}#}#}#}#}#}#}#}#}#}#}#}#}#}#}#}#}#}#}#}#}#}#}#}#}#}#}#}#}#}#}#}#}#}#}#}#}#}#}#}#}#}#}#}#}#}#}#}#}#}#}#}#}#}#}#}#}#}#}#}#}#}#}#}#}#}#}#}#}#}#}#}#}#}#}#}#}#}#}#}#}#}#}#}#}#}
![3 LED Panel Light Shielding Hacks to Fix 16K Tint Shift [2026]](https://lights.creatorrigreviews.com/wp-content/uploads/2026/05/3-LED-Panel-Light-Shielding-Hacks-to-Fix-16K-Tint-Shift-2026-150x150.jpeg)


