
My Journey Into the World of Softbox & Fill Light Techniques
Ever since I started creating content, I’ve been fascinated by the magic of lighting. I vividly remember my first attempt at setting up a softbox; it was a game-changer. The way soft diffused light transformed my shots made me realize how crucial lighting is for professional-looking videos and photos. Over the years, experimenting with various lighting setups has taught me that mastering softbox and fill light techniques can elevate any creator’s work, especially in 2024 when equipment options are more diverse than ever.
Why Softbox Lighting Is a Creator’s Best Friend
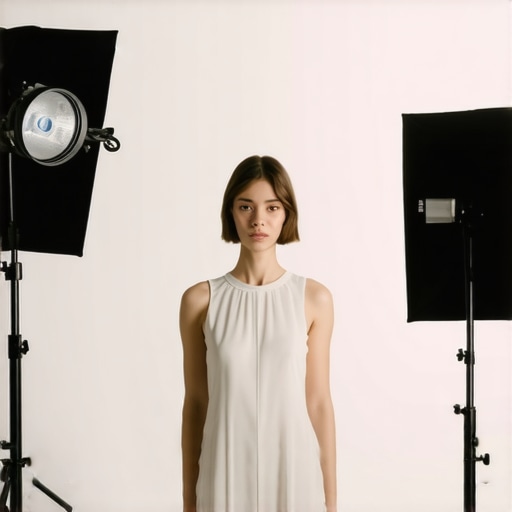
Softboxes have become my go-to tool for achieving that natural, flattering light. They soften harsh shadows and produce consistent, beautiful illumination. I recall a shoot where I used a large softbox to mimic natural sunlight at dawn, which gave my video a warm, inviting feel. For beginners, I recommend starting with a softbox key light setup, as it’s simple yet effective. The key is positioning your softbox at an angle that complements your face and enhances your features.
How to Use Fill Light to Achieve Natural Looks
Fill light is often overlooked but plays a vital role in balancing your scene. I’ve found that adding a subtle fill light, especially in natural lighting situations, can make your videos look more professional and less flat. For example, during outdoor shoots, I use a soft LED panel as a fill light to gently lift shadows on my face. The secret lies in adjusting the intensity; it should be subtle enough to maintain depth but enough to soften shadows. If you’re curious about the latest fill light techniques, check out these expert tips.
What Are the Best Fill Light Techniques for Different Scenarios?
Different scenarios demand different fill light strategies. For indoor studio shoots, I prefer using RGB tube lights to add creative color accents and depth, especially in evening scenes. During daytime, a simple bounce from a reflector or a low-powered LED panel often suffices. The challenge is balancing the fill light with your main softbox light to create a natural look. I’ve personally experimented with various setups, including softbox and RGB tube light combinations, which you can explore more in the Ultimate Guide to LED Panel Setup.
How Do I Choose the Right Equipment for My Creative Style?
Choosing the right lighting gear depends on your unique style and shooting environment. I’ve learned that investing in versatile tools like adjustable softboxes and RGB tube lights offers flexibility for different projects. For instance, my recent upgrade to softbox and RGB tube lights has allowed me to create both soft, natural looks and vibrant, artistic scenes. Remember, reading reviews and understanding your specific needs is essential. For more insights, I often consult authoritative sources like B&H Photo Video’s Lighting Guide.
If you’ve experimented with lighting as a creator, I’d love to hear your experiences! Drop a comment below or share your favorite techniques. Lighting isn’t just about equipment; it’s about how creatively you use it to tell your story.
Exploring Creative Lighting Styles: How Variations Impact Your Visual Storytelling
As creators, understanding the nuances of lighting can transform your videos and photos from ordinary to extraordinary. Different softbox angles, sizes, and fill light intensities create distinct moods and visual effects. For instance, a softbox positioned at a 45-degree angle can produce flattering, natural-looking shadows that add depth, while a front-facing softbox offers a more evenly lit appearance for a clean, professional look. Experimenting with various softbox sizes—from compact ones perfect for tight spaces to large octagonal softboxes—can dramatically alter the softness and spread of your light. According to this comprehensive guide, mastering these subtle differences allows you to tailor your lighting to suit each project’s mood and message.
How Can Fill Light Strategies Be Customized for Different Creative Goals?
Fill light isn’t just about softening shadows; it’s a powerful tool for enhancing storytelling. For a dramatic look, you might reduce fill light to emphasize contrast and create a moody atmosphere, while for a cheerful, inviting scene, a stronger fill can lift shadows and add vibrancy. Using adjustable RGB tube lights or LED panels with dimming features gives you precise control over fill levels. For example, during a daytime outdoor shoot, bouncing natural light with a reflector can serve as a subtle fill, but adding a soft LED panel can help balance challenging shadows on your subject’s face. The key is to understand your scene’s context and desired emotional tone. These techniques are thoroughly explored in expert insights into fill lighting.
What Are the Practical Implications of Combining Different Light Sources?
Combining softboxes with RGB tube lights or LED panels offers creative flexibility, but it also requires careful planning to avoid conflicting color temperatures or overexposure. For instance, mixing a daylight-balanced softbox with a colorful RGB tube light can produce vibrant, artistic effects perfect for branding or music videos. Conversely, matching the color temperature of all light sources ensures a cohesive look, especially in narrative filmmaking. The challenge lies in balancing intensity and color to maintain realism or achieve a desired stylized aesthetic. For detailed tutorials on integrating multiple lighting types, check out this ultimate guide. Understanding these combinations empowers you to craft compelling visual stories that resonate with your audience.
How Do I Adapt My Lighting Techniques for Different Shooting Environments?
Adapting your lighting setup to diverse environments is crucial for maintaining quality and consistency. Indoor studios benefit from controlled softbox and RGB tube light arrangements, enabling you to craft specific moods without interference from external factors. Outdoors, natural light fluctuates, so supplementing with portable fill lights becomes essential. For example, during golden hour shoots, you might rely on natural sunlight paired with a subtle fill to highlight your subject’s features without overpowering the scene. Additionally, understanding the principles of light placement and diffusion helps you navigate challenging environments—be it cramped spaces or large open areas. This adaptability is emphasized in this detailed guide to environment-specific lighting techniques. The ability to modify your approach on the fly ensures professional results regardless of location.
If you’re eager to deepen your lighting mastery, I recommend exploring more about advanced softbox configurations and creative fill light applications. Share your experiences or ask questions in the comments below—your insights can inspire fellow creators to elevate their craft!
Unlocking the Nuances of Creative Lighting: A Personal Reflection
Lighting is more than just a technical aspect of content creation; it’s an artistic tool that shapes mood, tells stories, and reveals the soul of a scene. Over the years, I’ve found that understanding the subtle differences between softbox angles, sizes, and fill light intensities can truly elevate my work from good to extraordinary. For instance, experimenting with a softbox placed at a 45-degree angle often yields a natural, flattering light that adds depth to portraiture, whereas a front-facing softbox creates a clean, professional look suitable for tutorials or corporate videos.
How Deep Can You Go with Fill Light Customization?
Fill light is often underestimated, yet it holds the power to dramatically alter the emotional tone of your footage. I’ve learned that adjusting fill light intensity and color temperature can evoke different feelings—warmth, serenity, or even tension. During evening shoots, I love using RGB tube lights to add vibrant accents that complement the scene’s mood, especially when combined with softbox key lights. This layered approach allows for nuanced storytelling, much like using a painter’s palette to craft a vivid canvas. For those interested in pushing their creative boundaries, exploring advanced fill lighting techniques can be eye-opening.
What Are the Hidden Challenges When Combining Multiple Light Sources?
Combining different types of lights—such as softboxes, RGB tubes, and LED panels—presents both opportunities and challenges. In my experience, one of the most critical aspects is matching color temperatures to avoid unnatural color casts, especially when mixing daylight-balanced softboxes with colorful RGB lighting. This requires careful planning and sometimes creative solutions, like using gels or adjusting Kelvin settings. The payoff, however, is a rich, dynamic scene that captures attention and adds visual interest. For detailed insights, I recommend checking out this comprehensive guide.
Adapting Your Lighting Technique for Different Environments
One thing I’ve come to appreciate deeply is the importance of adaptability. Whether I’m shooting indoors in a controlled studio or outdoors in unpredictable conditions, my lighting setup must evolve. Indoor environments benefit from precise softbox and RGB tube arrangements, allowing me to craft specific atmospheres. Outdoors, I rely on portable fill lights and reflectors to compensate for natural light fluctuations. For example, during a sunset shoot, I often use a combination of natural golden hour light with subtle fill from an LED panel to maintain the scene’s warmth and clarity. Mastering this flexibility is vital for producing consistent, high-quality visuals regardless of location. For more advanced tips, explore this detailed environment-specific guide.
If you’re passionate about refining your lighting craft, I encourage you to share your experiences or questions. The creative possibilities are vast, and often, it’s through experimentation that we discover our unique visual voice. Remember, lighting isn’t just about equipment—it’s about how you use it to tell stories that resonate deeply with your audience. So keep experimenting, keep learning, and let your light shape your narrative.
Refining Your Lighting Craft: Navigating the Nuances of Softbox Positioning for Artistic Impact
As I delved deeper into professional lighting, I discovered that the subtle adjustment of a softbox’s angle—be it 30°, 45°, or even 60°—can dramatically alter the mood and texture of your scene. For instance, a 45° angle often provides a natural, flattering light that enhances facial features without creating harsh shadows, reminiscent of classic portraiture. Conversely, experimenting with a 60° angle can introduce more dramatic shadows, adding depth and intensity that serve cinematic storytelling well. This nuanced control is crucial when aiming for specific emotional tones or visual styles. To perfect this, I often revisit mastering softbox lighting techniques, which emphasizes the importance of angle, distance, and diffusion in achieving your desired aesthetic.
How Can Fill Light Be Custom-Tailored to Convey Unique Narratives?
Fill light is a versatile tool, capable of subtly shaping the emotional resonance of your footage. For a scene demanding intimacy or vulnerability, I prefer a gentle fill with a lower intensity and warmer color temperature—think 3200K or 3500K—to evoke warmth and comfort. On the other hand, for a scene requiring stark contrast or tension, I crank up the fill light’s power and introduce cooler tones around 5000K, creating a cold, detached atmosphere. Leveraging adjustable RGB tube lights with fine dimming controls allows me to experiment seamlessly with these atmospheres. As detailed in this expert guide, mastering fill light customization empowers you to craft compelling visual stories that resonate on an emotional level.

By understanding these variations, you can elevate your visual storytelling—whether that’s evoking nostalgia, tension, or joy—through the meticulous calibration of fill light to match your narrative intent.
What Are the Best Strategies for Combining Multiple Light Sources Without Compromising Cohesion?
The fusion of different lighting elements—such as softboxes, RGB tubes, and LED panels—offers creative versatility but requires careful orchestration. My approach involves first matching color temperatures meticulously; for instance, aligning daylight softboxes (around 5600K) with RGB lights set to similar Kelvin values prevents unnatural color casts. Additionally, controlling the intensity ratios ensures that no single light overpowers the scene, maintaining visual harmony. For example, during a vibrant evening shoot, I often layer a softbox as my key light with RGB accent lights to add creative splashes of color, as demonstrated in this comprehensive guide. This technique not only enriches the scene but also allows for dynamic storytelling that captures viewers’ attention.
How Do I Adapt My Lighting Setup for Challenging Environments?
Adapting lighting to diverse environments is a skill that separates amateurs from seasoned creators. Indoors, I rely on precise softbox placements, sometimes supplementing with RGB tube lights for color accents or depth. Outdoors, natural light variability demands portable, versatile fill solutions like battery-powered LED panels and reflectors. During sunset shoots, I often combine natural golden hour light with subtle fill from a soft LED panel to preserve warmth and clarity. Understanding how to modify your setup on the fly—such as adjusting diffusion levels or switching to warmer gels—can ensure consistency and professionalism. For advanced tips on environment-specific lighting, I recommend exploring this detailed environment-specific guide.
If you’re eager to elevate your lighting expertise further, I invite you to share your experiences or ask questions. Sometimes, the most innovative solutions come from real-world experimentation and collaborative learning. Remember, mastering lighting is an ongoing journey—each scene offers new lessons to refine your craft and storytelling prowess.
Things I Wish I Knew Earlier (or You Might Find Surprising)
1. The Power of Softbox Angles
Early in my journey, I underestimated how much softbox positioning could change the mood of a shot. A subtle adjustment, like moving a softbox from 30° to 45°, can make a scene feel more natural or dramatically intense. Once I started experimenting with angles, my images instantly gained depth and emotion that I couldn’t achieve before.
2. Fill Light Is a Game Changer
Initially, I thought a good main light was enough. But adding a gentle fill light, especially in outdoor shoots, transformed my videos from flat to lively. It’s amazing how a soft LED panel or bouncing light can lift shadows and bring balance, making everything look more professional and authentic.
3. Combining Multiple Light Sources
Mixing softboxes with RGB tube lights opened up a world of creative possibilities. I learned that matching color temperatures and controlling intensity are key. When done right, this combo can produce vibrant, cinematic scenes that truly stand out, especially in artistic projects.
4. Adapting to Different Environments
Whether indoors or outdoors, adapting your lighting setup is crucial. I’ve found that portable fill lights and reflectors make outdoor shoots manageable, while controlled softbox arrangements shine in studio settings. Flexibility is essential for consistent, high-quality results.
5. Subtle Softbox Adjustments Impact Aesthetics
Playing with softbox diffusion and distance subtly alters softness and shadows. These small tweaks can enhance portraiture or create dramatic effects in storytelling. Mastering these nuances elevates your craft beyond basic lighting.
6. Fill Light for Emotional Storytelling
Adjusting fill light color and intensity helps evoke specific emotions. Warm fills create intimacy, while cooler tones add tension. I’ve used this technique to craft scenes that resonate deeply, proving that lighting is an artistic tool as much as a technical one.
Resources I’ve Come to Trust Over Time
- https://lights.creatorrigreviews.com/mastering-softbox-lighting-tips-for-perfect-portraits-at-dawn – This guide helped me understand the importance of softbox angles and diffusion in portrait photography, making my lighting more intentional and flattering.
- https://lights.creatorrigreviews.com/key-light-techniques-elevate-your-film-atmosphere-at-3-pm – A fantastic resource for mastering key light setups that suit different moods and scenes, especially in variable natural lighting conditions.
- https://lights.creatorrigreviews.com/ultimate-guide-to-rgb-tube-led-panel-lights-for-creators-in-2024 – This comprehensive guide opened my eyes to creative color uses and layering techniques with RGB tubes, adding vibrancy and depth to my projects.
Parting Thoughts from My Perspective
As I reflect on my journey with softbox and fill light techniques, I realize that understanding the subtle nuances of lighting can truly transform your content. Whether you’re aiming for a natural glow or dramatic shadows, mastering these tools allows you to tell stories visually that resonate. Remember, lighting isn’t just about equipment—it’s about your creativity and intent. Keep experimenting, stay curious, and don’t be afraid to push the boundaries of your craft. If this resonated with you, I’d love to hear your thoughts. Share your own experiences or questions below, and let’s grow together as creators in 2024 and beyond.
![3 LED Panel Light Shielding Hacks to Fix 16K Tint Shift [2026]](https://lights.creatorrigreviews.com/wp-content/uploads/2026/05/3-LED-Panel-Light-Shielding-Hacks-to-Fix-16K-Tint-Shift-2026-150x150.jpeg)


6 responses to “Effective Softbox & Fill Light Techniques for Creators in 2024”
Reading this post really resonated with my own journey into content creation and lighting. I agree that mastering softbox and fill light techniques is crucial for elevating visual quality, especially as equipment options diversify. I’ve personally found that experimenting with softbox angles—like shifting from 45° to even 60°—can dramatically change the mood of a scene, adding depth or softness depending on the goal. One challenge I often face is balancing multiple light sources without losing cohesion. Using gels or adjusting Kelvin settings has been a lifesaver, but I’m curious—how do others manage to keep color temperatures consistent when working with both natural and artificial lights in complex setups? It seems like a fine art to achieve the perfect blend without overcomplicating the scene. Would love to hear your tips or experiences on maintaining harmony when combining different lights effectively.
This article really struck a chord with me, especially the section on softbox angles and how a slight change can significantly impact the mood. I’ve found that in my own work, adjusting the angle of the softbox from 45° to a more dramatic 60° can really emphasize shadows, adding a cinematic feel. The challenge I often face is maintaining consistency when switching between natural daylight and artificial fill lights—getting the color temperature just right can be tricky. I’ve started using a Kelvin meter to help match lights more accurately, but I still wonder, do others have reliable methods for quickly balancing multiple light sources in dynamic outdoor settings? Also, I’d love to hear more about creative ways to layer different lights without overexposing or creating unnatural color shifts. What are your go-to tips for managing this in fast-paced shoots? Overall, this post has inspired me to experiment more confidently with different softbox angles and fill techniques to deepen the storytelling in my videos.
This post really resonated with my own experiences in refining lighting setups over the years. I completely agree that small adjustments, like changing the angle or size of a softbox, can have a profound impact on the mood and depth of a scene. I’ve often struggled with maintaining consistent color temperature when mixing natural and artificial lights, especially outdoors during variable lighting conditions. Using a Kelvin meter has helped, but I find that pre-planning my scene with test shots and color gels often saves time on set. I’m curious, how do others approach quick adjustments when shooting in unpredictable environments? Are there portable tools or techniques you’ve found particularly effective for balancing mixed light sources in real-time? Your insights could really help streamline my workflow for outdoor shoots, where flexibility is key. Overall, this article has inspired me to experiment more with different fill light techniques for storytelling. Thanks for sharing such valuable tips!
I really appreciate this detailed exploration of softbox and fill light techniques. It’s fascinating how small adjustments, like the angle of the softbox or the intensity of the fill, can completely change the mood and depth of a shot. Over the years, I’ve found that using diffusion materials or adjusting the distance from the subject can further refine the softness of the light, especially in portrait work. I’ve also experimented with colored gels on fill lights to evoke specific emotions or match scene tones, which adds another layer of creativity.
One challenge I often encounter is balancing multiple light sources in unpredictable environments, like outdoor shoots during changing weather or cloud cover. I’ve started using portable light meters for quick adjustments, but sometimes it’s still tricky to get consistent results in real-time. I’m curious—what are some effective strategies or tools you all use to maintain lighting harmony when conditions are constantly shifting? It seems like mastering this aspect can really elevate the professionalism of our content.
Reading this post really hit home for me, especially the part about softbox angles transforming the scene’s mood. I’ve recently started experimenting with different softbox sizes and angles, and I agree that a small shift can make a big difference—moving from a 45° to a 60° angle really deepened the shadows in my portraits, giving them a more dramatic look. One challenge I faced was keeping the color consistency when switching between outdoor natural light and indoor settings. Using gels and a Kelvin meter helped, but I’m curious: does anyone have tips for quick adjustments when working in rapidly changing environments? I’d love to hear how others manage to keep the lighting cohesive without overcomplicating the setup. Overall, this article inspires me to keep refining my softbox positioning and fill techniques to elevate storytelling. Do you think mastering these nuances is essential for achieving a distinct personal style in content creation? I’d love to learn more from fellow creators about balancing technical precision with creative expression in lighting.