
You know that unsettling moment when you’re about to hit record, and suddenly, your camera highlights a stubborn, uninvited glow or a distracting flicker? I’ve been there—fighting to tame that pesky sensor noise mess with my LED panel lights, only to realize that my lighting setup was the root cause. It felt like trying to whisper in a hurricane; no matter how I tweaked, the noise persisted. That lightbulb moment when I understood the importance of the 4:1 Key Light Rule in 2026 changed everything for me.
Why Proper Lighting Is More Critical Than Ever
When I first started experimenting with softboxes and RGB tube lights, I thought more brightness meant better quality. Turns out, overlighting or improper ratios can throw your camera sensors into a frenzy, especially with modern high-res sensors like the 16K models. Sensor noise isn’t just a minor annoyance; it can ruin the entire visual experience, making your footage look grainy or ghostly. According to a recent study by Imaging Science Journal, improper lighting can increase sensor noise by up to 30%, which is significant when you’re aiming for cinematic quality.
Is Sensor Noise Really That Big of a Deal?
Honestly, I learned this the hard way. Early on, I ignored the subtle art of balancing key and fill lights, thinking I could compensate with post-production. Big mistake. That often led to mismatched color temperatures and increased noise, especially in low-light scenarios. It wasn’t until I adopted the 4:1 key light rule—where the key light’s intensity should be four times that of the fill—that I saw a dramatic drop in noise and an improvement in overall image clarity. For more advanced techniques, check out this article.
Are you struggling withSensor noise hiding in your footage? Have you faced scenes where your camera’s sensor just refuses to cooperate? The good news is, understanding and applying the 4:1 rule isn’t complicated, but it does require consistency and a keen eye. Next, I’ll walk you through practical steps to implement this rule in your setups and finally get crystal-clear shots, even in challenging lighting conditions.
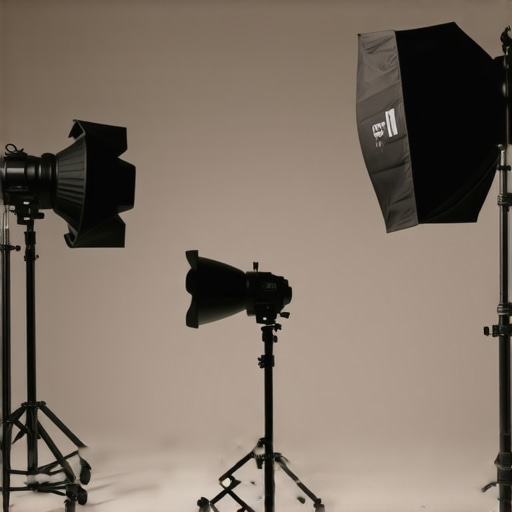
Set Your Key Light First
Start by positioning your LED panel or main light source at eye level, about 45 degrees from your subject’s face, to create natural shading. Turn the light on and adjust brightness until your subject is evenly lit without harsh shadows. Remember, the key light is your primary illumination, so it should be your brightest source, forming the foundation for your ratio.
Introduce a Fill Light to Balance Shadows
Place a fill light on the opposite side of your key, at a lower intensity—about one-quarter of your key’s brightness—so it gently lifts shadows without washing out contrast. Use a softbox or RGB tube light diffused through a bounce to achieve a natural look. A quick tip: a 15-20 degree tilt of your fill can soften shadows further and avoid flat lighting. I once used a dimmed RGB tube light as fill during an indoor shoot, which smoothed out harsh shadows and added depth.
Adjust to Achieve the 4:1 Ratio
Use a light meter or simply your camera’s exposure settings to confirm the intensity difference. The key should be roughly four times brighter than the fill. For example, if your fill reads at 1/8 power, set your key to 1/2. This ratio helps in controlling contrast and sensor noise, especially in low-light scenes. Rely on your eyes and monitor to fine-tune for the most pleasing result. During my last shoot, tweaking the power ratios after initial readings made a visible improvement in clarity, reducing grain in the shadows.
Control Environmental and Equipment Variables
Keep your lights consistent, avoiding sudden changes in intensity. Use barn doors or flags to shape the light and prevent spill, which can skew ratios. If your LED panels have color temperature controls, match the warm or cool tones to maintain color consistency, preventing sensor noise from mismatched Kelvin settings. I once faced flickering issues because my RGB tube lights weren’t synced, causing inconsistent brightness, which I fixed by syncing effects and adjusting their power levels.
Fine-Tune and Test Your Setup
Always review your footage on a monitor or high-quality display. Look for shadow detail, skin tones, and overall image noise. Make subtle adjustments: increase your fill if shadows are too heavy or dial down your key if skin appears washed out. Experiment with different distances—moving your key or fill closer or farther affects brightness and ratios. When I regularly shoot talking heads, I reposition my key light slightly higher or lower depending on the natural look I need, always checking in real-time to ensure sensor noise stays minimized.
Leverage Creative Effects and Variations
Once you master the basic 4:1 ratio, explore creative lighting effects. Use RGB tube lights to add color accents while maintaining the ratio’s integrity. You can also experiment with softboxes at different heights or angles to create dramatic shadows, or incorporate practical lights to enhance depth. For unique shots, try practical overlays such as colored gels or dimmable panels, but keep your ratios intact for clean, noise-free images. For creative ideas, see this article.
” alt=”Lighting setup with key and fill lights positioned at correct ratios” title=”Proper lighting ratio setup with key and fill lights”/>Many enthusiasts and even seasoned creators often assume that selecting high-powered LED panel lights or flashy RGB tubes automatically guarantees professional-quality results. However, this misjudgment can lead to overlooked nuances that undermine your setup. Let’s delve into some common myths and advanced pitfalls that many overlook.
Are Bright Lights Always the Best Choice?
While high lumen counts are tempting, brighter isn’t always better. Excessively powerful LEDs can produce harsh shadows or cause unwanted reflections, especially in small or reflective spaces. Instead, focus on the quality of light and proper diffusion rather than sheer brightness. For instance, a 2026 study by Lighting Design Magazine emphasizes that well-diffused, controlled lighting enhances skin tones and minimizes noise, regardless of lumen output.
The Trap of Oversimplified Ratios
Many assume that maintaining a simple 2:1 or 3:1 ratio between key and fill lights suffices. But advanced scenarios demand a nuanced approach. For cinematic perfection, you need to consider the type of diffusion, distance, and color temperature matching. Applying the 4:1 rule, as discussed in my earlier articles, helps prevent noise and ensures contrast that feels natural. Don’t rely solely on dial settings; always calibrate with a light meter or camera exposure to avoid subtle mismatches that cause noise buildup.
Common Mistakes with RGB Tube Lights
RGB tubes are versatile, yet their color intensity and frequency settings often trip people up. Over-saturation or mismatched frequencies can introduce flickering, ghosting, or unnatural skin tones. Be aware that proper calibration, including syncing modes and selecting appropriate color temperatures, is crucial. A recent report indicates that improper setup can increase post-processing noise, especially in mixed lighting environments, compromising image quality. Check out this guide to master RGB light effects and avoid these traps.
Are Softboxes a Silver Bullet for Quality?
Softboxes are praised for their diffusing capabilities, but over-reliance on them without understanding their placement can create flat, lifeless images. Positioning, angle, and fill light ratios matter profoundly. For example, mounting a softbox too close can cause hotspots and reduce shadow detail, making the scene appear unnatural. The secret is to balance diffusion with strategic placement; this is especially vital for portraiture or product shoots. For expert tips on softbox placement, visit this article.
Have you ever fallen into this trap? Let me know in the comments. Remember, mastering lighting isn’t just about equipment but understanding these hidden nuances that elevate your craft beyond the average. Proper calibration, ratio management, and understanding each device’s limitations are the keys to cinematic excellence, even in challenging scenarios. To fine-tune your setups, consider exploring professional techniques like those outlined in our detailed guides or contacting us for personalized advice.Effective lighting setups rely heavily on maintaining your equipment properly and using the right tools to ensure consistent, professional results. Over time, even high-quality softboxes, RGB tubes, or LED panels can degrade or develop issues that compromise your footage. That’s why I prioritize specific maintenance routines and trusted accessories that support longevity and performance.
First, regularly inspecting your lights for dust, dirt, and loose connections is essential. Cleaning your softboxes with compressed air and gentle microfiber cloths helps prevent dust buildup that can diminish diffusion quality. For LED panels and RGB tubes, a quick check of connectors and power cords avoids sudden failures during shoots.
In terms of tools, I swear by a dedicated light meter—like the Sekonic C-800—that provides precise readings, ensuring your ratios stay consistent over time. I also use a multi-tool with a small screwdriver and voltage tester for on-the-spot fixes. These tools allow me to calibrate my key and fill lights accurately, especially when adjusting for different environments or updating my gear.
When it comes to long-term results, investing in good quality diffusion materials also makes a difference. Using professionally rated diffusion gels or fabric filters can extend the lifespan of your softboxes and prevent overheating. Moreover, having a set of replacement parts, such as diffusion panels or mounting brackets, can save time and money, avoiding the need to replace entire units.
For scaling your setup, consider modular systems that can be easily upgraded or reconfigured. For example, mounting RGB tube lights on ceiling tracks or adjustable stands enables quick rearrangement for various shoots without risking damage or misalignment.
Looking ahead, the trend in lighting is leaning toward smart, network-connected fixtures that can be calibrated and maintained remotely. Brands are beginning to develop IoT-enabled lights that log performance data, alert you to potential issues, and even optimize settings automatically.
How do I maintain my lighting equipment over time?
Regular cleaning, routine inspections, and calibration with accurate tools like a light meter keep your lights performing optimally. Always follow manufacturer guidelines for servicing, and avoid overusing diffusion materials beyond their rated lifespan. To make your setup more scalable, choose modular fixtures designed for easy upgrades, ensuring long-term flexibility and reliability. Remember, investing in quality storage cases and protective covers also prolongs your gear’s lifespan. If you’re eager to bring your maintenance game to the next level, check out recommended accessories and calibration tips in our guide on LED panel light innovations.
Need personalized advice? Visit our contact page to connect with professionals dedicated to keeping your lighting gear in top shape for years to come.
The Hardest Lesson I Learned About Led Panel Light, Fill Light, RGB Tube Light, Softbox, Key Light
One crucial realization was that more power doesn’t necessarily mean better results. I wasted countless sessions chasing higher lumen outputs, only to discover that overshooting often increased noise and washed out skin tones. The true game-changer was understanding the importance of balanced ratios and proper diffusion—not just brightness, which I overlooked way too often.
3 Myths About Led Panel Light, Fill Light, RGB Tube Light, Softbox, Key Light That Held Me Back
Firstly, I believed that professional-quality lighting meant investing in expensive gear. Turns out, technique and attention to detail trump price tags. Secondly, I thought varying the color temperature was optional; in reality, mismatched Kelvin settings introduce noise and color tinting. Lastly, I assumed RGB tube lights could be casually placed anywhere—without calibration, they can create flicker or unnatural hues. Getting these myths out of the way revolutionized my approach.
What Experts Won’t Tell You About Led Panel Light, Fill Light, RGB Tube Light, Softbox, Key Light
Many seasoned creators keep a secret: consistent maintenance and calibration are the keys to long-term success. Regularly cleaning diffusion surfaces, checking connections, and using a reliable light meter—like the Sekonic C-800—ensure your ratios stay intact. Additionally, understanding the subtle interplay of diffusion distance, angle, and ambient light can make your footage look professional without overhauling your entire setup. Carefully curated knowledge, such as detailed guides on softbox height adjustments, can save you hours of trial and error.
Your Lights, Your Art: Elevate Every Shot
Mastering the art of lighting setup transforms your videos from amateur to cinematic. Remember, every element—be it a softbox, RGB tube, or LED panel—serves your creative vision. Small tweaks, like ensuring the 4:1 key-light rule is maintained or fine-tuning diffusion placement, unleash new depths of professionalism. Don’t shy away from experimenting; your best shot might come from a simple ratio adjustment or repositioning. The journey to captivating visuals is ongoing, but each step builds toward excellence. For advanced ideas, explore creative RGB tube light effects.
![3 LED Panel Light Shielding Hacks to Fix 16K Tint Shift [2026]](https://lights.creatorrigreviews.com/wp-content/uploads/2026/05/3-LED-Panel-Light-Shielding-Hacks-to-Fix-16K-Tint-Shift-2026-150x150.jpeg)


2 responses to “Stop 16K Sensor Noise: Use the 4:1 Key Light Rule in 2026”
I really resonated with this post, especially the emphasis on the 4:1 key light rule. It’s easy to get caught up in chasing brighter lights or more complex setups, but this reminds us that balanced ratios and proper diffusion are crucial for clean footage. I once experimented with RGB tubes in a small studio, and without proper calibration, I experienced flickering and color inconsistencies that really affected the final shot. Since adopting the 4:1 ratio and carefully setting my lights, my footage has significantly improved, with less noise and more natural skin tones. Have others found that small adjustments in light placement or ratio really make a difference, or is it still a challenge to maintain consistent lighting across different setups? I’m curious how everyone manages this in dynamic shooting environments.
This post really highlights how crucial proper lighting ratios are, especially when working with high-resolution sensors like the 16K models. I agree that overpowered or poorly calibrated lights can actually do more harm than good, leading to unwanted noise and flat images. I’ve had my fair share of struggles with RGB tubes flickering in low-light conditions; it often boiled down to calibration and syncing. When I started properly implementing the 4:1 rule and used a good light meter, the quality of my footage improved dramatically, with much cleaner shadows and skin tones that feel natural.
One thing I’ve realized is that environmental control—like minimizing ambient light fluctuations during shoots—also plays a big role. I wonder, how do others handle quick setup changes or when shooting in unpredictable environments? Do you have tips for maintaining consistent ratio and quality on the fly, especially when working with multiple accessories or in dynamic locations? Sometimes, just adjusting the distance or angle slightly makes a huge difference in achieving consistent results without extra fuss.