
Ever set up your studio lights, only to realize your shot looks flat, dull, or just not quite right? I’ve been there. One moment I thought I nailed the lighting, and the next, it’s glaringly obvious that something’s off. My breakthrough came when I finally understood that not all softboxes or RGB tube lights are created equal—and more importantly, how to use them effectively. If you’re tired of fighting with inconsistent lighting or wasting time on setups that don’t deliver, then you’re in the right place. Today, I’ll take you through some game-changing tips that have transformed my shooting experience, and I promise they’ll do the same for you.
Why Getting Your Lighting Right Makes or Breaks Your Content
In 2024, the difference between amateur and professional-looking videos often comes down to lighting. It’s not just about having a fancy key light or RGB tube; it’s about how you use them to craft mood, depth, and clarity. I used to think that buying the latest gear would instantly improve my videos. Turns out, I was wrong. I made the mistake of relying solely on the specs without understanding the nuances of positioning, color temperature, or the interplay between different lights. That one mistake cost me hours of frustration and subpar results. According to a study by HubSpot, good lighting can increase viewer engagement by up to 50%. That’s a number worth paying attention to, right?
Have you ever felt like your lighting setup is more of a hindrance than a help?
If yes, you’re not alone. Many creators jump into the world of softboxes, LED panels, and RGB tubes with high hopes only to find themselves lost in a sea of confusing options and conflicting advice. The truth is, understanding how to optimize your lighting isn’t about having the most expensive gear—it’s about knowing the right techniques. And that’s where my experience comes in. I once thought that more light was better, but I learned that controlling light—its direction, softness, and color—is what truly matters. Want to skip the trial-and-error phase? I’ll guide you through some practical tips and tricks that have helped me and countless others elevate our studio game.
Now, let’s dive into the core principles that will turn your lighting chaos into cinematic perfection. We’ll start with mastering your softbox setup, then explore how RGB tube lights can add that creative flair, and finally, how to blend everything seamlessly for stunning results. Ready? Let’s go.
Position Your Softboxes for Flattering Light
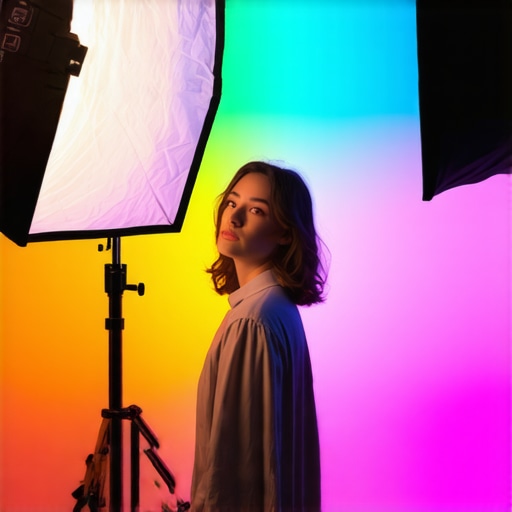
Start with your softbox as your primary light source. Place it at a 45-degree angle to your subject, slightly above eye level. This angle mimics natural sunlight and creates a pleasing catchlight. I once spent hours adjusting my softbox, and by moving it just a few inches closer or farther, I noticed a dramatic difference in skin tone and shadow softness. Use a light stand with adjustable height to fine-tune the angle and height for optimal results. For portraits, keep the softbox slightly off-center to add depth and avoid flat lighting. Check your camera preview to ensure the light wraps evenly around your face or subject. For detailed softbox techniques, explore mastering softbox lighting tips.
Learn to Use RGB Tube Lights Creatively
RGB tubes are versatile but can be overwhelming without a plan. Think of them as a painter’s palette—you can add color, shape, and mood. For natural-looking fill, set your RGB tubes to a warm white (around 3000K) and place them opposite your key light to soften shadows. To create mood, dial in vibrant colors—red, blue, or green—and position the tubes behind or beside your subject for a glow. I experimented during an evening shoot by placing RGB tubes behind my subject, changing colors mid-shoot, and instantly transforming the scene. This technique is perfect for artistic projects or dynamic social media content. Check out creative RGB tube effects for more ideas.
Blend Lights Seamlessly for a Cinematic Look
Combining softboxes and RGB tubes requires finesse. Think of your lighting setup as a musical harmony—each element must complement the others. Start by placing your softbox as the main source, then add RGB tubes as accent or background lights. Use dimmers or app controls to balance their intensity. I once struggled with overly harsh RGB colors bleeding into my subject’s face; the fix was reducing their brightness and adjusting the softbox for more contrast. Use flags or barn doors to control spill and prevent unwanted reflections. For professional results, consider integrating softbox and RGB light techniques.
Refine Your Setup Through Practice
The key is consistent trial and error. Take your time, observe how light interacts with your subject, and make small adjustments. Remember, even a slight change in angle or color temperature can drastically improve your shot. Keep notes or take photos of your setups to replicate success. When I first started, I kept a lighting journal, which saved me hours in future shoots. With persistence, your lighting will become instinctive, elevating your content to a professional level.
Many creators assume that choosing the right lighting gear is just about specs and brand names, but in reality, there are deeper nuances that can make or break your setup. Let’s dig deeper into what most people get wrong about softboxes, LED panels, RGB tubes, key lights, and fill lights, and how understanding these can elevate your lighting game.
Why Bigger Isn’t Always Better with Softboxes
One widespread misconception is that larger softboxes automatically produce softer, more flattering light. While size does influence softness, the key lies in the relative distance between the softbox and your subject. A smaller softbox placed closer can outperform a large, distant one in creating skin-friendly, diffused light. This nuance is often overlooked, leading creators to buy bigger gear than necessary, which complicates setup and limits flexibility. Mastering softbox techniques can help you optimize size and distance for stunning results.
LED Panel Brightness Is Not the Whole Story
Many think that a brighter LED panel automatically means better lighting. However, lumen output doesn’t tell the full story. Color rendering index (CRI) and TLCI ratings are crucial for skin tones and color accuracy, especially in professional settings. A high-lumen but low-CRI LED can wash out or distort colors, giving your footage a flat, unnatural look. In fact, the latest LED panel innovations focus on balancing brightness with color fidelity, which is vital for high-quality videos.
RGB Tubes Are Not Just for Color—They’re About Control
Another myth is that RGB tubes are only useful for adding vibrant colors. In reality, their true power lies in precise control over hue, saturation, and brightness. When used thoughtfully, RGB tubes can serve as effective fill or accent lights, blending seamlessly with other sources. Over-saturation or inconsistent positioning, however, can lead to garish scenes or color spill, which detracts from professionalism. Advanced users leverage app-controlled settings and color temperature matching for more natural and creative effects. For advanced tips, check creative RGB tube lighting strategies.
Are Key Lights Always the Main Focus?
Many believe that the key light must always be the brightest or most prominent source. But in sophisticated setups, the key light’s role is to set the mood and shape the subject, not necessarily dominate the scene. Balancing key with fill, background, and accent lights creates depth and avoids flatness. Overpowering your key light can flatten features and reduce dimension. Fine-tuning intensity and position, guided by key and fill light techniques, offers a more nuanced approach that elevates your visuals.
In summary, understanding these hidden nuances helps you avoid common pitfalls and unlock the full potential of your lighting equipment. Don’t fall for simplistic assumptions—invest in learning the subtle art of lighting, and your content will stand out. Have you ever fallen into this trap? Let me know in the comments.
Investing in quality lighting gear is just the beginning; maintaining your equipment ensures consistent performance over time. It’s easy to overlook small issues that can compromise your shots, so I recommend establishing a routine check-up schedule and using specific tools designed for lighting maintenance. This proactive approach not only extends the lifespan of your softbox, LED panels, RGB tubes, key lights, and fill lights but also keeps your creative workflow smooth and predictable.
How do I keep my studio lights in top shape over the long haul?
First, always clean your equipment after each shoot. Dust and dirt can accumulate on the softbox diffusers, LED panels, or RGB tubes, leading to uneven light output and color shifts. For softboxes, I use a gentle brush and a microfiber cloth to remove dust from the fabric and frame. When cleaning LED panels or RGB tubes, ensure they are powered off, and use a soft, lint-free cloth to wipe down surfaces. If you notice any stubborn dirt or smudges, a slightly damp cloth with distilled water works well—just be cautious to avoid moisture seeping into electronic components.
Next, inspect your gear regularly for physical damage. Cracked diffusers, loose connections, or frayed cables can cause flickering or color inconsistencies. I keep a small toolkit on hand, including screwdrivers, pliers, and spare cables, to quickly address minor repairs. For example, replacing a damaged RGB tube’s connector or tightening loose mounting brackets can restore optimal performance without needing to buy new equipment.
What are my go-to tools for maintaining studio lighting?
I personally rely on a few specialized tools that have proven invaluable. A digital lux meter helps me measure light intensity and ensure my softboxes and LED panels are calibrated correctly. It’s especially useful when balancing multiple sources to achieve a seamless look. I also use a color meter app on my smartphone to verify that the color temperature remains consistent over time, which is critical for professional results. Additionally, a small cleaning kit with compressed air, microfiber cloths, and gentle cleaning solutions keeps my gear spotless and functioning smoothly.
For software management, I utilize lighting control apps compatible with my RGB tubes. These apps allow me to fine-tune hue, brightness, and saturation remotely, which is a game-changer during shoots. Regular firmware updates from manufacturers improve stability and add new features, so I make it a habit to check for updates monthly on the manufacturer’s website.
Looking ahead, the future of lighting maintenance might include smarter, self-diagnosing equipment that alerts you to issues before they become problematic. Already, some LED panels feature built-in sensors that monitor temperature and output quality, sending notifications via app. As technology advances, I predict more intuitive tools that simplify maintenance and extend gear longevity, saving creators both time and money.
To get started, I challenge you to pick one of these tips—perhaps calibrate your RGB tubes with a color meter or schedule a quick cleaning session—and see how it improves your setup’s reliability. Proper maintenance isn’t glamorous, but it’s the secret behind consistent, professional-looking videos that keep your audience engaged. If you’d like personalized advice on your specific setup, feel free to reach out through my contact page.

The Hardest Lesson I Learned About softbox, led panel light, rgb tube light, key light, fill light
One of the most eye-opening lessons I encountered was realizing that bigger softboxes don’t always mean softer light. It’s more about distance and placement than size alone. This insight helped me avoid unnecessary gear purchases and focus on what truly improves my shots. Experimenting with positioning revealed that a small softbox placed closer can produce a beautifully diffused, flattering light that rivals larger setups. Trust me, mastering this nuance made a huge difference in my workflow.
3 Myths About RGB Tube Lights That Held Me Back
I used to think RGB tubes were only good for adding vibrant colors, but I learned they are much more versatile. Their real power lies in controlling hue, saturation, and brightness precisely. When I started using app-controlled settings to match color temperatures and balance saturation, my scenes looked more natural and professional. Avoid over-saturating or misplacing RGB tubes, and you’ll unlock their true potential as flexible creative tools.
What Experts Won’t Tell You About LED Panels and Key Lights
Many assume that brighter LED panels always deliver better results, but the truth is, color rendering index (CRI) and TLCI ratings are what matter most. A high-lumen LED with poor color fidelity can ruin skin tones and flatline your footage. I switched to LED panels with high CRI ratings, and the difference was night and day. The key is balancing brightness with accurate color reproduction, which elevates your overall video quality.
Where to Go from Here
If you’re serious about lighting, invest in tools like a lux meter or color meter app to calibrate your setup. Regular maintenance—cleaning, inspecting connections, and updating firmware—keeps your gear performing reliably. I’ve found that small routines, like cleaning diffusers or tightening loose cables, prevent unexpected issues during shoots. This proactive approach saves time and ensures consistent results, making your lighting setup a dependable foundation for great content.
Your Turn to Try
Lighting is less about expensive gear and more about technique, placement, and maintenance. I challenge you to pick one tip from this article—maybe calibrate your RGB tubes or adjust your softbox distance—and see how it transforms your shots. Remember, mastery comes with practice and patience. Ready to elevate your studio lighting game? Share your experiences or questions below, and let’s grow together!
![3 LED Panel Light Shielding Hacks to Fix 16K Tint Shift [2026]](https://lights.creatorrigreviews.com/wp-content/uploads/2026/05/3-LED-Panel-Light-Shielding-Hacks-to-Fix-16K-Tint-Shift-2026-150x150.jpeg)


