
Ever spent hours tweaking your lighting only to find that your subject still looks flat, unnatural, or just off? I remember those frustrating nights, fumbling with mismatched lights and inconsistent colors, thinking I was doing everything right but still missing that professional glow. It wasn’t until I dove deep into the world of RGB tube lights and softbox techniques that I finally started getting the results I dreamed of. If you’ve ever faced similar struggles, you’re not alone. Lighting is both an art and a science, and mastering it can transform your videos, photos, or streams from amateur to pro.
The Why Behind Lighting Mastery in 2024
Lighting isn’t just about illumination; it’s about shaping mood, highlighting details, and creating a sense of depth. In 2024, the demand for high-quality visuals has skyrocketed, especially with the rise of content creators, streamers, and independent filmmakers. RGB tube lights have become a game-changer because they offer incredible flexibility—color, intensity, and even effects—all in one package. But here’s the catch: without understanding the best softbox and fill light techniques, those features can quickly turn into a visual chaos rather than a creative boon. I learned this the hard way early on when I overused colors or failed to balance my key and fill lights, resulting in unnatural skin tones and distracting backgrounds. That mistake taught me that even the most advanced RGB lights need a strategic approach to truly shine. Mastering these techniques not only elevates your quality but also boosts your confidence in every shot, whether it’s a vlog, product shoot, or cinematic scene. If you’re tired of inconsistent lighting and want to unlock the full potential of your RGB tube lights, you’re in the right place.
Is RGB Tube Lighting Overhyped or Really Worth It?
Many skeptics ask whether investing in RGB tube lights is just a flashy trend. I admit, I was skeptical at first—spending money on what seemed like a gimmick. But I quickly realized that the key lies in how you use these lights. When I first started, I made the mistake of treating RGB lights like regular ones—ignoring color temperature, effects, and proper positioning. That’s a common pitfall. The truth? RGB tube lights are incredibly versatile when wielded correctly, especially when paired with the right softbox and fill light techniques. They can mimic natural light, create dramatic effects, or add subtle warmth—all with a few taps. If you’ve faced the fear that these lights might be just a gimmick, I understand. But with the right methods, they become your secret weapon for professional-quality visuals. Want to learn how I cracked the code? Let’s dive into the practical steps that will turn your lighting setup into a creative powerhouse.
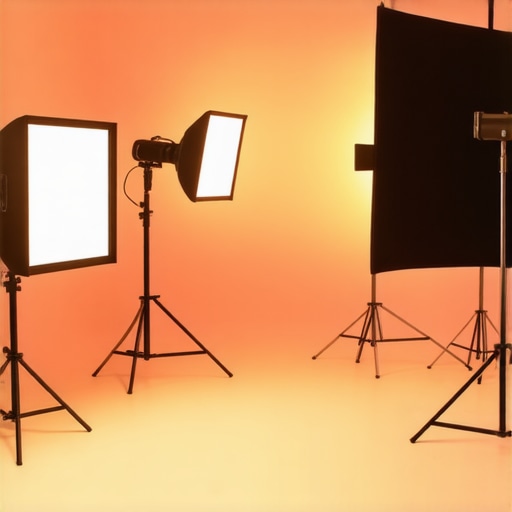
Position Your Lights for Optimal Results
Start by placing your RGB tube lights at different angles relative to your subject. Think of it like painting with light—each position creates shadows and highlights that add depth. For example, set your key light slightly above eye level and angled down at 45 degrees, mimicking natural sunlight. Use a softbox on your key light to diffuse harsh shadows, ensuring a smooth, flattering look. I remember a shoot where I initially placed the light too far to the side, causing uneven skin tones. Moving it closer and angling it correctly made a dramatic difference. To refine your softbox setup, check out these key tips.
Control Your Fill Light for Natural Balance
Next, add a fill light to soften shadows created by the key light. Use an RGB tube light with a softbox or diffusion panel, keeping it at a lower intensity—about 30-50% of your key. Position it opposite the key light, aiming to fill in shadows without flattening the image. I once used a bright RGB panel as a fill, but it washed out my subject; lowering the intensity and diffusing the light restored natural skin tones. For more advanced techniques, explore this guide.”
Color Temperature and Effects
Don’t forget that RGB tube lights give you the power of color. Use warm tones to add coziness or cool tones for a modern, clinical feel. During a recent evening shoot, I experimented with shifting colors mid-session, creating a dynamic scene that captivated viewers. Use color effects sparingly; overdoing it can distract from your subject. Adjust the hue and saturation to match the mood you’re aiming for, and always preview your shot in real-time to avoid surprises. Check out these creative effects for inspiration.
Fine-Tune with Distance and Diffusion
The distance between your lights and subject dramatically affects the softness and intensity. A closer light creates softer shadows, while moving it back increases contrast. I once struggled with harsh shadows until I realized that slightly increasing the diffusion—adding a layer of frosted material—made my lights wrap around my subject more naturally. Use a combination of softbox size and diffusion to find that perfect balance. For detailed setup tips, see this comprehensive guide.
Experiment and Record Your Settings
Lighting is an iterative process. Keep notes on your angles, distances, and color settings. During a recent shoot, I kept adjusting my RGB tube lights and found that small tweaks—like shifting the fill light slightly higher—created more flattering results. Use a color chart or test shots to ensure consistency, especially when working across multiple scenes or sessions. The more you experiment, the more intuitive your setup becomes, saving you time and frustration on future shoots.
Remember, mastering these core techniques transforms your lighting from a necessity into a creative tool. Experiment, record, and refine—your visuals will thank you for it.
While mastering lighting techniques is essential, many enthusiasts fall into subtle traps that sabotage their efforts without realizing it. One pervasive misconception is that more vibrant colors or overly complex effects automatically enhance your visuals. In reality, overusing RGB tube light effects can lead to a cluttered, distracting scene that pulls attention away from your subject. Less is often more—use color effects sparingly and focus on maintaining a balanced, natural look. For advanced tips on fine-tuning your lighting setup, check out this comprehensive guide.
Another common mistake is neglecting the importance of consistent color temperature across your setup. Many believe that since RGB lights can produce any hue, they can ignore the underlying color balance. However, mismatched color temperatures—such as a warm key light paired with a cool fill—can produce unnatural skin tones and reduce the visual cohesion. Always aim for a harmonious color palette, adjusting hue and saturation thoughtfully. It’s worth noting that even with RGB capabilities, understanding traditional color theory remains crucial. For more on achieving the perfect balance, explore softbox and fill light strategies.
How Can Advanced Users Leverage Distance and Diffusion Effectively?
Many creators overlook the nuanced relationship between light distance, diffusion, and softness. Moving lights closer increases softness but can cause hotspots if not diffused properly. Conversely, pushing lights back enhances contrast but can make your scene look flat. An advanced technique involves combining diffusion layers—like frosted gels or softboxes—with precise distance control to sculpt your scene. This approach ensures your subject remains flattering without harsh shadows or unnatural highlights. A recent study in professional cinematography emphasizes that controlled diffusion and strategic positioning are key to achieving a professional-grade look, especially when working with versatile RGB tube lights. To refine your setup, consider experimenting with different diffusion materials and distances, and always record your settings for future reference. Remember, mastery is in the details—small adjustments can dramatically elevate your results. Have you ever fallen into this trap? Let me know in the comments.
Keeping your lighting setup operational and reliable over time is crucial for consistent, professional results. The right tools and maintenance routines can extend the lifespan of your equipment and ensure your studio remains bright and clear, no matter the project. As I’ve learned from my experience, proactive care and strategic tool choices make all the difference in avoiding unexpected downtimes and costly repairs.
How do I maintain my lighting gear over time?
Regular cleaning is the foundation of effective maintenance. Dust, dirt, and even humidity can degrade the performance of your RGB tube lights and softboxes. I recommend using a soft microfiber cloth to wipe down the exterior surfaces weekly. For the lenses and diffusion panels, a gentle lens cleaner or compressed air can prevent dust buildup that causes uneven lighting or color shifts. This simple routine prevents many common issues and keeps your lights functioning at their best.
Beyond cleaning, inspecting your equipment for wear and tear is essential. Check the power cords, connectors, and mounting clamps for any signs of damage. I’ve caught loose connections early by simply giving everything a quick once-over before each shoot, which saved me from sudden failures during critical moments. For detailed inspections, I keep a checklist based on the manufacturer’s guidelines, focusing on heat dissipation, fan operation, and cable integrity.
Tools I recommend for long-term lighting care
Having the right tools on hand can streamline your maintenance routine. A reliable multimeter is invaluable for testing electrical continuity and voltage across your RGB lights and panels. I personally use a digital multimeter from Fluke because of its durability and precision. Additionally, a set of high-quality cable ties and replacement connectors ensures you can quickly fix or replace faulty wiring, minimizing downtime.
For cleaning delicate components, I keep a can of compressed air and a soft brush. These tools help remove dust from vents and internal fans without risking damage. If your diffusion panels or softboxes get scratched or stained, having a set of replacement panels or a cleaning kit designed for fabrics can save you money in the long run. Regularly updating your tools and keeping spare parts stocked makes ongoing maintenance less stressful and more predictable.
Predicting the future of lighting maintenance
As technology advances, I believe upcoming innovations will focus on smarter, self-diagnosing lighting systems. Imagine RGB lights that can alert you to potential failures via app notifications or automatically adjust their internal cooling to prevent overheating. Staying ahead means adopting these emerging tools early—integrating IoT-enabled lights and maintenance apps can keep your studio running smoothly with minimal manual intervention.
To get started, try implementing a weekly cleaning routine combined with a basic inspection checklist. Investing in a good multimeter and some spare connectors now can save you significant time and money down the line. Remember, proactive maintenance isn’t just about preserving equipment; it’s about ensuring your creative flow remains uninterrupted. For more detailed maintenance strategies, check out this guide on softbox care.
Ready to elevate your studio’s longevity? Start today by reviewing your current maintenance routine and adding one new tool or practice from this list. Your future self will thank you!
The Hardest Lesson I Learned About RGB Lighting
One of my biggest lightbulb moments was realizing that RGB tube lights are incredibly powerful tools, but only when used with purpose. Early on, I thought more color effects meant better visuals, but I learned the hard way that subtlety and balance are key. Overusing effects can distract from your subject and diminish the professional feel. The lesson? Master the basics first—positioning, diffusion, and color harmony—before going all-in on creative effects.
3 Myths About Lighting That Held Me Back
- More lights equal better quality: It’s tempting to add multiple lights, but quality and positioning matter more. Overlighting can create unwanted shadows and flat scenes.
- RGB lights are just for colors: These lights are versatile for natural tones, warm atmospheres, or dramatic effects. It’s about how you leverage their full potential.
- Perfect setup is instant: Achieving professional results takes experimentation. Patience and recording your settings help you improve faster.
What Experts Won’t Tell You About Softbox and Fill Light Techniques
Many overlook the importance of softboxes and diffusion materials. Proper diffusion smooths out harsh shadows, making your subject look natural and flattering. Pairing softboxes with strategic fill lights creates depth and dimension, elevating your visuals from good to cinematic. For detailed, step-by-step techniques, check out this comprehensive guide.
Don’t Miss Your Creative Edge in 2024
Lighting mastery isn’t just about equipment; it’s about your vision and effort. The more you experiment—adjusting distances, tweaking diffusion, balancing color—the closer you get to your ideal shot. Remember, the best creators are those who refine their craft continuously. Your journey to professional-quality lighting starts now. Dive deeper into these strategies and watch your content transform.
![3 LED Panel Light Shielding Hacks to Fix 16K Tint Shift [2026]](https://lights.creatorrigreviews.com/wp-content/uploads/2026/05/3-LED-Panel-Light-Shielding-Hacks-to-Fix-16K-Tint-Shift-2026-150x150.jpeg)


4 responses to “Top Softbox & Fill Light Techniques with RGB Tube Lights in 2024”