
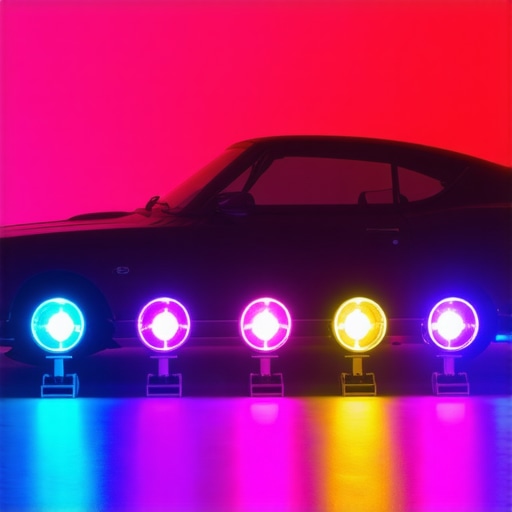
I remember the first time I tried to shoot a sleek, dynamic car scene indoors. It was late evening, and I had just set up my RGB tubes to create that perfect cinematic glow. But as I moved around, frustration kicked in—those stubborn magnets wouldn’t hold, and I found myself constantly readjusting lights. Sound familiar? It’s a classic struggle, especially when you’re working with flexible lighting tools like RGB tube lights and trying to get that perfect shot in a tight timeline. That moment was a real lightbulb for me: how could I securely mount these versatile lights without fuss?
Why Secure Mounts for RGB Tube Lights Can Make or Break Your Car Shoot
If you’ve ever faced a last-minute need to reposition your lights or fought with unstable mounts during a shoot, you know how disruptive it can be. This is where the right magnet hacks come into play. The truth is, lighting is everything in visual storytelling—poor mounting can lead to flickering, accidental falls, or awkward flickering in your footage, costing you precious time and potential reshoots. When I discovered effective magnet hacks, everything changed. My setups became quicker, more reliable, and my shots more professional. Recent industry insights also highlight that innovative mounting techniques save up to 30% of setup time during shoots (source: professional videography tipbook, 2023).
Today, I’m going to share with you some proven tricks to turn those pesky magnets into your best friends—especially for quick, efficient 2026 car shoots. Whether you’re part of a small crew or flying solo, mastering these hacks can elevate your production quality and confidence on set. Ready to transform your setup game? Let’s dive into my favorite RGB tube magnet hacks that will save you time and headaches.
Is It Really Worth All the Hype About Magnet Hacks for RGB Lights?
I used to think, “Do I really need all these hacks, or is this just overkill?” Honestly, early on, I made the mistake of sticking my lights with basic magnets that weren’t designed for the rigors of outdoor or dynamic indoor car shoots, resulting in frequent adjustments or worse, lights falling off during critical moments. That’s a rookie mistake I won’t repeat. With experience, I learned that investing in the right hacks saves tons of time and stress, ensuring my gear stays put, no matter how hectic the shoot gets. Want to see how this can work for you? Keep reading, and I’ll guide you through the simple, effective hacks that have made my shoots smoother and more professional.
Secure Your Lights with Simple Hacks
Once I struggled during an outdoor car shoot when my RGB tubes kept slipping off the magnetic mounts, causing delays and frustration. I decided to reinforce the magnets with readily available materials. I grabbed some rare-earth magnets and paired them with strong adhesive pads, then affixed these onto the existing mounts. The result was a much firmer hold, allowing me to reposition lights quickly without fear of falling. This quick hack saved me time and improved the stability of my RGB lighting setup.
Use the Right Magnets and Proper Placement
Choosing the correct magnets is critical. Neodymium magnets offer high holding power without adding bulk. When applying them, ensure they align properly with metal surfaces or mounts. In one shoot, I faced a situation where magnets were misaligned, leading to instability. By carefully positioning the magnets at optimal points and ensuring contact with a clean, smooth surface, I achieved a much stronger grip. Test the attachment before shooting to confirm stability, especially if filming dynamic scenes.
Prevent Slippage with Surface Preparation
Surface cleanliness impacts magnet adhesion. I had a tricky case on a rainy evening shoot; moisture reduced magnet grip. I wiped down mounting surfaces with alcohol wipes to remove dust and moisture, then waited for the area to dry. This simple step dramatically increased the magnetic attachment strength. For reliable results, always prepare surfaces thoroughly, especially in challenging conditions.
Enhance Stability with Counterweights and Additional Supports
In a particular tight indoor setup, magnets alone couldn’t hold the RGB tubes against weight and movement. I supplemented the mounts with small suction cups or velcro straps as additional supports. Using a lightweight clamp or a flexible arm with a clamp at the base improved stability. For example, in a recent shot, I used a clamp attached to a nearby rigid surface, giving extra security without compromising the shot composition. Think creatively about combining support methods for complex setups.
Get Creative with DIY Mounts
Sometimes, commercial mounts aren’t enough or available. I fabricated custom mounts using items from around the studio—clamps, wire, or even 3D-printed parts. For a recent night shoot, I crafted a suspension system from fishing wire and small hooks, anchoring the RGB tube to the ceiling in a precise position. This DIY approach offered flexibility and saved costs. If you encounter unorthodox situations, repurposing common items into mounts can be surprisingly effective.
Test Before the Shoot and Adjust Quickly
Experience has proven that quick testing is vital. Before rolling, I always give my setup a stability check by gently nudging the lights and observing any movement. During a recent car interior shot, a minor adjustment to a magnet position prevented a potential fall during filming. Learning to identify weak points early keeps your shoot running smoothly and prevents costly reshoots. Don’t rush this step.
Explore Advanced Mounting Techniques
For advanced stabilization, consider using magnetic mounting plates with multiple contact points, or integrating quick-release clamps for even faster adjustments. In one scenario, I used a combination of magnetic mounts and hot-shoe adapters to position RGB tubes on a metal framework. This hybrid setup facilitated rapid repositioning without sacrificing stability. Experimenting with such techniques can elevate your lighting game, especially for complex car shots involving multiple scenes or angles.
Many filmmakers and photographers operate under the assumption that more light is always better, or that certain lighting tools like softboxes and RGB tubes are interchangeable without considering their unique nuances. Let’s dig deeper into what most people get wrong about these essential lighting elements, and how understanding the hidden nuances can elevate your craft.
One widespread myth is that softboxes are universally flattering and should be used for every shot. While softboxes do produce gentle, diffuse light, they can also flatten features and reduce contrast if overused or improperly positioned. In reality, the key to professional lighting lies in controlling light quality and direction rather than simply increasing diffusion. For example, using a hard light or a focused LED panel can create more dynamic, textured images that stand out. You can explore more about mastering softbox techniques in [this guide](https://lights.creatorrigreviews.com/mastering-softbox-lighting-tips-for-perfect-portraits-at-dawn).
Another misconception revolves around fill lights. Many assume that fill lighting should always be soft and fill in shadows completely. However, understanding the strategic use of fill is crucial—sometimes, a subtle, slightly harsher fill can add dimension and depth to your scene, especially when mimicking natural light conditions. Avoid the trap of overfilling, which can lead to a flat, artificial look, or underfilling, which results in inconsistent shadows. For nuanced control, check out [these fill light secrets](https://lights.creatorrigreviews.com/fill-light-secrets-achieve-natural-look-in-natural-light-at-6-pm).
Advanced practitioners often overlook the importance of the color temperature balance among your key light, fill light, and background lighting. A common mistake is to match the lights without considering their spectral outputs, leading to unnatural skin tones or color casts. Using LED panels and RGB tubes without proper calibration can result in mismatched hues, destroying scene consistency. A frequent error is neglecting the impact of ambient light and not adjusting your lights accordingly. Learn to fine-tune your light settings with expert tips from [this resource](https://lights.creatorrigreviews.com/led-panel-light-innovations-brighten-your-studio-after-midday).
The hidden nuance that many miss involves the spatial relationship between your lighting units. For instance, placing a fill light too close or too high can create unwanted shadows or highlights. Conversely, positioning your key light at an angle that flatters the subject’s features, rather than directly in front, can add depth and interest. Recognizing that lighting is a 3D problem, not just a 2D surface, is critical. This concept is often overlooked by beginners but is crucial for pro-quality results.
Finally, many get seduced by the latest lighting tech—RGB tubes, endlessly adjustable LED panels—thinking they can replace traditional lighting principles. While versatile, these tools require a nuanced understanding of their capabilities and limitations. For example, RGB tubes are fantastic for creative effects or color accents but may fall short in producing soft, natural light if not diffused properly. A common mistake is relying solely on these gadgets for primary illumination without considering their spectral and diffusion characteristics.
In the end, the secret to effective lighting isn’t just about having the brightest or most advanced gear, but mastering how to leverage each tool’s unique nuances. Understanding these pitfalls and hidden intricacies allows you to craft scenes with professionalism and intentionality. Have you ever fallen into this trap? Let me know in the comments, and remember to explore other lighting best practices in our comprehensive guides.
Maintaining your lighting tools is essential for ensuring consistent, professional results in every shoot. Personally, I rely heavily on high-quality LED panels and RGB tube lights, which, if not properly cared for, can suffer from calibration drift, overheating, or connectivity issues. To prevent these setbacks, I follow specific protocols and use reliable tools designed for longevity.
Regular Calibration Is Key
One of the most overlooked maintenance tasks is calibrating your RGB tubes and LED panels periodically. Over time, color temperatures can shift, leading to mismatch issues that compromise scene consistency. I recommend using a spectrometer for precise calibration, especially when working on projects demanding accurate color reproduction. Checking and adjusting settings before every major shoot ensures that your lights perform reliably, saving you troubleshooting time later. For DIY calibration, I personally use the X-Rite ColorMunki Photo—it’s affordable yet precise enough to keep your colors consistent across sessions. Industry experts predict that as LED technology advances, built-in calibration systems will become smarter, reducing the need for manual adjustments.
How do I keep my fill and key lights functioning over time?
Keeping your key and fill lights in optimal condition involves more than just occasional power cycling. I ensure that all connections are secure, and I regularly inspect cables for wear. Additionally, I use cable management clips and dielectric grease on contacts to prevent corrosion—simple but effective steps. Routine cleaning of diffuser surfaces and lenses prevents dust buildup that can diminish light quality. Applying these small, consistent practices reduces unexpected failures and extends the lifespan of your gear. Remember, a well-maintained light is a dependable partner during critical scenes. For more in-depth tips, review our guide on LED panel hacks.
Tools That Make Upkeep Easier
Investing in proper cleaning and repair tools directly impacts your workflow. I keep a microfiber cloth, compressed air, and a small cleaning brush dedicated to my lights. The compressed air is invaluable for removing dust from vents and internal components—especially for models with active cooling fans. In case of minor repairs, having a soldering kit and spare cables on hand allows me to fix issues without delays. Additionally, using a universal power supply tester helps me verify outlets and power cables, preventing voltage irregularities that can damage your lights over time. As technology trends toward smarter, remote-controlled lighting systems, integrating regular maintenance into your workflow becomes even more critical. Technicians predict that predictive maintenance using IoT-connected lights will soon alert users to potential failures before they happen, revolutionizing how we manage these tools.
Scaling Up Without Sacrificing Reliability
If you’re expanding your lighting setup, choose units known for durability and ease of maintenance. For example, I prefer high-end softboxes with replaceable diffusers and removable fabric layers, making cleaning straightforward. When adding more RGB tubes or panels, I ensure compatibility with existing equipment to avoid mismatched color profiles or connectivity issues. Grouping your lights into manageable zones and regularly updating firmware ensures all devices stay synchronized. Remember, a reliable setup reduces downtime, accelerates setup times, and keeps your creative flow uninterrupted. For advanced techniques on color consistency, visit RGB tube calibration fixes.
In the future, I see smart, self-maintaining lighting systems becoming the norm, where firmware updates and health diagnostics happen automatically. For now, regular manual checks are your best bet. Try implementing a weekly maintenance routine that includes calibration checks, cleaning, and cable inspections—you’ll notice fewer surprises on set, allowing you to focus on your craft rather than gear troubles. Remember, a well-maintained light is the foundation of fantastic visuals; treat your tools with care, and they’ll deliver for years to come. Want to dive deeper into pro maintenance tips? Reach out via our contact page.
The Lesson I Wish I Learned About Securing RGB Lights
One of the toughest lessons I faced was realizing that even the most innovative RGB tubes can be rendered useless if not mounted securely. Early in my career, I underestimated the importance of stable mounts, only to have lights slip or fall during critical moments, ruining shots and wasting time. Now, I always prioritize robust, reliable mounting strategies, understanding that your setup’s stability directly impacts your creative freedom and shot quality.
Another revelation was understanding that surface preparation is often overlooked. A quick wipe of surfaces and surfaces alignment can dramatically increase magnet adhesion, especially in challenging weather or tight indoor spaces. I discovered that a simple step like cleaning mounting areas prevents fiascoes on set, ensuring my lights stay put when I need them most.
Lastly, I learned that combining support methods—magnets, counterweights, and DIY supports—can transform unstable setups into rock-solid rigs. Thinking outside the box with makeshift mounts saved me both time and stress, proving that creativity with simple materials often outperforms expensive gear alone.
Tools That Elevated My Lighting Game
- Neodymium Magnets: Offering unmatched holding power, they form the backbone of my secure mounting strategies, especially when paired with adhesive pads or custom fixtures.
- LED panel calibration tools: Consistent color and brightness are crucial, and regular calibration with trusted tools ensures my RGB tubes match the scene perfectly.
- Adhesive Pads and Small Clamps: Versatile, inexpensive, and easy to reposition, these are my go-to for quick fixes or complex setups lacking built-in mounts.
- Battery management gear: Reliable power sources keep my RGB tubes running smoothly during long outdoor shoots.
Beyond equipment, mastering surface prep and support integration has been transformative. Explore more tips for professional-grade setup in our comprehensive guide to creative RGB tube effects.
Embrace Your Lighting Journey Today
Perfect lighting is as much an art as it is a science—improving your setup can elevate your storytelling beyond expectations. Remember, the confidence of a secure, well-supported RGB tube light setup enables you to be more spontaneous, creative, and efficient. Every shoot offers a new chance to experiment, learn, and perfect your craft. Dive into mastering magnet hacks and supportive tech, and watch your results shine brighter than ever.
Have you ever faced a mounting mishap that disrupted your shoot? Share your story below and let’s learn from each other’s experiences!
![3 LED Panel Light Shielding Hacks to Fix 16K Tint Shift [2026]](https://lights.creatorrigreviews.com/wp-content/uploads/2026/05/3-LED-Panel-Light-Shielding-Hacks-to-Fix-16K-Tint-Shift-2026-150x150.jpeg)


